> For the complete documentation index, see [llms.txt](https://help.verkada.com/llms.txt). Markdown versions of documentation pages are available by appending `.md` to page URLs; this page is available as [Markdown](https://help.verkada.com/command/ja/sekyuriti/identity-providers/onelogin.md).

# OneLogin

Verkada は、OneLogin を IDプロバイダ（IdP）として使用する Security Assertion Markup Language (SAML) 認証をサポートしています。

| 機能            |  対応 |
| ------------- | :-: |
| OIDC SSO      |  —  |
| SAML SSO      |  はい |
| SCIM プロビジョニング |  —  |
| ECEサポート       |  —  |

***

## OneLogin で Verkada SSO を構成する

{% hint style="warning" %}
OneLogin SAML を有効にする前に、 **必ず** [クライアント ID を生成します](/command/ja/sekyuriti/identity-providers.md#generate-client-id).
{% endhint %}

{% stepper %}
{% step %}
**OneLogin を起動し、メニューバーで \[Applications] > \[Add App] を選択します。**

<div align="left" data-with-frame="true"><img src="/files/d5a95ffe07c11ffe403bf46fbb1783d86e7cda6b" alt="" width="948"></div>
{% endstep %}

{% step %}
**SAML Custom Connector (Advanced) を検索します。**

<div align="left" data-with-frame="true"><img src="/files/8b18445bb69898f77112830c73c9c85528aca4e8" alt="" width="1143"></div>
{% endstep %}

{% step %}
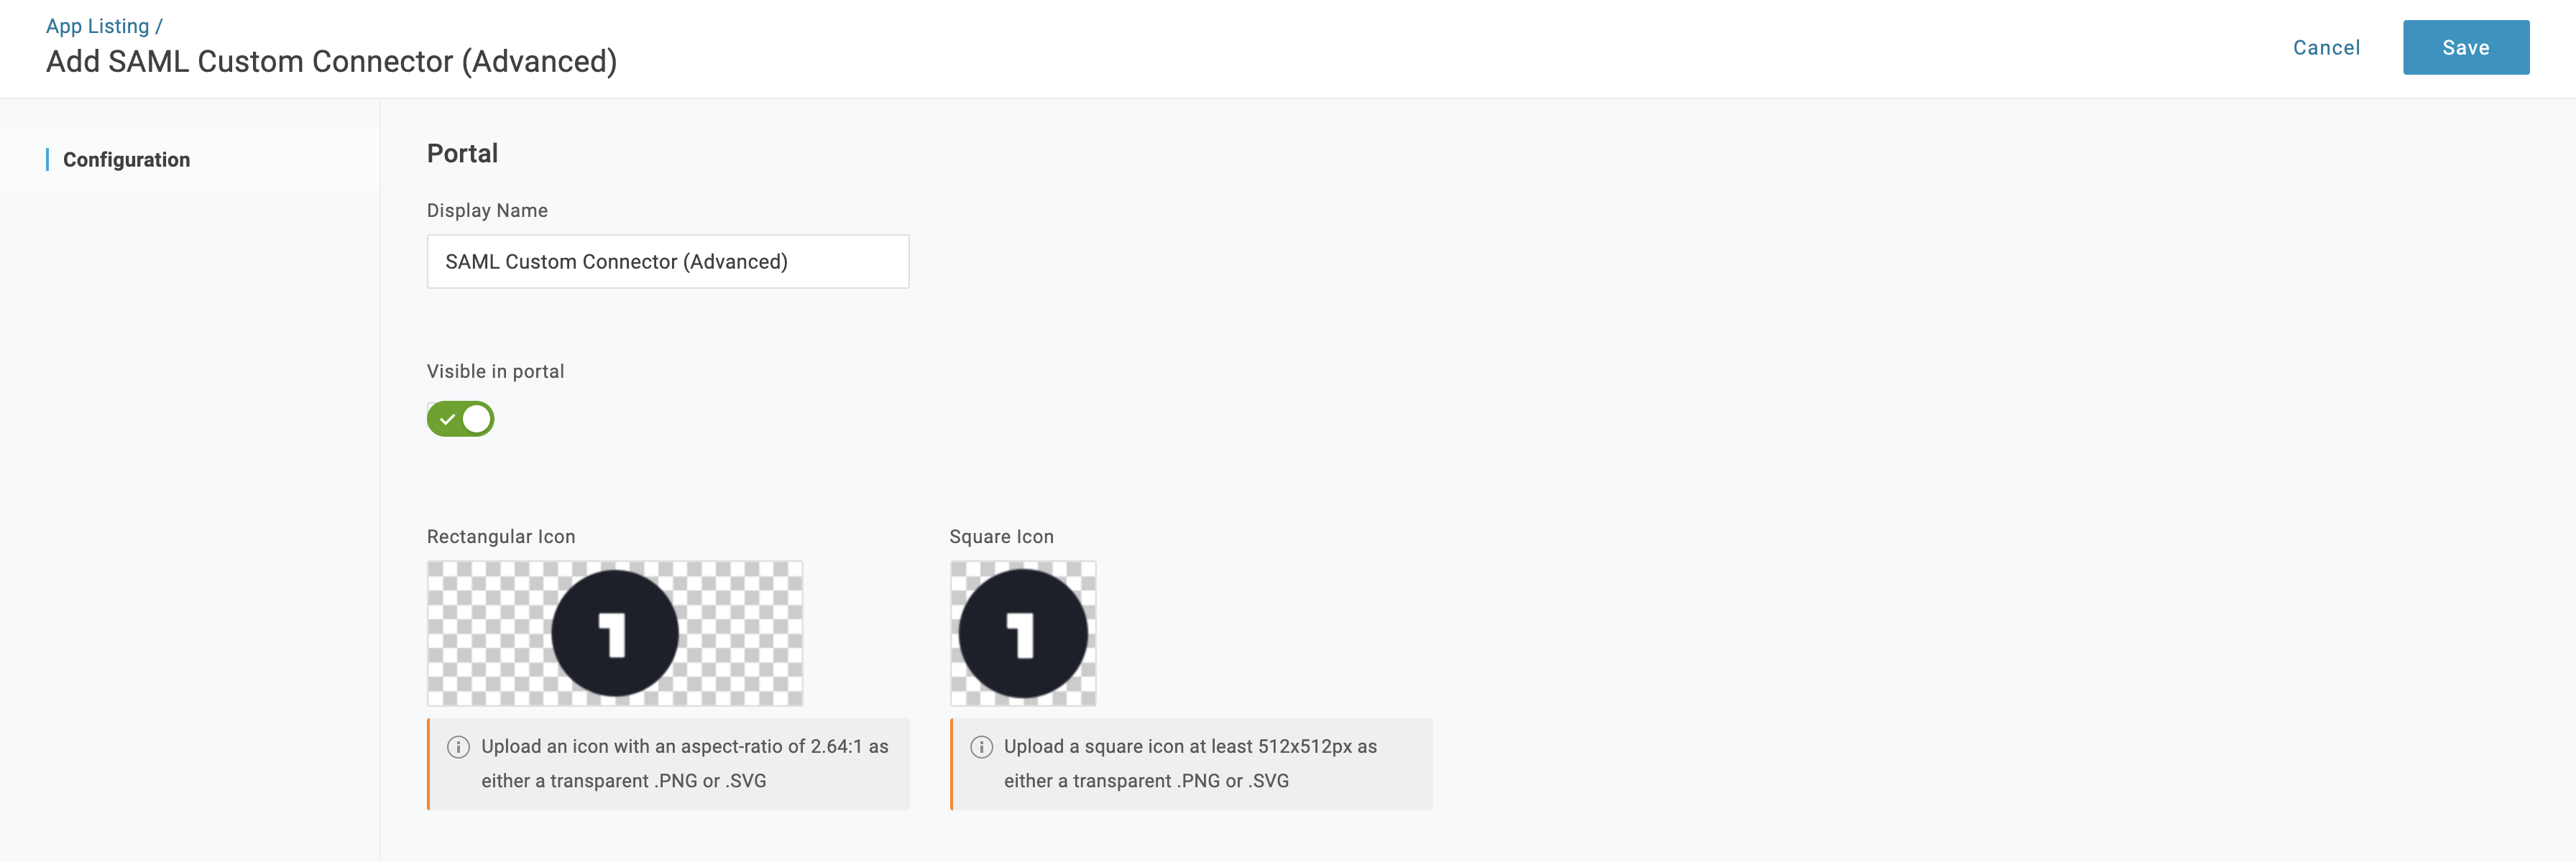
**表示名を選択し、\[Save] をクリックします。**

<div align="left" data-with-frame="true"><img src="/files/aacf010a52a510ac1045937140a4cbb7cda41556" alt="" width="1792"></div>
{% endstep %}

{% step %}
**\[Applications] > \[SAML Custom Connector (Advanced)] に移動し、\[Configuration] を選択して、これらの値をコピーして貼り付けます。その際、 `CLIENT-ID` を、前に生成したクライアント ID に置き換えます。**

a. 次の項目について: **Audience（EntityID）** と **受信者**:

* 米国の組織の場合: <https://vauth.command.verkada.com/saml/sso/%3Cclient-ID%3E>
* EUの組織では: [https://saml.prod2.verkada.com/saml/sso/](https://saml.prod2.verkada.com/saml/sso/%3CclientID%3E)
* AUSの組織では: <https://saml.prod-ap-syd.verkada.com/saml/sso/%3Cclient-ID%3E>

e. **必須**. 次のための **ACS（Consumer）URL 検証**:

* 米国の組織の場合: [https://vauth.command.verkada.com/saml/sso/](https://vauth.command.verkada.com/saml/sso/%3CclientID%3E)
* EUの組織では: [https://saml.prod2.verkada.com/saml/sso/](https://saml.prod2.verkada.com/saml/sso/%3CclientID%3E)
* AUSの組織では: <https://saml.prod-ap-syd.verkada.com/saml/sso/%3Cclient-ID%3E>

i. **必須**. 次のための **ACS（Consumer）URL**:

* 米国の組織の場合: [https://vauth.command.verkada.com/saml/sso/](https://vauth.command.verkada.com/saml/sso/%3CclientID%3E)
* EUの組織では: [https://saml.prod2.verkada.com/saml/sso/](https://saml.prod2.verkada.com/saml/sso/%3CclientID%3E)
* AUSの組織では: <https://saml.prod-ap-syd.verkada.com/saml/sso/%3Cclient-ID%3E>

m. 次のための **SAML 署名要素**で、ドロップダウンをクリックして **両方**.

{% hint style="warning" %}
現在の地域を確認するには、 [Verkadaでオーガナイゼーションが作成された場所を参照してください](/command/ja/hajimeni/get-started-with-verkada-command.md).
{% endhint %}
{% endstep %}

{% step %}
**\[Applications] > \[SAML Custom Connector (Advanced)] で、\[Parameters] を選択します。**
{% endstep %}

{% step %}
**プラス（+）アイコンをクリックし、次のパラメータを構成します。**

a. 次の項目について: **名前**に、名と姓を入力します。\
b. \[ **値** ] のドロップダウンをクリックして **メール** > **名**。\
c. \[ **フラグ**] で、 **SAML アサーションに含める**にチェックを入れ、 **Save**.
{% endstep %}

{% step %}
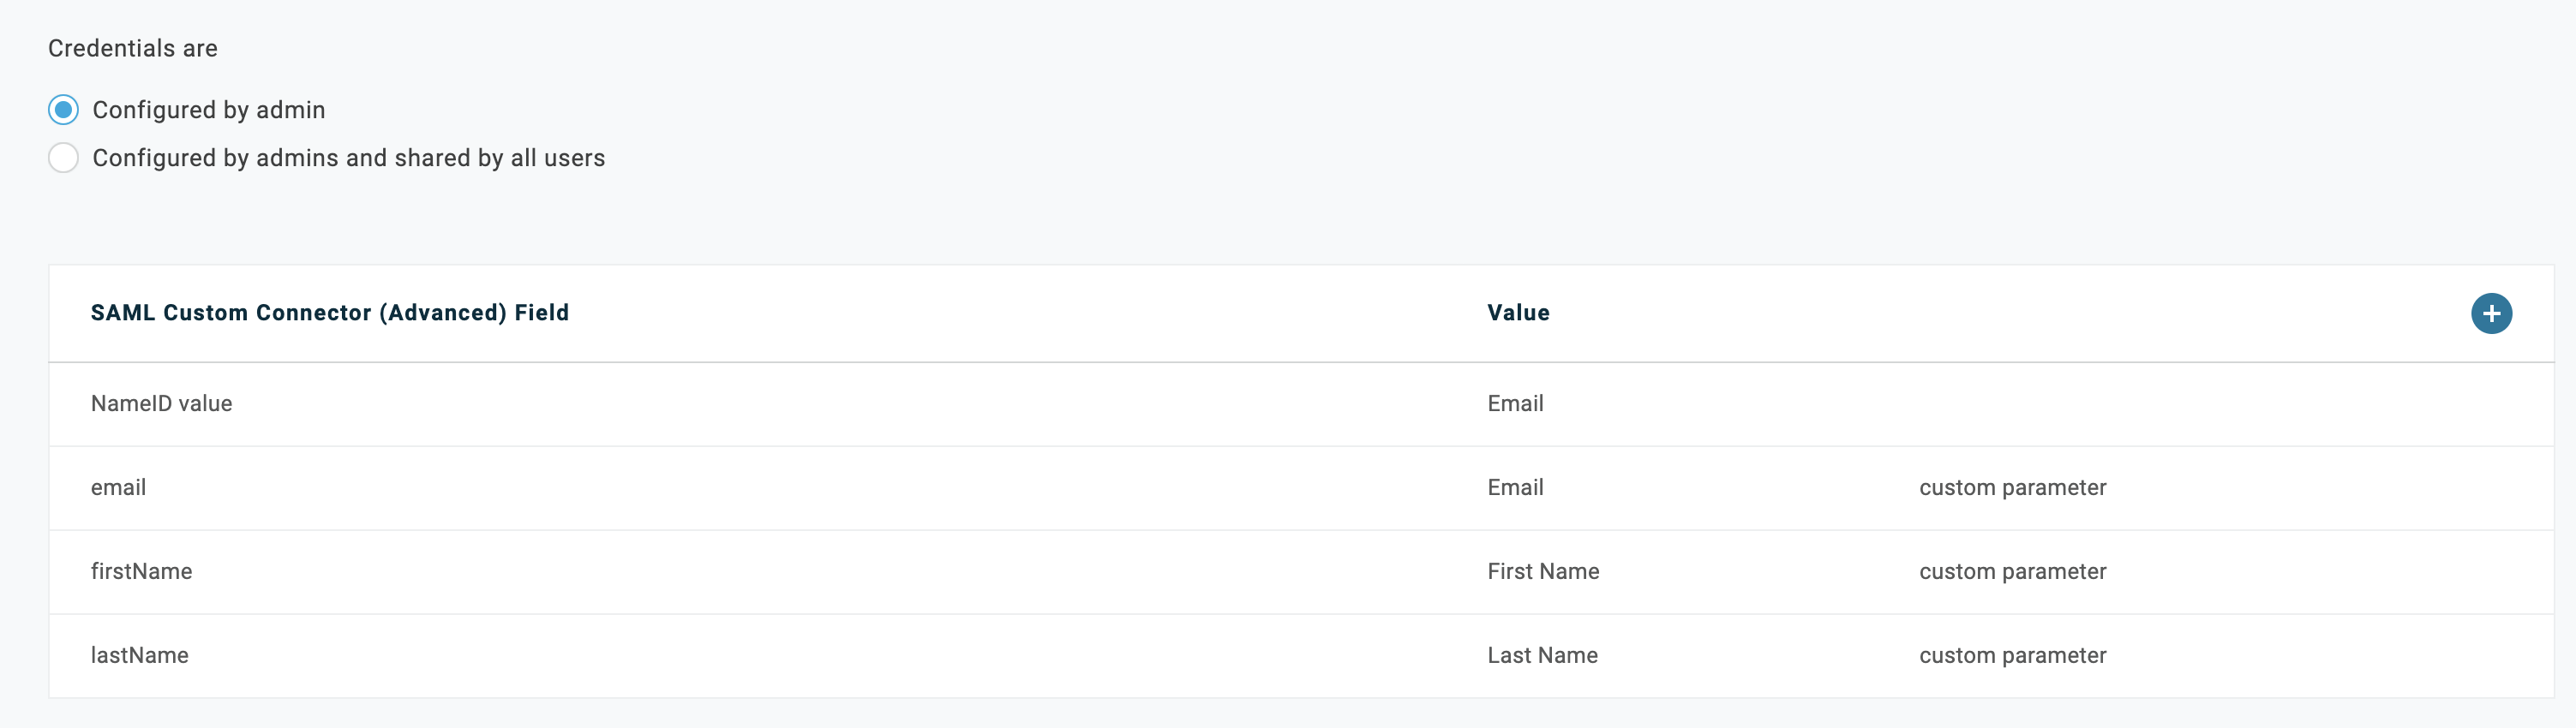
**プラス（+）アイコンをクリックし、次に開くダイアログで \[Configured by admin] を選択します。**

パラメータは次のようになります。

<div align="left" data-with-frame="true"><img src="/files/3bcee433a5b12c07cf2da40070252862f8662828" alt="" width="1503"></div>
{% endstep %}

{% step %}
**\[Applications] > \[SAML Custom Connector (Advanced)] に戻り、\[SSO] を選択します。**
{% endstep %}

{% step %}
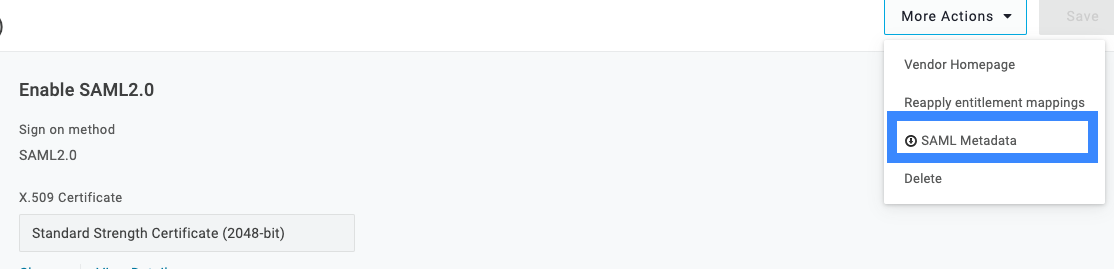
**\[More Actions] のドロップダウンをクリックし、メタデータをダウンロードするために \[SAML Metadata] を選択します。**

<div align="left" data-with-frame="true"><img src="/files/c6c82fa772d113b9d0b757e1f9f533107ea78686" alt="" width="557"></div>
{% endstep %}

{% step %}
**必須。セットアップ プロセスを完了するには、** [**メタデータを Command にアップロードする必要があります**](/command/ja/sekyuriti/identity-providers.md#upload-saml-xml-metadata)**.**
{% endstep %}

{% step %}
**SAML ログイン URL でログインします。**
{% endstep %}
{% endstepper %}


---

# Agent Instructions
This documentation is published with GitBook. GitBook is the documentation platform designed so that both humans and AI agents can read, navigate, and reason over technical content effectively. Learn more at gitbook.com.

## Querying This Documentation
If you need additional information that is not directly available in this page, you can query the documentation dynamically by asking a question.

Perform an HTTP GET request on the current page URL with the `ask` query parameter, and the optional `goal` query parameter:

```
GET https://help.verkada.com/command/ja/sekyuriti/identity-providers/onelogin.md?ask=<question>&goal=<endgoal>
```

`ask` is the immediate question: it should be specific, self-contained, and written in natural language.
`goal` is optional and describes the broader end goal you are ultimately trying to accomplish on behalf of the user. GitBook uses it to tailor the answer towards what is most useful for that goal.

The response will contain a direct answer to the question and relevant excerpts and sources from the documentation.

Use this mechanism when the answer is not explicitly present in the current page, you need clarification or additional context, or you want to retrieve related documentation sections.