# JumpCloud

Verkada は、JumpCloud を IDプロバイダ (IdP) として使用した Security Assertion Markup Language (SAML) 認証をサポートしています。

| 機能            | サポート済み |
| ------------- | :----: |
| OIDC SSO      |    —   |
| SAML SSO      |   はい   |
| SCIM プロビジョニング |    —   |
| ECE サポート      |    —   |

### はじめる前に

Security Assertion Markup Language (SAML) を統合するには、まず [クライアント ID を生成する](/command/ja/sekyuriti/identity-providers.md#generate-client-id).

***

## 設定

### SSO を設定する

{% stepper %}
{% step %}
**Verkada Command で、\[All Products] > \[Admin] > \[Privacy & Security] > \[Authentication & User Management] に移動します。**
{% endstep %}

{% step %}
**\[Add New] をクリックして、シングルサインオン (SSO) を設定します。**
{% endstep %}
{% endstepper %}

### Verkada アプリを作成する

{% stepper %}
{% step %}
**JumpCloud のダッシュボードに移動し、\[SSO] をクリックして SSO アプリケーションを表示します。**
{% endstep %}

{% step %}
**プラス (+) アイコンをクリックして、新しいアプリケーションを作成します。**

<div align="left" data-with-frame="true"><img src="/files/f6fd0d3b4c8598ef8e95806dc1f951dcc0dbf304" alt="" width="563"></div>
{% endstep %}

{% step %}
**\[Custom SAML App] をクリックします。**

<div align="left" data-with-frame="true"><img src="/files/3ffa46ca7663a2cd2ba6607a35ba2327dc2fb056" alt="" width="563"></div>
{% endstep %}

{% step %}
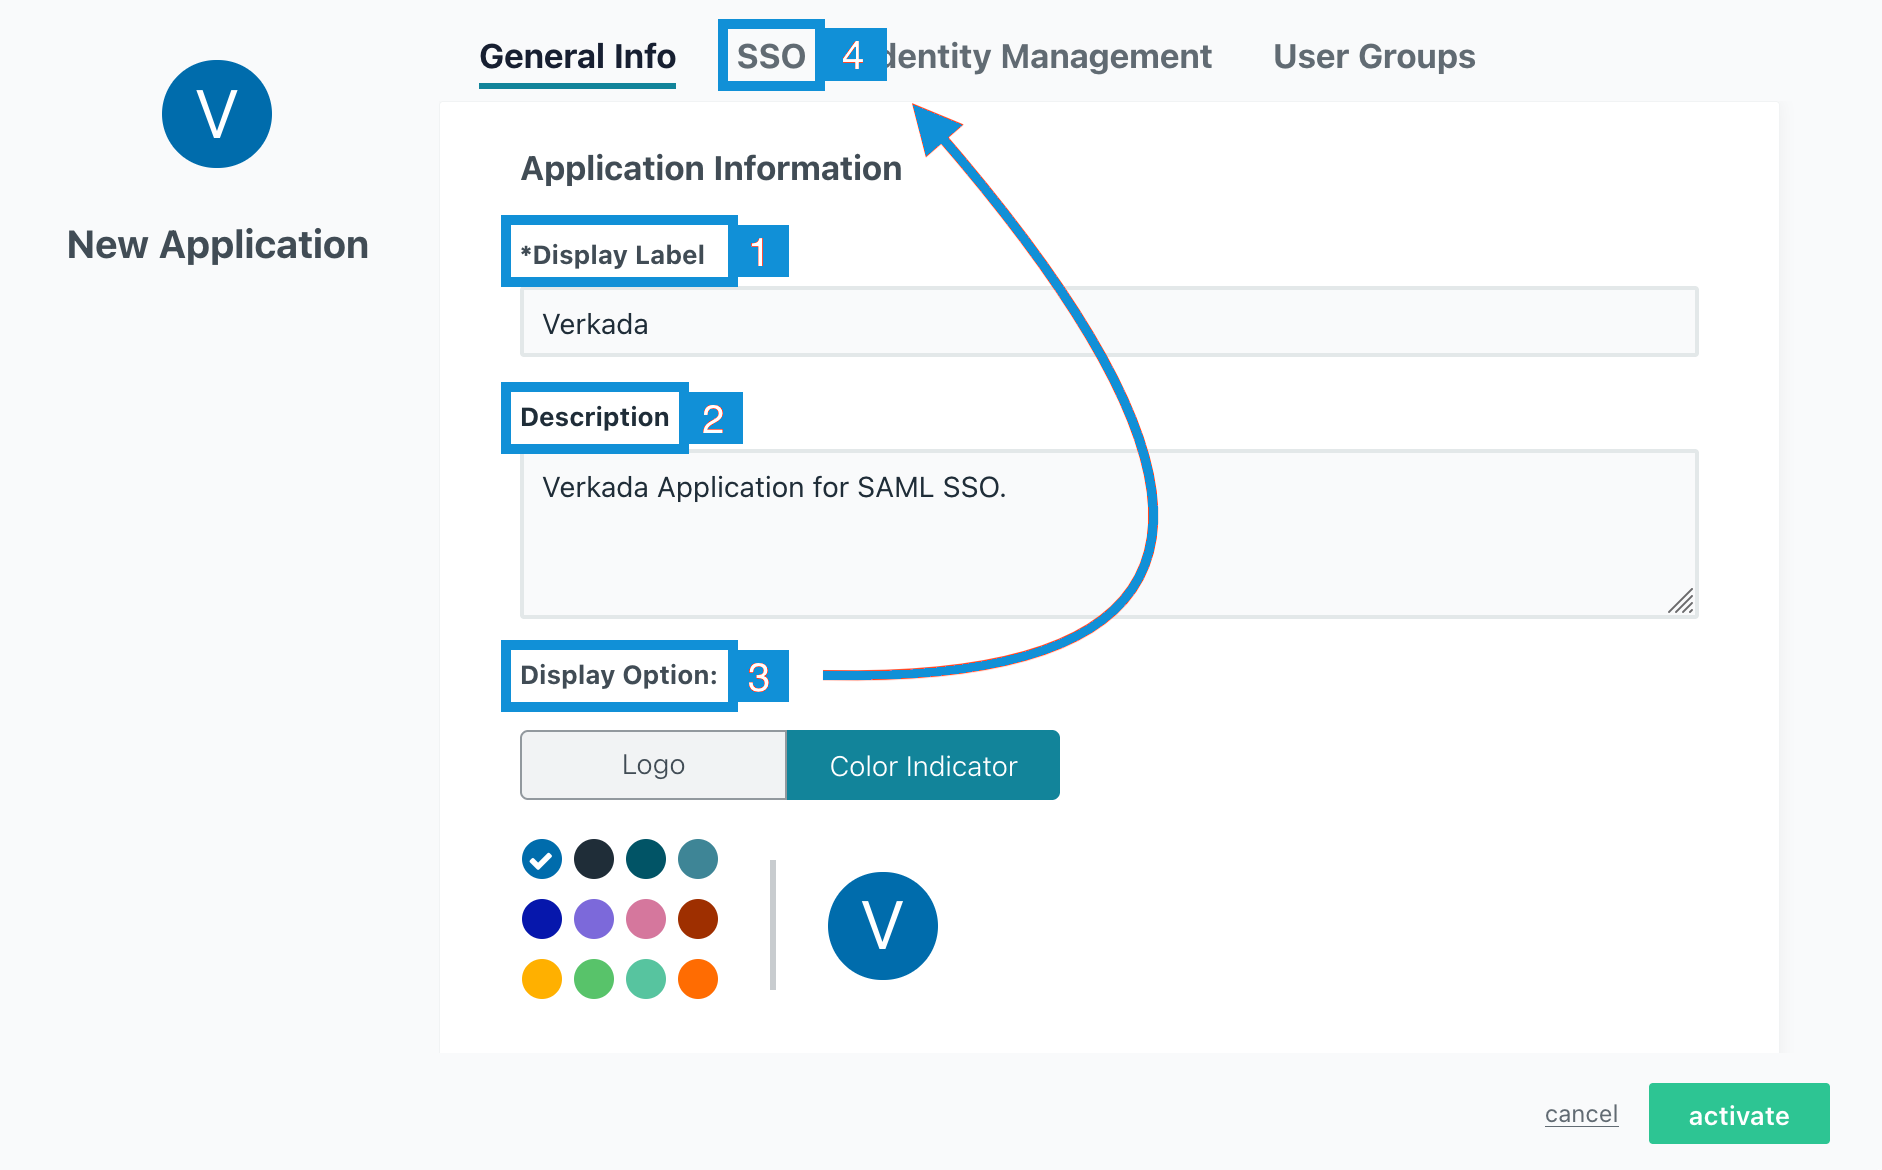
**アプリケーションに名前を付け、説明を追加し、必要に応じてアイコンを変更します。Verkada に関連する名前を使用してください。**
{% endstep %}

{% step %}
**完了したら、上部メニューで \[SSO] を選択し、\[activate] をクリックします。**

<div align="left" data-with-frame="true"><img src="/files/a30e6eab4a78464288239d23621b6611c1a2005b" alt="" width="563"></div>
{% endstep %}

{% step %}
**IdP Entity ID、SP Entity ID、および ACS URL を次のように設定します。**

* 対象 **IdP Entity ID**:\
  米国のオーガナイゼーション' の場合: [https://vauth.command.verkada.com/saml/sso](https://vauth.command.verkada.com/sam/sso)\
  EU のオーガナイゼーション' の場合: <https://saml.prod2.verkada.com/saml/sso>

  AUS のオーガナイゼーション' の場合: <https://saml.prod-ap-syd.verkada.com/saml/sso>
* 対象 **SP Entity ID**:\
  米国のオーガナイゼーション' の場合: [https://vauth.command.verkada.com/saml/sso](https://vauth.command.verkada.com/sam/sso)\
  EU のオーガナイゼーション' の場合: <https://saml.prod2.verkada.com/saml/sso>

  AUS のオーガナイゼーション' の場合: <https://saml.prod-ap-syd.verkada.com/saml/sso>
* 対象 **サインオン URL**:\
  米国のオーガナイゼーション' の場合: <https://vauth.command.verkada.com/saml/login>\
  EU のオーガナイゼーション' の場合: [https://saml.prod2.verkada.com/saml/login](https://saml.prod2.verkada.com/saml/login/)

  AUS のオーガナイゼーション' の場合: <https://saml.prod-ap-syd.verkada.com/saml/login>
* または、Command からフィールドをコピーすることもできます。

{% hint style="warning" %}
現在のリージョンを確認するには、 [Verkada 用にオーガナイゼーション' が作成された場所を参照してください](/command/ja/hajimeni/get-started-with-verkada-command.md).
{% endhint %}
{% endstep %}

{% step %}
**\[activate] をクリックします。**
{% endstep %}

{% step %}
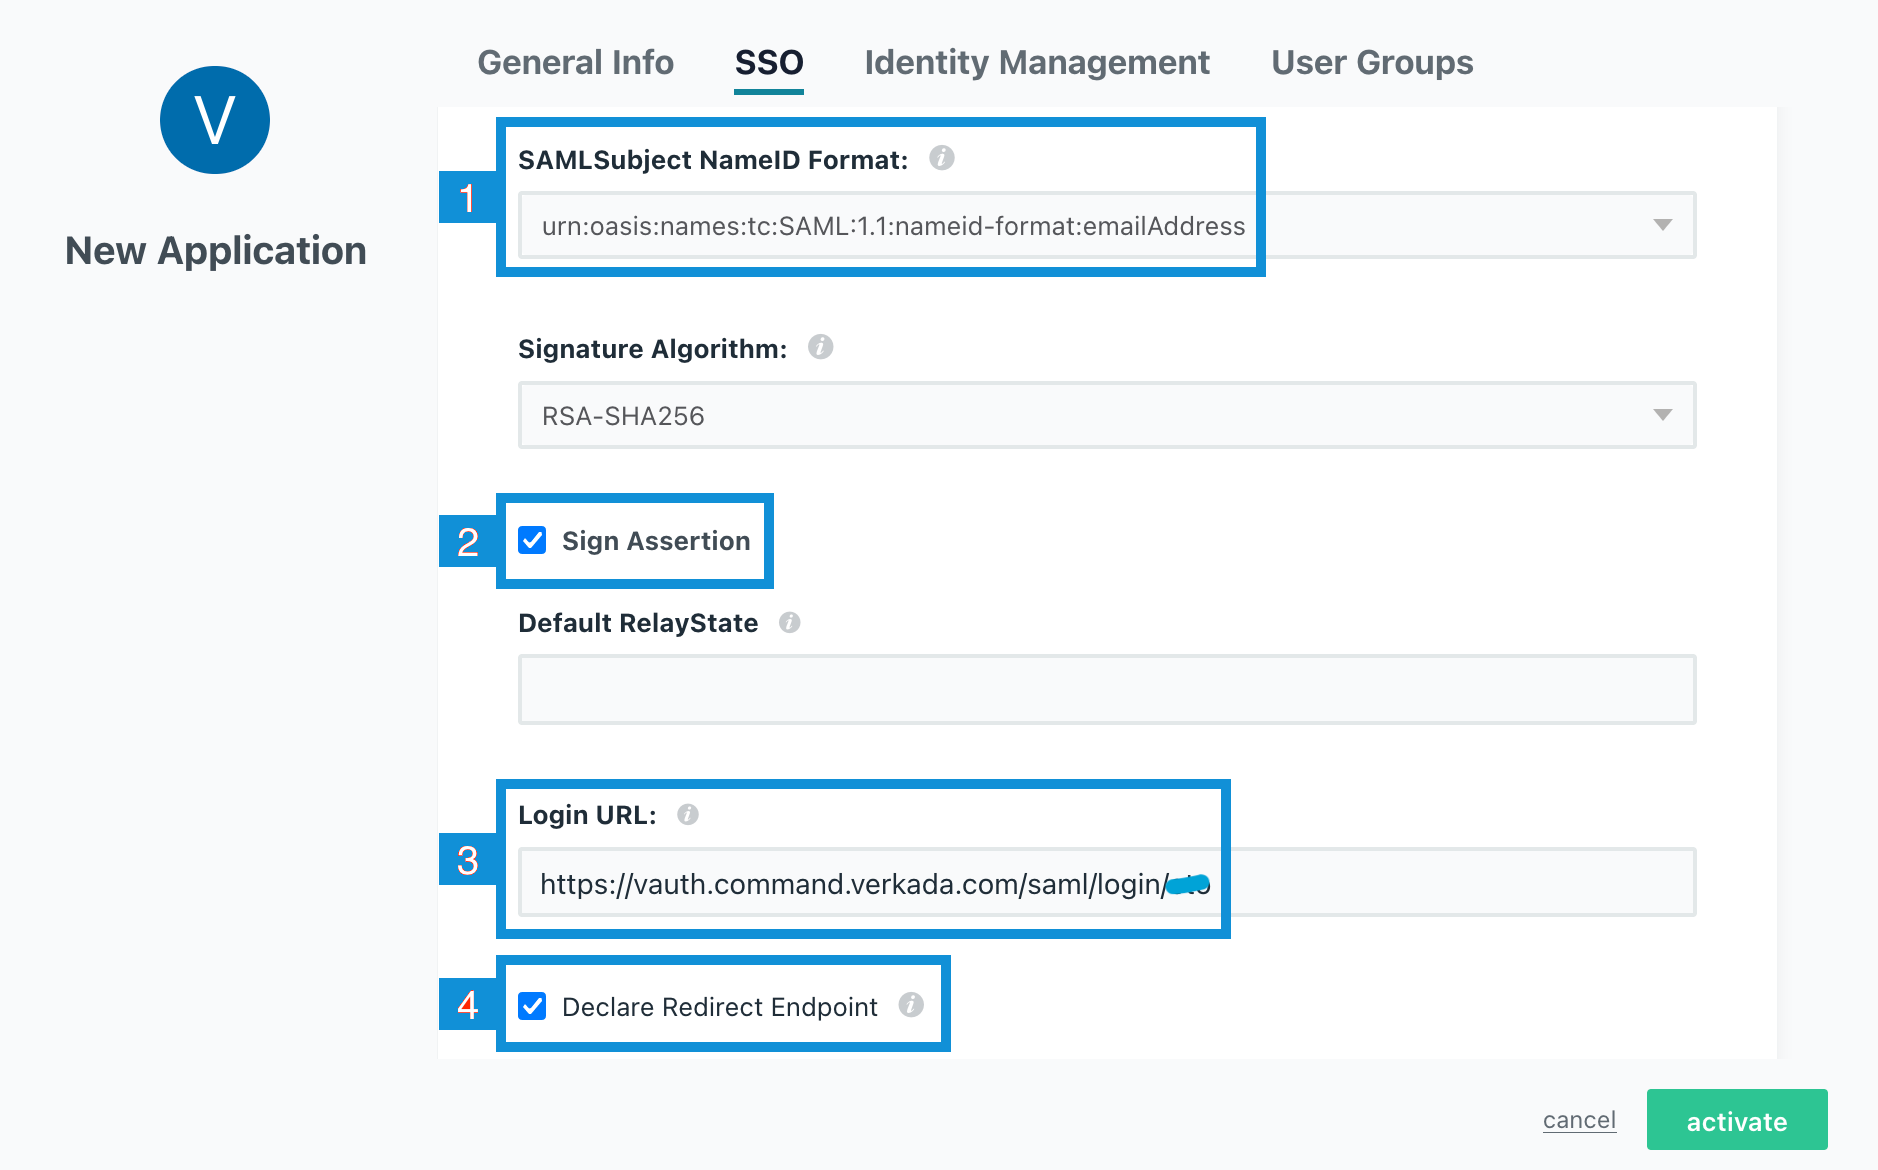
**下にスクロールしてドロップダウンを選択し、SAML Subject NameID Format を次に設定します `urn:oasis:names:tc:SAML:1.1:nameid-format:emailAddress`.**
{% endstep %}

{% step %}
**まだの場合は、\[Sign Assertion] ボックスをオンにします。**
{% endstep %}

{% step %}
**ログイン URL を設定し、次を置き換えます `<client-ID>` を、以前に生成したクライアント ID に置き換えます（このアプリケーションの例では、 `cto` がクライアント ID です）:**

* 米国のオーガナイゼーション' の場合: <https://vauth.command.verkada.com/saml/login/%3Cclient-ID%3E>
* EU のオーガナイゼーション' の場合: <https://saml.prod2.verkada.com/saml/login/%3Cclient-ID%3E>
* AUS のオーガナイゼーション' の場合: <https://saml.prod-ap-syd.verkada.com/saml/sso/%3Cclient-ID%3E>

{% hint style="warning" %}
現在のリージョンを確認するには、 [Verkada 用にオーガナイゼーション' が作成された場所を参照してください](/command/ja/hajimeni/get-started-with-verkada-command.md).
{% endhint %}
{% endstep %}

{% step %}
**まだの場合は、\[Declare Redirect Endpoint] ボックスをオンにして、\[activate] をクリックします。**

<div align="left" data-with-frame="true"><img src="/files/60968ac8ef6a46169ee52ce01b51623d4dab1488" alt="" width="563"></div>
{% endstep %}
{% endstepper %}

### SAML 属性を設定する

{% stepper %}
{% step %}
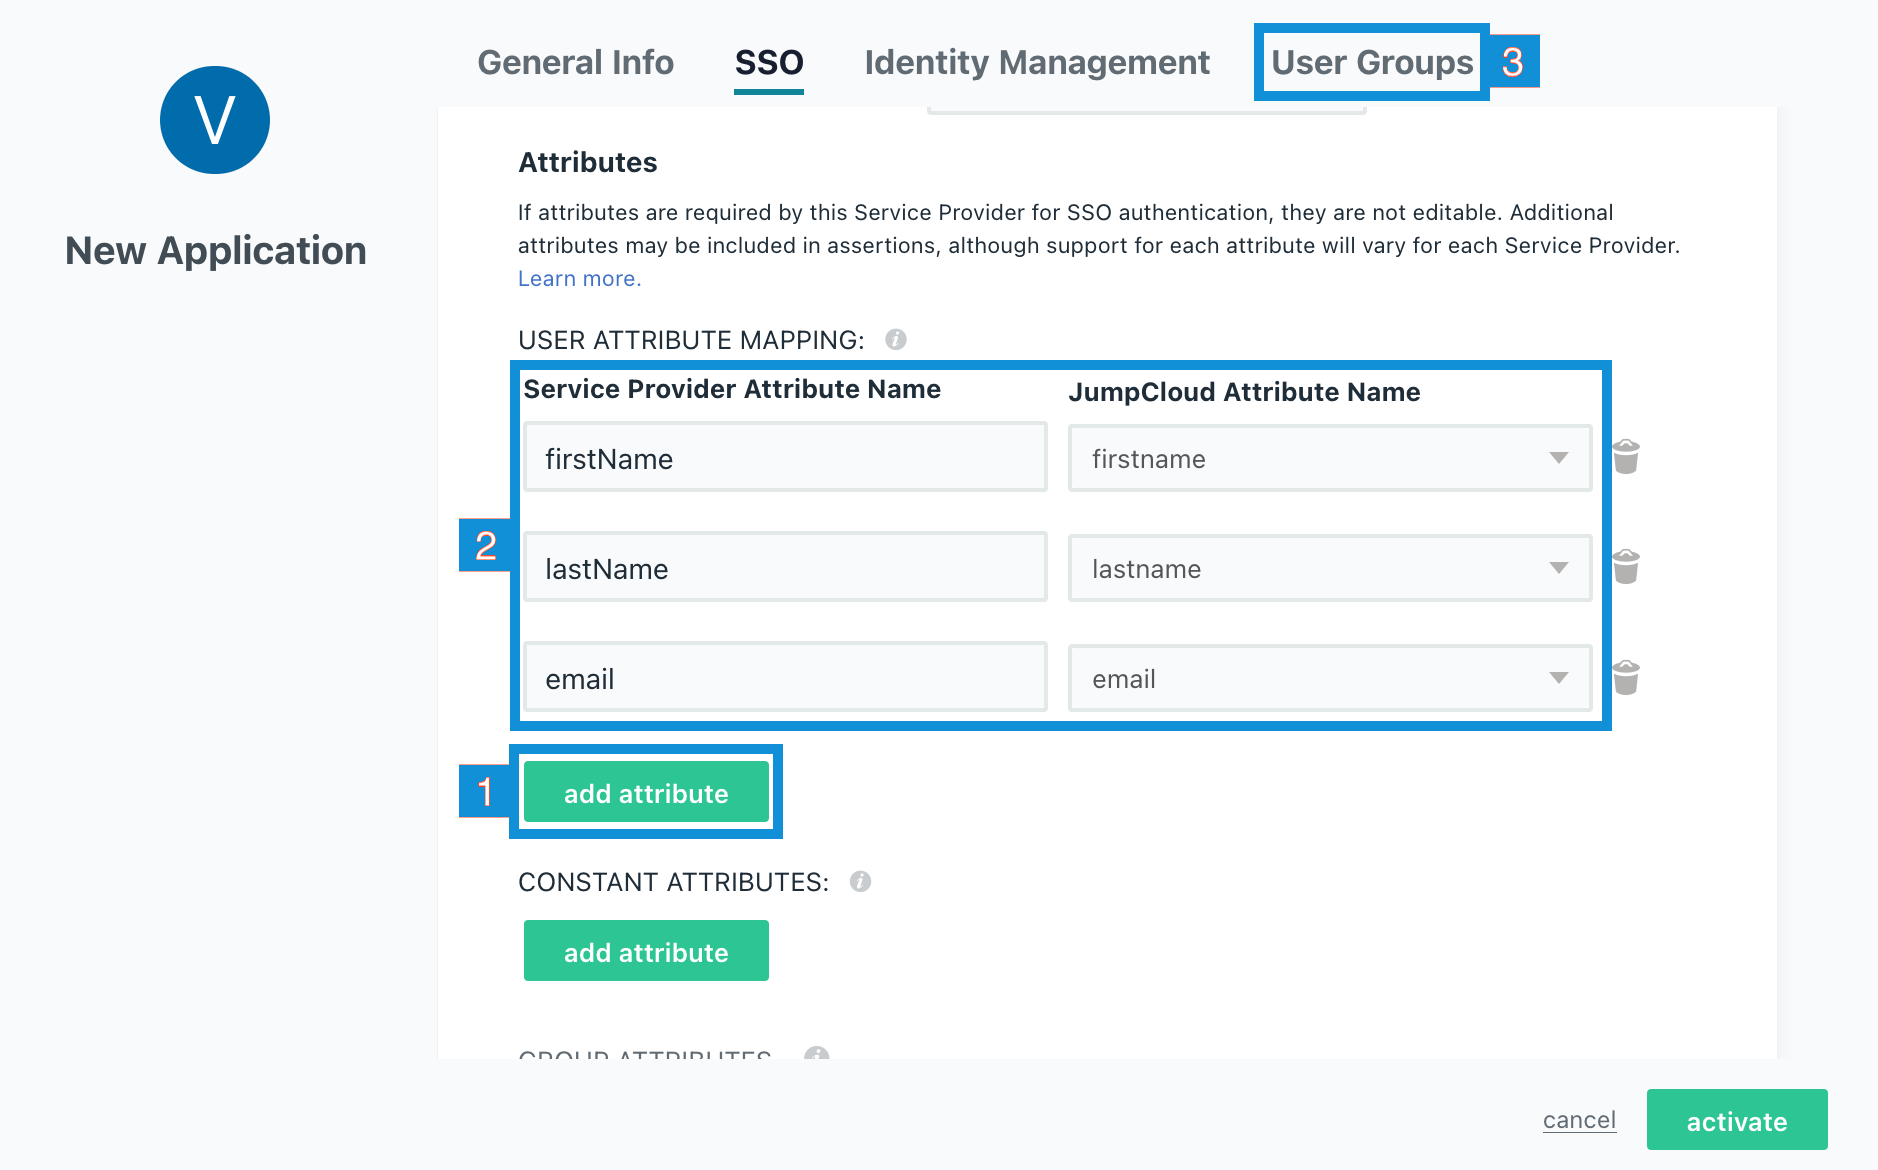
**さらに下にスクロールし、\[add attribute] を 3 回クリックして 3 つの属性フィールドを開きます。**
{% endstep %}

{% step %}
**下の画面に表示されている情報をそのまま入力します。大文字と小文字が区別されます。**
{% endstep %}

{% step %}
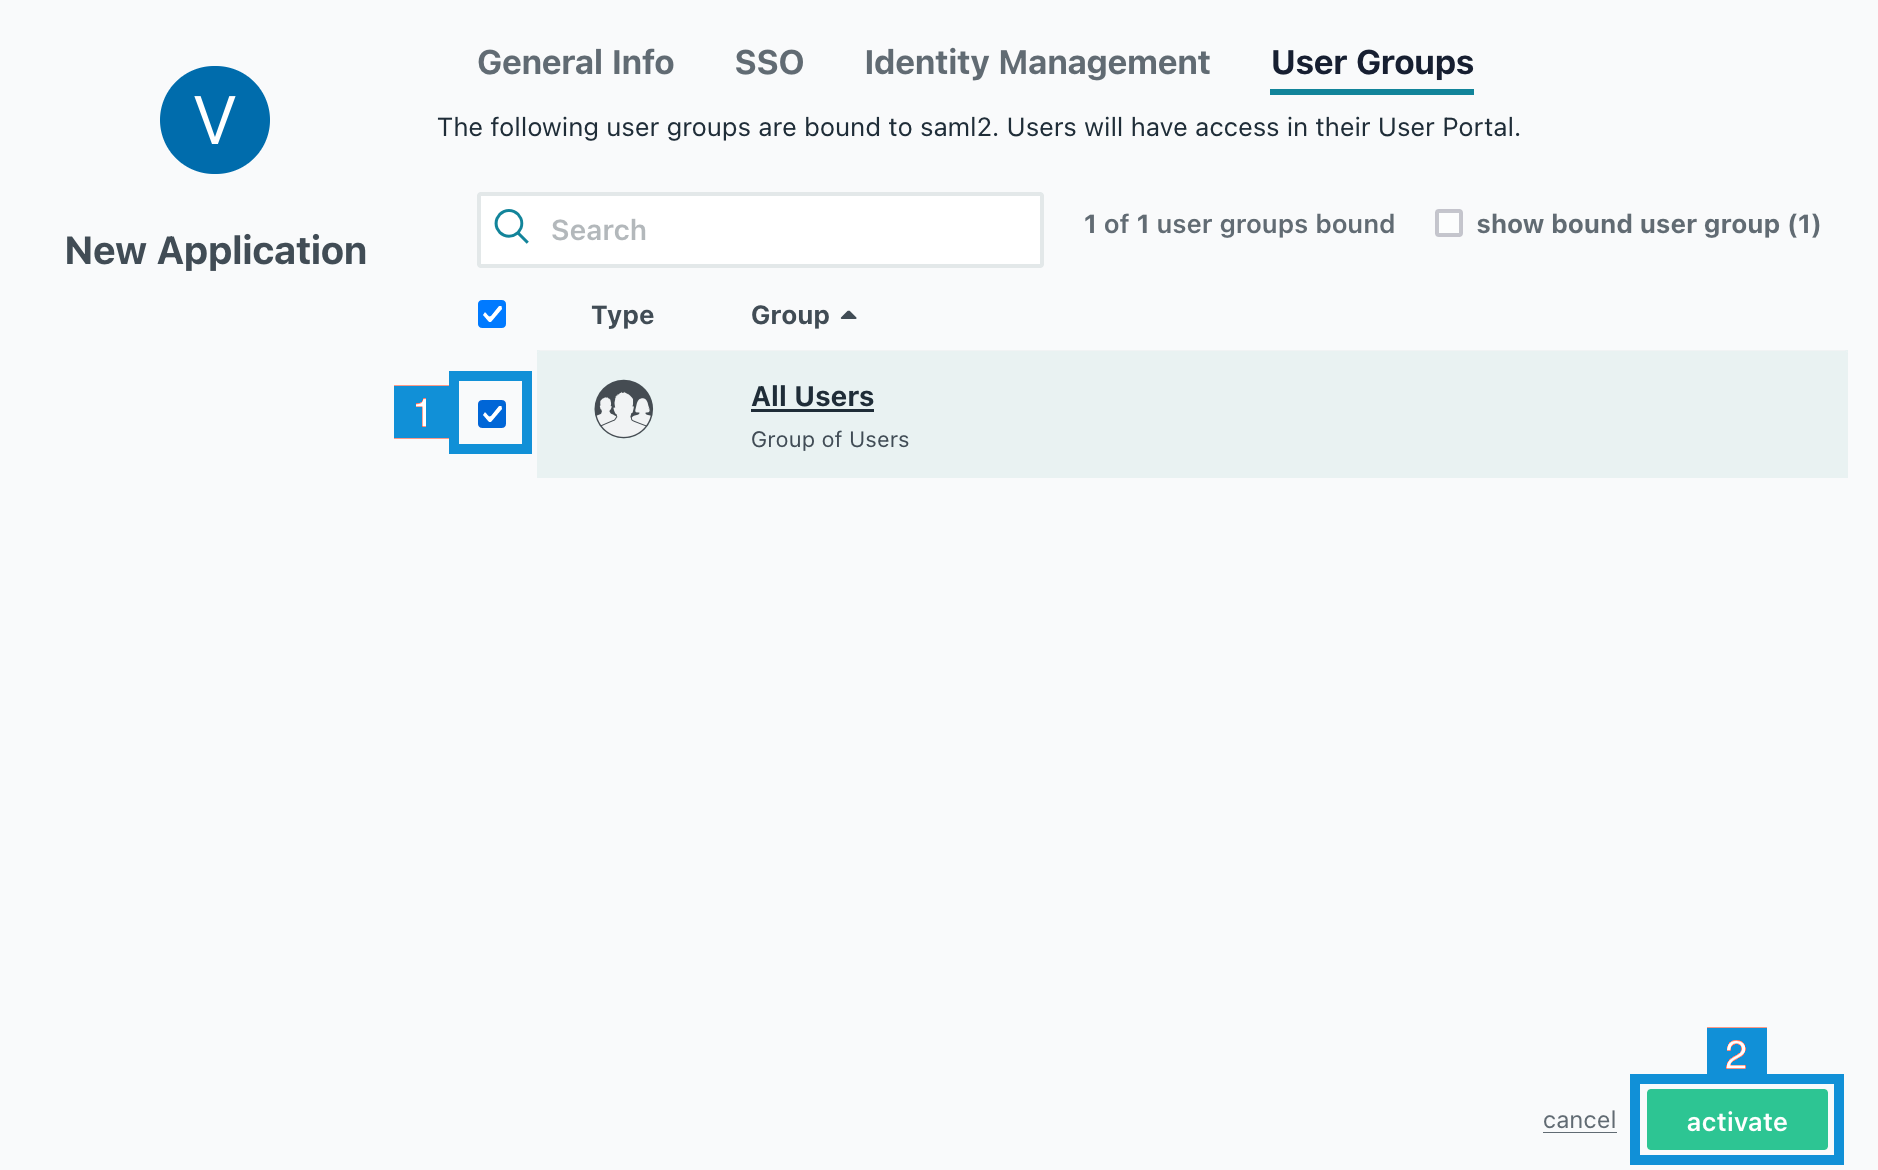
**\[User Groups] を選択し、SSO アクセスを有効にしたいグループが選択されていることを確認します。この JumpCloud インスタンスでは、All Users という名前のグループが 1 つだけあります。**

<div align="left" data-with-frame="true"><img src="/files/e5002d8bcdc325ed1d26bb8f2db0befa5e2416e7" alt=""></div>
{% endstep %}

{% step %}
**\[activate] をクリックして、このグループに Verkada アプリケーションへのアクセスを有効にします。**
{% endstep %}

{% step %}
**\[activate] > \[confirm] をクリックして、新しい SSO コネクタ インスタンスを完了します。**

<div align="left" data-with-frame="true"><img src="/files/f7bee25f69acb3ae80b7c2c3fb3eae70c822257a" alt=""></div>
{% endstep %}
{% endstepper %}

### XML メタデータをエクスポートする

{% stepper %}
{% step %}
**有効化されたら、対象アプリケーションに戻って XML メタデータファイルをダウンロードします。**

<div align="left" data-with-frame="true"><img src="/files/2ad9bb7c46c4ed4190367c06fa874c3bdb1cc065" alt=""></div>
{% endstep %}

{% step %}
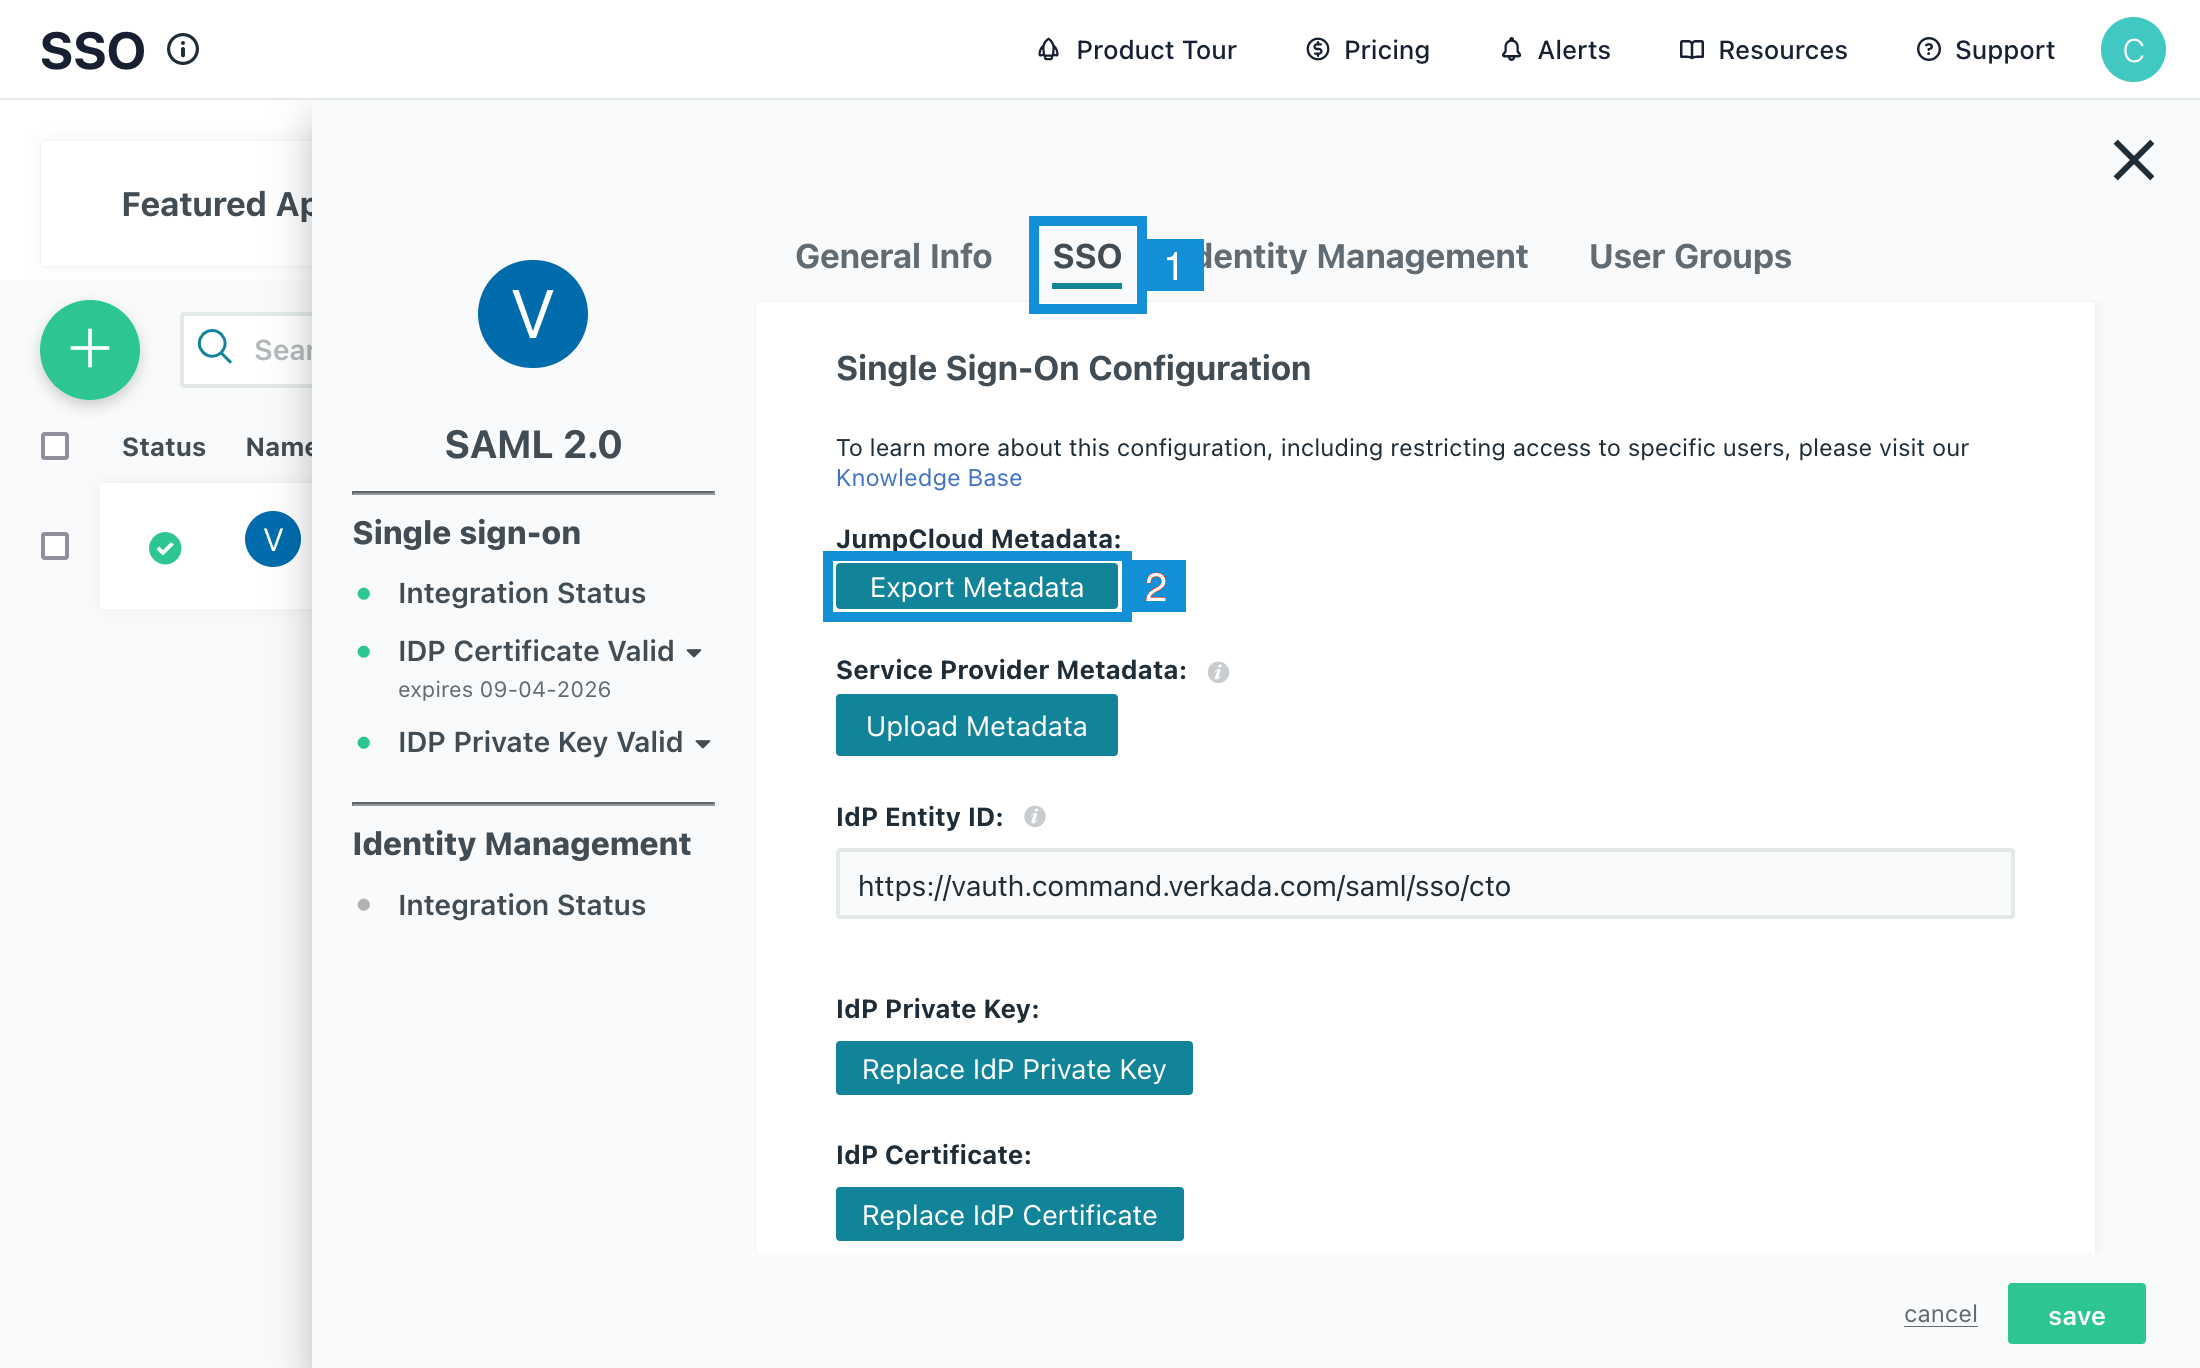
**\[SSO] を選択し、\[Export Metadata] をクリックして JumpCloud Metadata ファイルをエクスポートします。**

<div align="left" data-with-frame="true"><img src="/files/b72be9f2f3bf540847c0eec10bfb017feea8bfc5" alt=""></div>
{% endstep %}

{% step %}
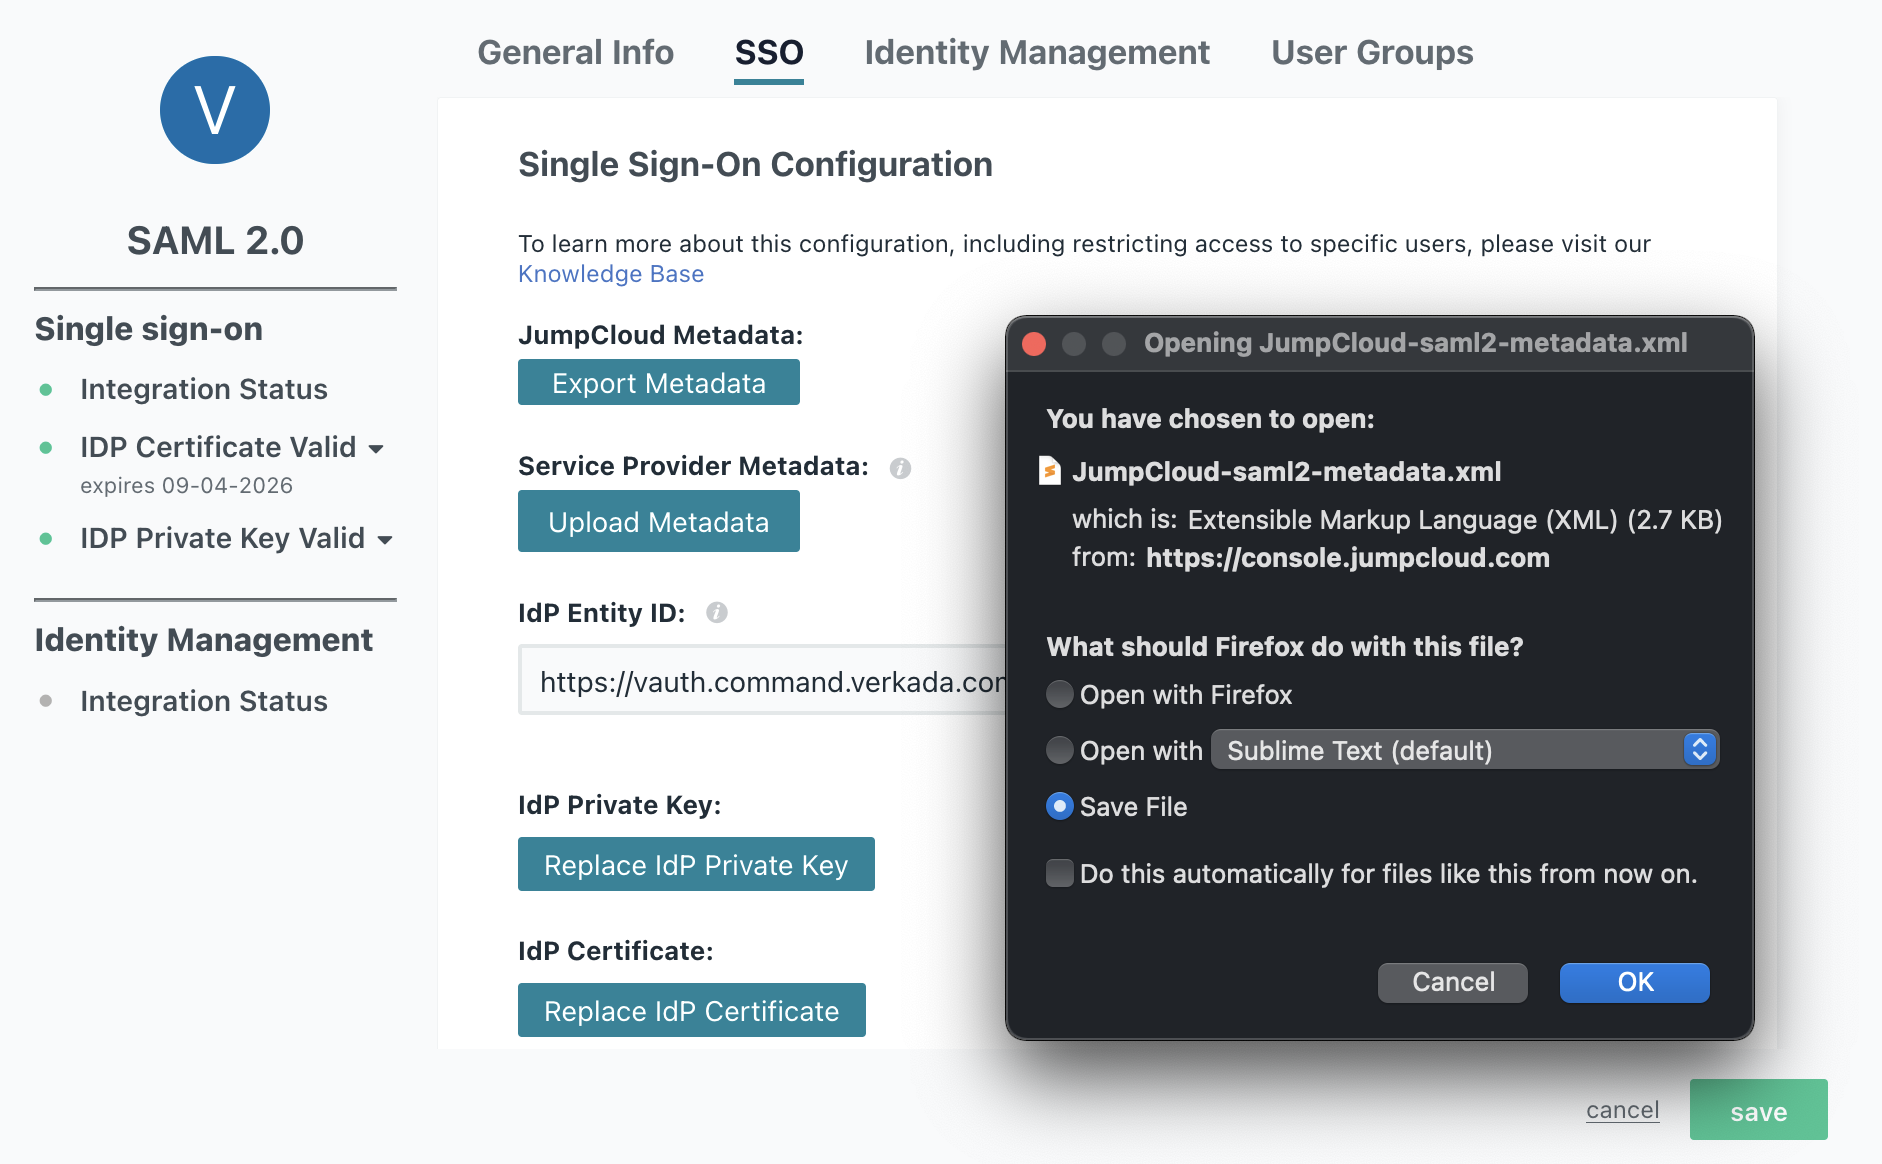
**エクスポートしたファイルを保存し、関連する名前を付けて、\[OK] > \[Save] をクリックします。**

<div align="left" data-with-frame="true"><img src="/files/a51bf26d9a0bc87a3e48857c2f182e44523cf568" alt=""></div>
{% endstep %}

{% step %}
**XML ファイルをダウンロードした後、** [**Command にアップロードします**](/command/ja/sekyuriti/identity-providers.md#command-sso-configuration)**.**
{% endstep %}
{% endstepper %}

### SSO ユーザーがプロビジョニングされていることを確認する（オプション）

{% hint style="warning" %}
SCIM を使用するかアカウントを手動で作成するかにかかわらず、SSO を使用するユーザーがすでに Command でプロビジョニングされていることを確認してください。そうでないと、SSO は機能しません。
{% endhint %}

{% stepper %}
{% step %}
**ユーザーは次にアクセスできます** [**JumpCloud User Console**](https://console.jumpcloud.com/userconsole#/) **(IdP 主導フロー)。**

<div align="left" data-with-frame="true"><img src="/files/9c9ce92b0638f7832efba536cc114faf19a6ba97" alt=""></div>
{% endstep %}

{% step %}
**Command 経由のシングルサインオンを選択します（サービスプロバイダー \[SP] 主導フロー）。**
{% endstep %}
{% endstepper %}


---

# Agent Instructions: Querying This Documentation

If you need additional information that is not directly available in this page, you can query the documentation dynamically by asking a question.

Perform an HTTP GET request on the current page URL with the `ask` query parameter:

```
GET https://help.verkada.com/command/ja/sekyuriti/identity-providers/jumpcloud.md?ask=<question>
```

The question should be specific, self-contained, and written in natural language.
The response will contain a direct answer to the question and relevant excerpts and sources from the documentation.

Use this mechanism when the answer is not explicitly present in the current page, you need clarification or additional context, or you want to retrieve related documentation sections.