> For the complete documentation index, see [llms.txt](https://help.verkada.com/llms.txt). Markdown versions of documentation pages are available by appending `.md` to page URLs; this page is available as [Markdown](https://help.verkada.com/command/ja/sekyuriti/identity-providers/ad-fs.md).

# AD FS

Verkada Command は、Active Directory Federation Services (AD FS) と連携して、ユーザーが既存の AD 資格情報を使用してログインできるようにします。

Security Assertion Markup Language (SAML) は、AD FS が Command と通信して、ユーザーに組織へのアクセスを安全に付与できるようにする言語です。

| 機能            | 対応済み |
| ------------- | :--: |
| OIDC SSO      |   —  |
| SAML SSO      |  はい  |
| SCIM プロビジョニング |   —  |
| ECE サポート      |   —  |

{% hint style="warning" %}
SAML は、ユーザーを組織に追加したり招待したりしません。代わりに、以前にプロビジョニングされたユーザーが、Verkada が管理するユーザー名とパスワードではなく、AD 資格情報でログインできるようにするだけです。

ドメインのユーザーとグループを Command に同期することに関心がある場合は、詳細をこちらでご確認ください。 [SCIM](/command/ja/sekyuriti/identity-providers/microsoft-entra-id.md).
{% endhint %}

### 開始する前に

SAML 連携を開始するには、次の操作が必要です [組織のクライアント ID を生成する](/command/ja/sekyuriti/identity-providers.md#generate-client-id) （クライアント ID は大文字と小文字を区別します）。

***

## 設定

### Relying Party Trust を追加する

{% stepper %}
{% step %}
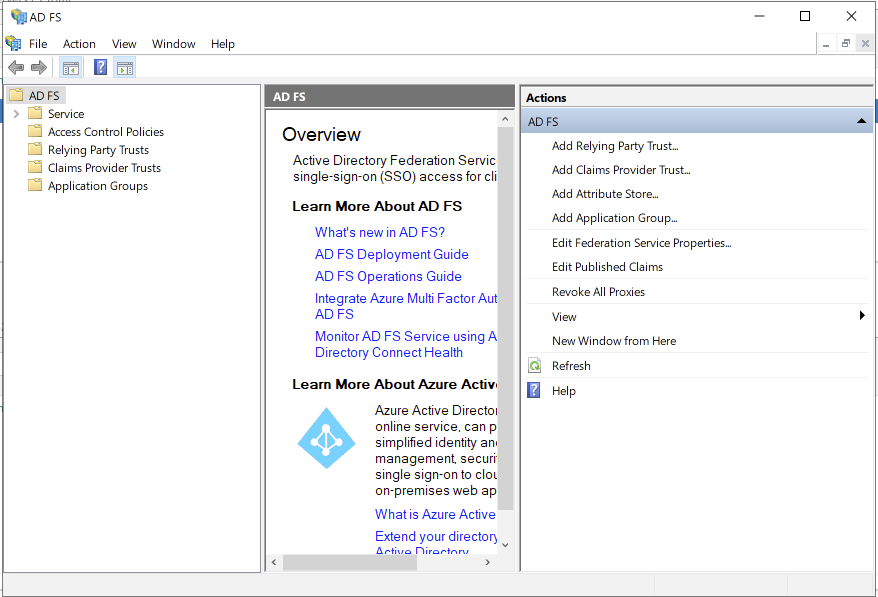
**AD FS Management を開きます。**

<div align="left" data-with-frame="true"><img src="/files/599abcdf2a0156984b8d272fe0eebc80ffb1b669" alt=""></div>
{% endstep %}

{% step %}
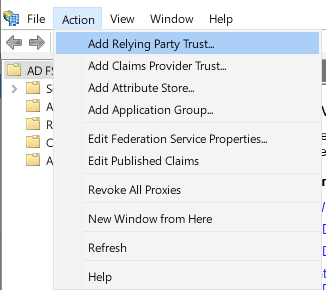
**\[Action] > \[Add Relying Party Trust] を選択します。**

<div align="left" data-with-frame="true"><img src="/files/5d60f3e2aac11191d82139be609e9e9224a35192" alt=""></div>
{% endstep %}

{% step %}
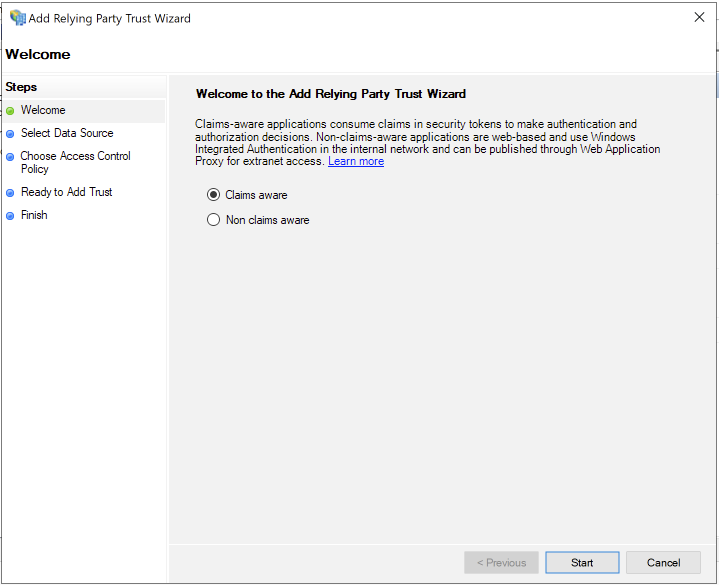
**\[Claims aware] にチェックを入れ、\[Start] をクリックします。**

<div align="left" data-with-frame="true"><img src="/files/ac5dd455ff36a28f914d849749ccc0b58a5b6c44" alt=""></div>
{% endstep %}

{% step %}
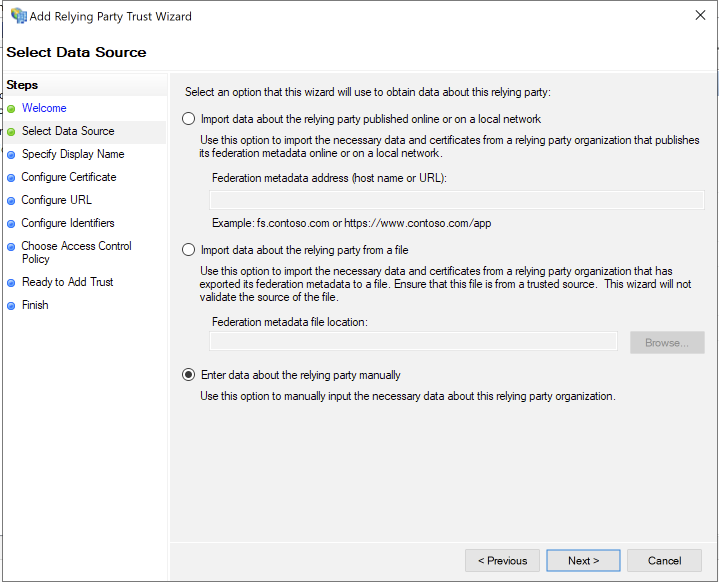
**\[Enter data about the relying party manually] を選択し、\[Next] をクリックします。**

<div align="left" data-with-frame="true"><img src="/files/97fa8610f9a150b269feea38b5fbb380b9167a5f" alt=""></div>
{% endstep %}

{% step %}
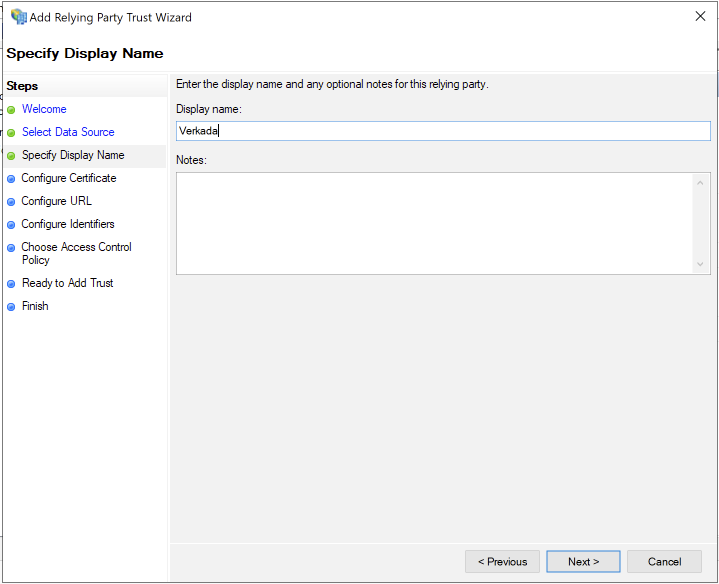
**表示名を入力し（何でもかまいません）、\[Next] をクリックします。**

<div align="left" data-with-frame="true"><img src="/files/e82fad0a9c49d8003904811b06ad8bb3d5613587" alt=""></div>
{% endstep %}

{% step %}
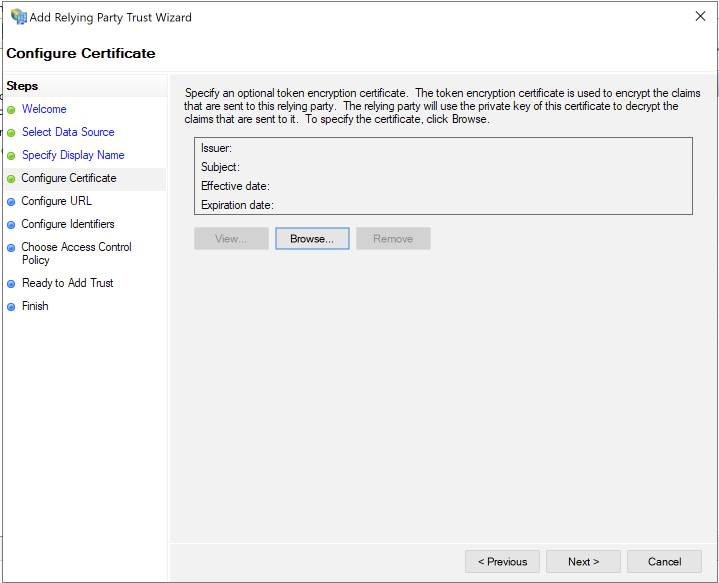
**任意のトークン暗号化証明書を指定し（指定するには \[Browse] をクリック）、その後 \[Next] をクリックします。**

<div align="left" data-with-frame="true"><img src="/files/be2443886d0386d92cac475eff81050a3dce46a1" alt=""></div>
{% endstep %}

{% step %}
**\[Enable support for the SAML 2.0 WebSSO protocol] にチェックを入れ、\[Relying party SAML 2.0 SSO service URL] フィールドに（次の値を置き換えます&#x20;*****client-ID*****&#x20;：以前に生成したクライアント ID を使用します）：**

* 米国の組織の場合： <https://vauth.command.verkada.com/saml/sso/%3Cclient-ID%3E>
* EU の組織の場合： [https://saml.prod2.verkada.com/saml/sso/](https://saml.prod2.verkada.com/saml/sso/%3Cclient-ID%3E)
* AUS の場合： <https://saml.prod-ap-syd.verkada.com/saml/sso/%3Cclient-ID%3E>

{% hint style="warning" %}
お住まいの地域を確認するには、 [組織が Verkada で作成された場所を参照してください](/command/ja/hajimeni/get-started-with-verkada-command.md).
{% endhint %}
{% endstep %}

{% step %}
**\[Next] をクリックします。**
{% endstep %}

{% step %}
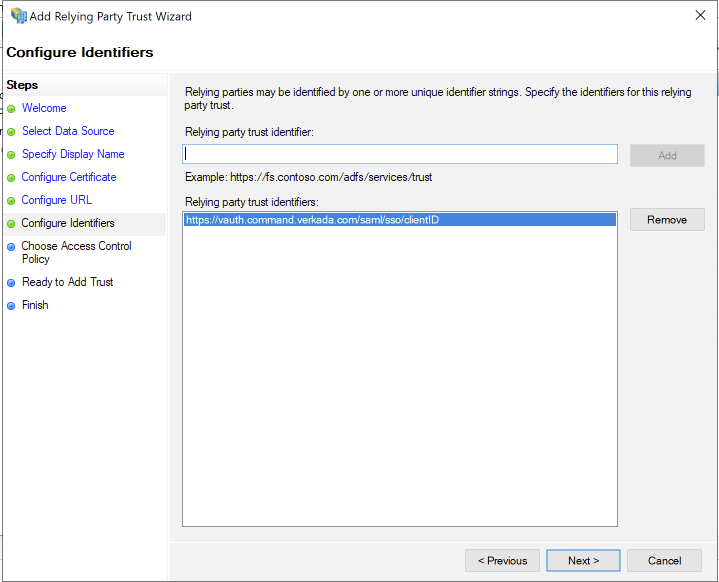
**\[Relying party trust identifier] フィールドに、手順 7 と同じ URL を入力し、\[Add] > \[Next] をクリックします。**

<div align="left" data-with-frame="true"><img src="/files/46bc45b141d1623c9da9f0b3f635a834cb56658c" alt=""></div>
{% endstep %}

{% step %}
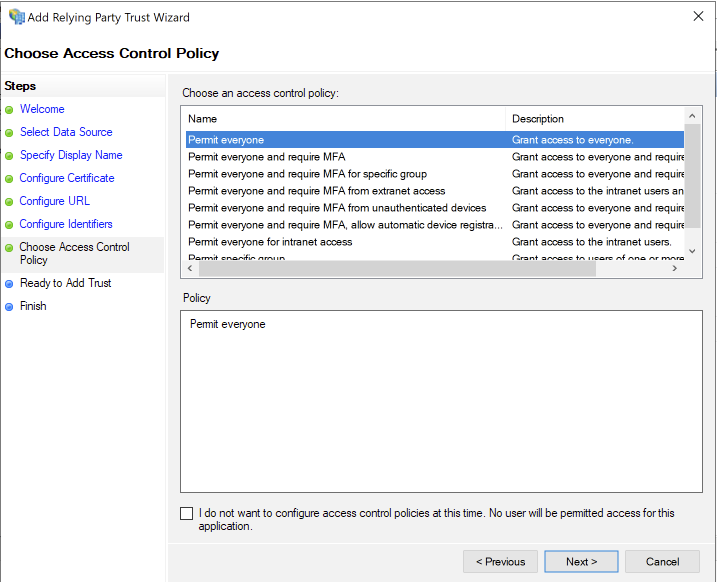
**このアプリケーションに適切なアクセスコントロール ポリシーを設定し、\[Next] をクリックします。**

<div align="left" data-with-frame="true"><img src="/files/65b6fae04882f80096be6a7ae8fd8d9fec9c2efc" alt=""></div>
{% endstep %}

{% step %}
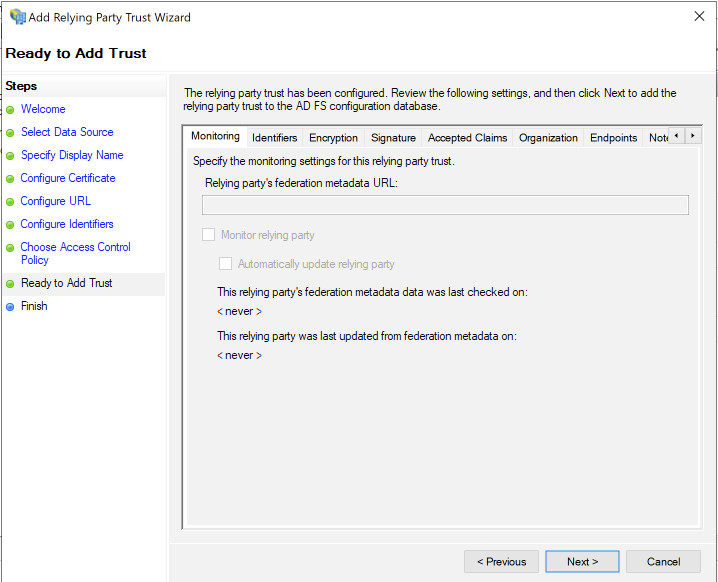
**Relying party の設定を確認し、\[Next] > \[Close] をクリックします。**

<div align="left" data-with-frame="true"><img src="/files/5e9d9994845f99acc39be9de06e4c1c5d6b2f638" alt=""></div>
{% endstep %}
{% endstepper %}

### クレーム発行ポリシーを編集する

{% stepper %}
{% step %}
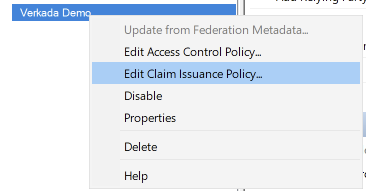
**新しく作成した Relying Party Trust を右クリックし、\[Edit Claim Issuance Policy] を選択します。**

<div align="left" data-with-frame="true"><img src="/files/e4fd7dcba32606f288f9aa977936cc8e35d3ba02" alt=""></div>
{% endstep %}

{% step %}
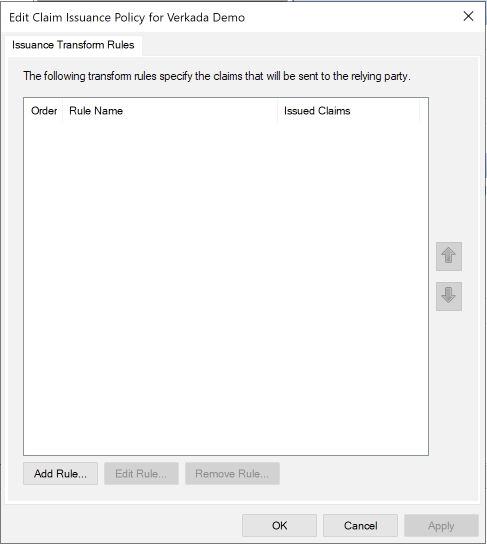
**\[Add Rule] > \[OK] をクリックします。**

<div align="left" data-with-frame="true"><img src="/files/852a24a8a1fab8dffd75c74f4192ff60786a5332" alt=""></div>
{% endstep %}
{% endstepper %}

### 変換クレーム ルールを追加する

{% stepper %}
{% step %}
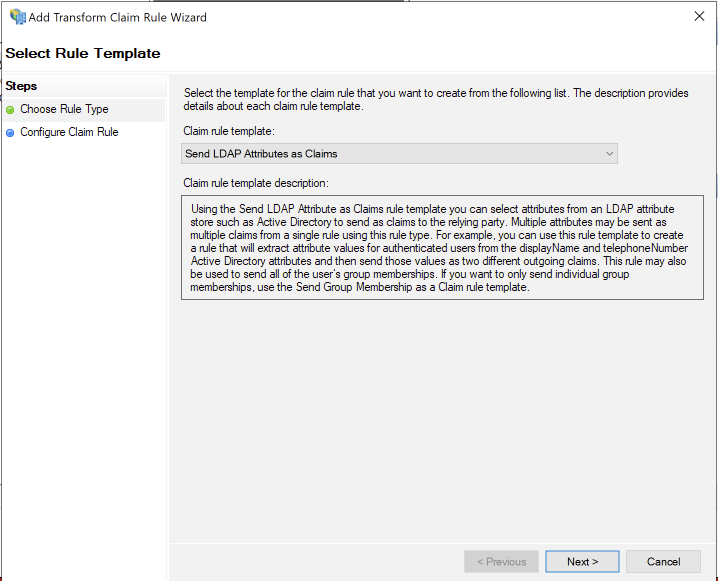
**\[Send LDAP Attributes as Claims] が選択されていることを確認し、\[Next] をクリックします。**

<div align="left" data-with-frame="true"><img src="/files/598539b94ba96dd968cebc81c6711473db11c4d5" alt=""></div>
{% endstep %}

{% step %}
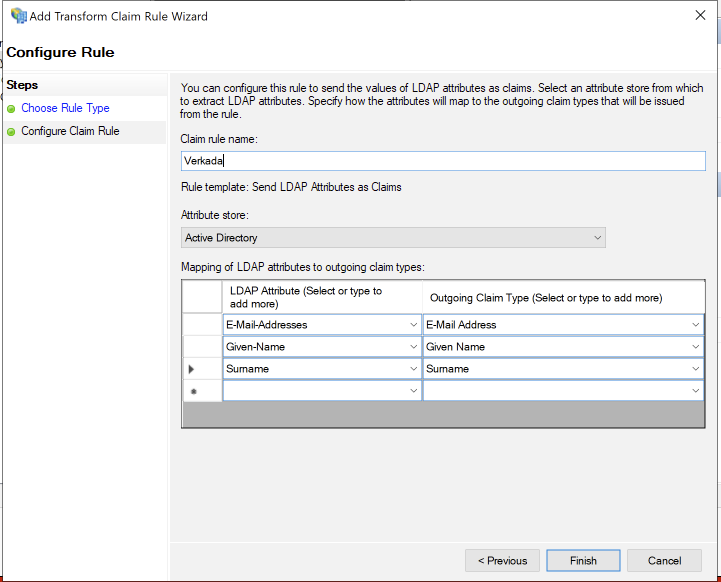
**次のルール設定を構成し、完了したら \[Finish] をクリックします：**

a. 次の値を入力します **クレーム ルール名** （何でもかまいません）。\
b.  **Attribute store**の下で、 **Active Directory** が選択されていることを確認します。\
c. 次の LDAP 属性を、適切な **発行クレームの種類**:

* E-Mail-Addresses > E-Mail Address
* Given-Name > Given Name
* Surname > Surname

<div align="left" data-with-frame="true"><img src="/files/f4f3ec82ccc36c5724d0aec055b124ebb1607907" alt=""></div>
{% endstep %}

{% step %}
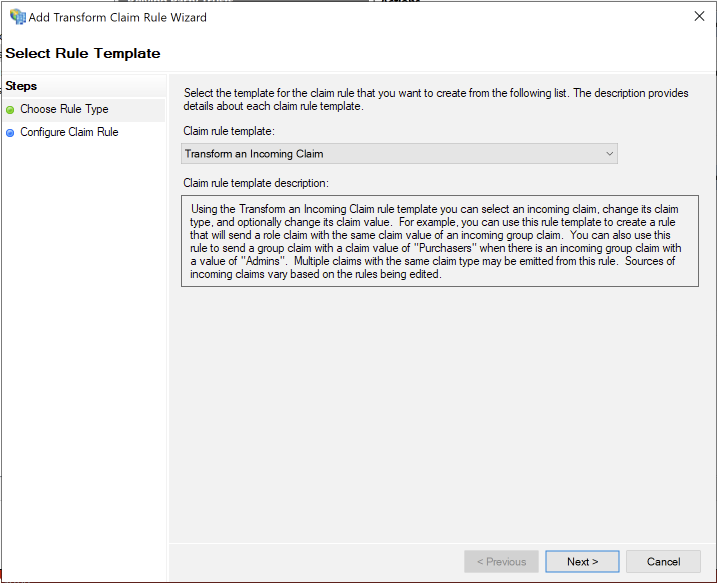
**\[Claim rule template] で \[Transform an Incoming Claim to add another rule] を選択し、\[Next] をクリックします。**

<div align="left" data-with-frame="true"><img src="/files/106f07b8f1eff6d6826662e8e7910f2c08f7c5a9" alt=""></div>
{% endstep %}

{% step %}
**クレーム ルールを設定します：**

a. 次を入力します **クレーム ルール名** （何でもかまいません）。\
b.  **受信クレームの種類**の横で、 **E-Mail Address**を選択します。\
c.  **発行クレームの種類**の横で、 **Name ID**の横で、 **発行 Name ID 形式**の横で、 **Transient Identifier**を選択します。\
e.  **すべてのクレーム値をパススルーする** が選択されていることを確認します。\
f.  **\[Finish] をクリックします**.

<div align="left"><figure><img src="/files/67180d2224e7fac921c1e7857a3c7e1bf3e70a3b" alt=""><figcaption></figcaption></figure></div>
{% endstep %}

{% step %}
**次へ移動し、 `https:///FederationMetadata/2007-06/FederationMetadata.xml` XML メタデータ ファイルをダウンロードします。**

{% hint style="danger" %}
**しないでください** この手順では Internet Explorer を使用しないでください。Internet Explorer を使用すると、XML ファイルで問題が発生する可能性があります。
{% endhint %}
{% endstep %}
{% endstepper %}

***

### Command で SAML のセットアップを完了する

次の手順に従ってください [Command アカウントで SAML を有効にする](/command/ja/sekyuriti/identity-providers.md#upload-saml-xml-metadata) Command で SAML のセットアップを完了します。

### 連携をテストする

連携が完了したら、テストします。

{% stepper %}
{% step %}
**シークレット/プライベート ブラウジング ウィンドウを開き、次へ移動します（ここで clientID を上記で生成したクライアント ID に置き換えます）：**

* 米国の場合： <https://vauth.command.verkada.com/saml/login/%3Cclient-ID%3E>
* EU の場合： [https://saml.prod2.verkada.com/saml/login/](https://saml.prod2.verkada.com/saml/login/%3Cclient-ID%3E)
* AUS の場合： [https://saml.prod-ap-syd.verkada.com/saml/sso/](https://saml.prod2.verkada.com/saml/login/%3Cclient-ID%3E)

{% hint style="warning" %}
お住まいの地域を確認するには、 [組織が Verkada で作成された場所を参照してください](/command/ja/hajimeni/get-started-with-verkada-command.md).
{% endhint %}
{% endstep %}

{% step %}
**AD FS のログイン ページに移動するはずです。資格情報でサインインしてみてください。**
{% endstep %}

{% step %}
**Command の組織にリダイレクトされた場合、SAML 連携は成功です。**
{% endstep %}
{% endstepper %}


---

# Agent Instructions
This documentation is published with GitBook. GitBook is the documentation platform designed so that both humans and AI agents can read, navigate, and reason over technical content effectively. Learn more at gitbook.com.

## Querying This Documentation
If you need additional information that is not directly available in this page, you can query the documentation dynamically by asking a question.

Perform an HTTP GET request on the current page URL with the `ask` query parameter, and the optional `goal` query parameter:

```
GET https://help.verkada.com/command/ja/sekyuriti/identity-providers/ad-fs.md?ask=<question>&goal=<endgoal>
```

`ask` is the immediate question: it should be specific, self-contained, and written in natural language.
`goal` is optional and describes the broader end goal you are ultimately trying to accomplish on behalf of the user. GitBook uses it to tailor the answer towards what is most useful for that goal.

The response will contain a direct answer to the question and relevant excerpts and sources from the documentation.

Use this mechanism when the answer is not explicitly present in the current page, you need clarification or additional context, or you want to retrieve related documentation sections.