> For the complete documentation index, see [llms.txt](https://help.verkada.com/llms.txt). Markdown versions of documentation pages are available by appending `.md` to page URLs; this page is available as [Markdown](https://help.verkada.com/access-control/ja/yzto/add-a-user-to-the-verkada-access-system/print-access-control-badges.md).
# アクセスコントロールバッジを印刷する
アクセスバッジでサポートされるデータフィールドとバッジの印刷方法を学ぶ
これらのアクセス ユーザーデータ フィールドは、アクセスバッジでサポートされています:
* 名
* ミドルネーム
* 姓
* 役職
* 部署
* 会社名
## ユーザーデータを追加
ユーザーデータは次の方法で追加できます:
* ユーザーのプロフィールで手動で
* .csvファイルでインポート
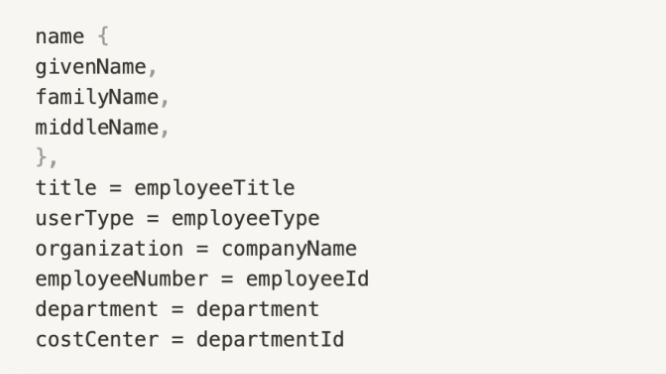
* クロスドメインID管理のためのシステム(SCIM)経由でインポートします。この場合、ADクライアントが次の詳細をSCIMコネクタに送信していることを確認してください:
***
## バッジテンプレートを管理
{% hint style="danger" %}
バッジテンプレートの管理、編集、複製、削除を行うには、Access System Admin の権限が必要です。詳細はこちら: [アクセスコントロールのロールと権限](/access-control/ja/hajimeni/roles-and-permissions-for-access-control.md).
{% endhint %}
{% stepper %}
{% step %}
**Verkada Command で、All Products > Access に移動します。**
{% endstep %}
{% step %}
**左側のナビゲーションで、[アクセス]の[ユーザーとグループ]をクリックします。**
{% endstep %}
{% step %}
**上部で[バッジ]をクリックし、[テンプレートを追加]を選択します。**
{% endstep %}
{% step %}
**必要に応じてテンプレートをカスタマイズします。**
{% endstep %}
{% endstepper %}
***
## 印刷オプション
### プリンターを設定する
Verkadaのバッジ印刷ソリューションはプリンター非依存であり、当社のソフトウェアはすべてのバッジプリンターと互換性があります。
{% stepper %}
{% step %}
**プリンターを正しく設定するには、バッジプリンタードライバーがコンピューターに正しくインストールされており、ブラウザーがそれを認識できることを確認してください。**
{% endstep %}
{% step %}
**プリンターがコンピューターに正しくインストールされると、ブラウザーのプリンター選択肢に表示されます。**
{% endstep %}
{% endstepper %}
{% hint style="warning" %}
両面印刷を行うには、プリンターでこの機能がサポートされるように設定されていることを確認してください。詳しくはプリンターのマニュアルを参照してください。
{% endhint %}
### 1枚のバッジを印刷する
{% stepper %}
{% step %}
**Verkada Command で、All Products > Access に移動します。**
{% endstep %}
{% step %}
**左側のナビゲーションで、[アクセス]の[ユーザーとグループ]をクリックします。**
{% endstep %}
{% step %}
**編集するユーザーを選択します。**
{% endstep %}
{% step %}
**[プロフィール]>[認証情報]を選択します。**
{% endstep %}
{% step %}
**[Keycards]で[カードを印刷]をクリックします。**
1. 選択します **バッジテンプレート。**
2. 必要に応じて、いずれかの名前フィールドのテキストを編集します。
{% endstep %}
{% step %}
**右下の[カードを印刷]をクリックします。**
ブラウザーの印刷プレビューウィンドウが表示されるはずです。
1. 正しいバッジプリンターが選択されていることを確認します。
2. 用紙サイズがバッジと同じ寸法であり、余白が0に設定されていることを確認します。
3. 右下の **[印刷]をクリックします。**
{% endstep %}
{% endstepper %}
### バッジを一括で印刷する
{% stepper %}
{% step %}
**Verkada Command で、All Products > Access に移動します。**
{% endstep %}
{% step %}
**左側のナビゲーションで、[アクセスユーザーとグループ]をクリックします。**
{% endstep %}
{% step %}
**印刷したい各ユーザーの横にあるチェックボックスをオンにします。**
{% endstep %}
{% step %}
**右上のツールバーで[カード]をクリックし、[カードを印刷]を選択します。**
{% endstep %}
{% step %}
**[カードを印刷]で[バッジテンプレート]を選択します。**
{% endstep %}
{% step %}
**[カードを印刷]をクリックすると、ブラウザーの印刷プレビューウィンドウが表示されるはずです。**
a. 正しいバッジプリンターが選択されていることを確認します。\
b. 用紙サイズがバッジと同じ寸法であり、余白が0に設定されていることを確認します。
{% endstep %}
{% step %}
**[印刷]をクリックすると、バッジがペアリング済みのプリンターに印刷されます。**
{% endstep %}
{% endstepper %}
{% hint style="warning" %}
必須データフィールドが不足している場合は、警告が表示されます。これを上書きするには **とにかく印刷**.
{% endhint %}
---
# Agent Instructions
This documentation is published with GitBook. GitBook is the documentation platform designed so that both humans and AI agents can read, navigate, and reason over technical content effectively. Learn more at gitbook.com.
## Querying This Documentation
If you need additional information that is not directly available in this page, you can query the documentation dynamically by asking a question.
Perform an HTTP GET request on the current page URL with the `ask` query parameter, and the optional `goal` query parameter:
```
GET https://help.verkada.com/access-control/ja/yzto/add-a-user-to-the-verkada-access-system/print-access-control-badges.md?ask=&goal=
```
`ask` is the immediate question: it should be specific, self-contained, and written in natural language.
`goal` is optional and describes the broader end goal you are ultimately trying to accomplish on behalf of the user. GitBook uses it to tailor the answer towards what is most useful for that goal.
The response will contain a direct answer to the question and relevant excerpts and sources from the documentation.
Use this mechanism when the answer is not explicitly present in the current page, you need clarification or additional context, or you want to retrieve related documentation sections.