> For the complete documentation index, see [llms.txt](https://help.verkada.com/llms.txt). Markdown versions of documentation pages are available by appending `.md` to page URLs; this page is available as [Markdown](https://help.verkada.com/access-control/ja/toarto/configure-access-control-event-alerts/access-control-tailgate-detection.md).

# 共連れ検出

テールゲーティングとは、許可されたユーザーがドアを開けるのを待ち、その後ろに続いて入り込み、建物に不正にアクセスする行為を指します。ほとんどの組織にとって、これは重大なセキュリティリスクとなります。

Verkadaのテールゲーティング検出機能により、お使いの組織はこの行動を簡単に識別できます。ネイティブのカメラ統合により、AIおよびMLアプリケーションを用いた自動セキュリティ監視が可能になり、テールゲーティング、群衆などを検出できます。

統合されたビデオセキュリティとアクセスコントロールにより、Verkadaはドアイベントとエッジベースの映像解析のデータを活用して、正確な人数カウントを生成します。1回のアクセス許可で複数人がドア口を通過した場合、システムはイベントを発生させ、それをテールゲーティングとしてフラグ付けします。

## 仕組み

テールゲーティングのイベントは、他のすべてのドアイベントとともにVerkada Commandに表示され、人や資産をより積極的に保護できるようになります。

Verkadaのテールゲーティング実装には、新しいハードウェアは不要です。アクセスコントロールされたドアとペアリングされたVerkadaカメラがあれば、このソフトウェア機能をCommandから有効にできます。

{% hint style="warning" %}
テールゲーティング検出は現在、 [D80](https://docs.verkada.com/docs/video-security-d80-datasheet.pdf) カメラモデルではサポートされていません。
{% endhint %}

## カメラ設置要件

* **屋内カメラ**—カメラをドアの内側（リーダーの反対側）に設置し、認証後に人がカメラに向かって歩くようにします。
* **カメラの高さ**—カメラはドア枠の上端より高い位置に設置してください。
* **カメラの視野（FOV）**—ドア枠の下端とカメラの視野の端との間に隙間を空けてください。
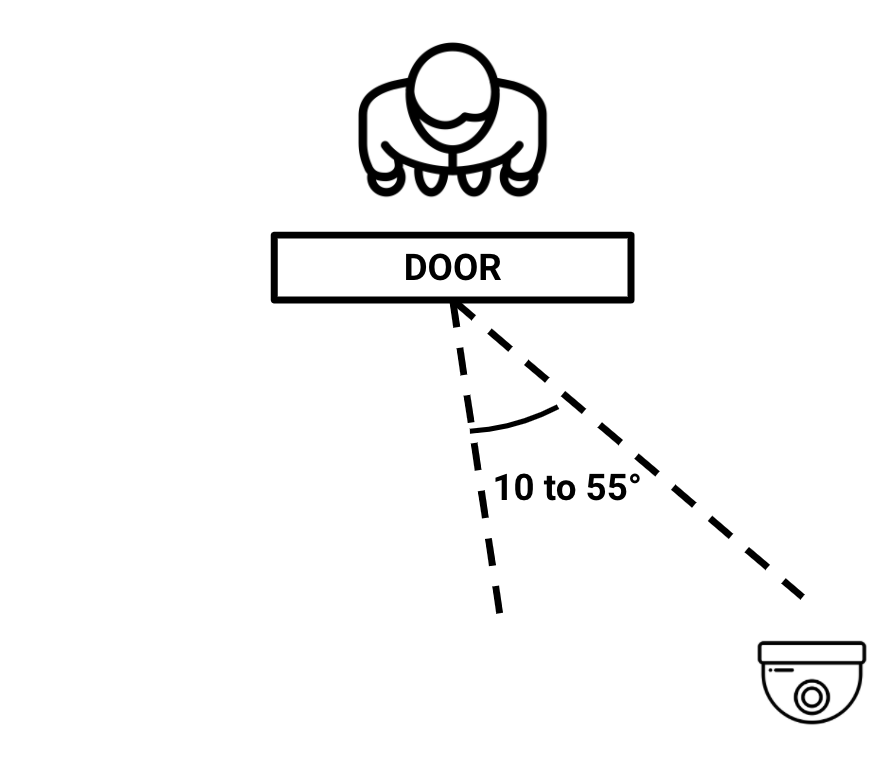
* **カメラの角度**—カメラの角度は、垂直軸に対して10°～55°の範囲に設定してください（ドアを正面から見たときに測定）。\
  ​

  <div data-with-frame="true"><img src="/files/cb66b4508ac806519849dceb259490f008c400d5" alt=""></div>
* **ドアからの最大距離**—最適な結果を得るには、カメラをドアから設置できる最大距離についてこの表を参照してください。

|                                                                                                                                |                |
| ------------------------------------------------------------------------------------------------------------------------------ | -------------- |
| **カメラモデル**                                                                                                                     | **ドアからの最大距離**  |
| [CD42](https://www.verkada.com/security-cameras/dome/cd41/) \| [CD42-E](http://verkada.com/security-cameras/dome/cd41-e/)      | 42フィート（12.8m）  |
| [CD52](https://www.verkada.com/security-cameras/dome/cd51/) \| [CD52-E](https://www.verkada.com/security-cameras/dome/cd51-e/) | 39フィート（11.8m）  |
| [CD62](https://www.verkada.com/security-cameras/dome/cd61/) \| [CD62-E](https://www.verkada.com/security-cameras/dome/cd61-e/) | 50フィート（15.2m）  |
| [CB52-E](https://www.verkada.com/security-cameras/bullet/cb52-e/)                                                              | 43フィート（13.1m）  |
| [CB62-E](https://www.verkada.com/security-cameras/bullet/cb62-e/)                                                              | 62フィート（18.8m）  |
| [CB52-TE](https://www.verkada.com/security-cameras/bullet/cb52-te/)                                                            | 105フィート（32m）   |
| [CB62-TE](https://www.verkada.com/security-cameras/bullet/cb62-te/)                                                            | 140フィート（42.6m） |
| [CM41](https://www.verkada.com/security-cameras/mini/cm41/) \| [CM41-E](https://www.verkada.com/security-cameras/mini/cm41-e/) | 42フィート（12.8m）  |

## テールゲーティング検出を構成する

{% hint style="danger" %}
A [DPI](/access-control/ja/she-ding/configure-a-door-in-command.md) テールゲーティング検出を構成するには、ドアに設置され、設定で有効にされている必要があります。
{% endhint %}

{% stepper %}
{% step %}
**Verkada Command で、All Products > Access に移動します。**
{% endstep %}

{% step %}
**左上のドロップダウンからサイトを選択します。**
{% endstep %}

{% step %}
**テールゲーティングを有効にするドアを選択します。**
{% endstep %}

{% step %}
**［設定］をクリックします。**
{% endstep %}

{% step %}
**［一般］>［カメラのペアリング］で：**

a. の横に **内側** クリック **カメラを追加。**\
b. テールゲーティングを検出するために使用するカメラを選択します。\
c. クリック **完了** して続行します。
{% endstep %}

{% step %}
**Track Tailgating の［内側カメラ］トグルの上にあります。**

a. カメラが推奨設定に従って取り付けられていることを確認し、クリック **次へ**.\
b. グリッド内でドアをハイライトし、ドアがフレームの少なくとも80%を占めていることを確認して、クリック **完了**.
{% endstep %}

{% step %}
**テールゲーティングが検出されると、イベントは3分以内にCommandに表示されます。**
{% endstep %}
{% endstepper %}

{% embed url="<https://player.vimeo.com/video/829700618?h=7cda064008>" %}

***

{% hint style="info" %}
**実際の動作をご覧になりますか？** こちらをご覧ください。 [動画チュートリアル](https://www.youtube.com/watch?v=JGxbyF_wxHw).
{% endhint %}


---

# Agent Instructions
This documentation is published with GitBook. GitBook is the documentation platform designed so that both humans and AI agents can read, navigate, and reason over technical content effectively. Learn more at gitbook.com.

## Querying This Documentation
If you need additional information that is not directly available in this page, you can query the documentation dynamically by asking a question.

Perform an HTTP GET request on the current page URL with the `ask` query parameter, and the optional `goal` query parameter:

```
GET https://help.verkada.com/access-control/ja/toarto/configure-access-control-event-alerts/access-control-tailgate-detection.md?ask=<question>&goal=<endgoal>
```

`ask` is the immediate question: it should be specific, self-contained, and written in natural language.
`goal` is optional and describes the broader end goal you are ultimately trying to accomplish on behalf of the user. GitBook uses it to tailor the answer towards what is most useful for that goal.

The response will contain a direct answer to the question and relevant excerpts and sources from the documentation.

Use this mechanism when the answer is not explicitly present in the current page, you need clarification or additional context, or you want to retrieve related documentation sections.