> For the complete documentation index, see [llms.txt](https://help.verkada.com/llms.txt). Markdown versions of documentation pages are available by appending `.md` to page URLs; this page is available as [Markdown](https://help.verkada.com/classic-alarms/ja/ibentotoarto/configure-alarms-event-alerts/configure-camera-alarm-trigger-events.md).
# カメラのアラームトリガーイベントを構成
アラームトリガーアラート用にカメラを構成する方法を学ぶ
{% hint style="success" %}
Verkadaは、Classic Alarmsの全世界での販売終了日(2026年8月1日)および製品終了日(2027年8月1日)を発表しました。対象のお客様は、2027年1月31日まで追加費用なしでNew Alarmsにアップグレードできます。アクセス [Verkada.com/alarms/upgrade](https://www.verkada.com/alarms/upgrade) 開始するには。
{% endhint %}
Verkada のカメラアラームトリガーは、監視担当者がそのイベントが人物や財産に対する脅威かどうかを判断するための追加情報を提供します。また、 [アラート](/classic-alarms/ja/ibentotoarto/configure-alarms-event-alerts.md) 設定されたアラームトリガーに基づいて。
{% hint style="warning" %}
車両検知イベントは **映像で確認されません** 自動的にアラームが発生します。
{% endhint %}
アラームトリガーの種類についての詳細は以下を参照してください:
* [人物検知](#h_0f8f2047f8)
* [ラインクロッシング](#h_71ccaf8225)
* [滞留](#h_f4fc8818d9)
## 検知はいつ発生しますか?
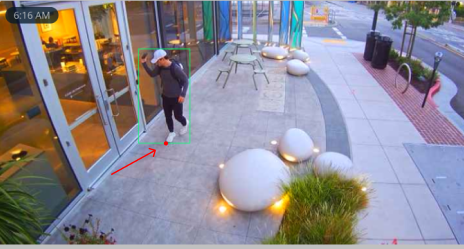
Verkada カメラが物体を検知すると、検知された対象の上に緑のバウンディングボックスが表示されます。カメラの [人物および車両のモーション検索](/verkada-cameras/ja/fen-xi/people-and-vehicle-motion-search.md) またはカメラの履歴動画をスクラブすると表示されます。
人物のバウンディングボックスの下中央が線を横切るか、滞留領域内に入ったときに検知が確定します(大半の場合、それは人物の足です)。
トリガーポイント
{% hint style="warning" %}
利用可能な場合は、人物検知の代わりにラインクロッシング検知と滞留検知を使用してください。滞留検知とラインクロッシングは、CP52 を除く CF81 および第3世代以降のカメラ(型番の末尾が「2」以上のモデル)でのみ利用できます。
{% endhint %}
## アラームトリガーを設定する
{% stepper %}
{% step %}
**Verkada Command で、\[All Products] > \[アラーム] に移動します。**
{% endstep %}
{% step %}
**サイトを選択し、右上の設定をクリックします。**
{% endstep %}
{% step %}
**設定で、アラームトリガーに移動します。**
{% endstep %}
{% step %}
**カメライベントで:**
a. クリック **カメラを選択します。**\
b. 設定するカメラを選択します。\
c. 必要に応じてトリガータイプを設定します。\
d. クリック **完了。**
{% endstep %}
{% step %}
**有効になっているトリガータイプを示すトリガーバッジがカメラに表示されます。**
{% endstep %}
{% step %}
**(任意)必要に応じて他のカメラでも手順4を繰り返します。**
{% endstep %}
{% step %}
**完了したら Done をクリックします。**
{% endstep %}
{% endstepper %}
## アラーム トリガー
### 人物検知
人物検知は、人物のバウンディングボックスのいずれかの部分が設定された関心領域と交差するたびに確定します。
### ラインクロッシング(推奨)
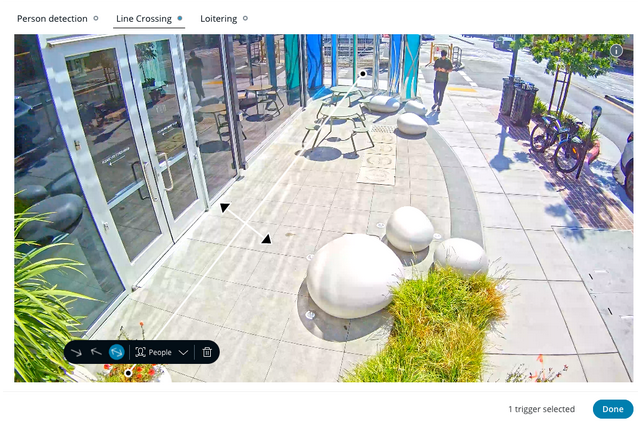
ラインクロッシングでは、検知が発生する前に人物が横切る必要のある一方向または双方向の線を定義できるため、トリガーをより細かく制御できます。
最大4本の線を定義でき、人物や車両が横切ると想定する方向を選択できます。
### 滞留検知
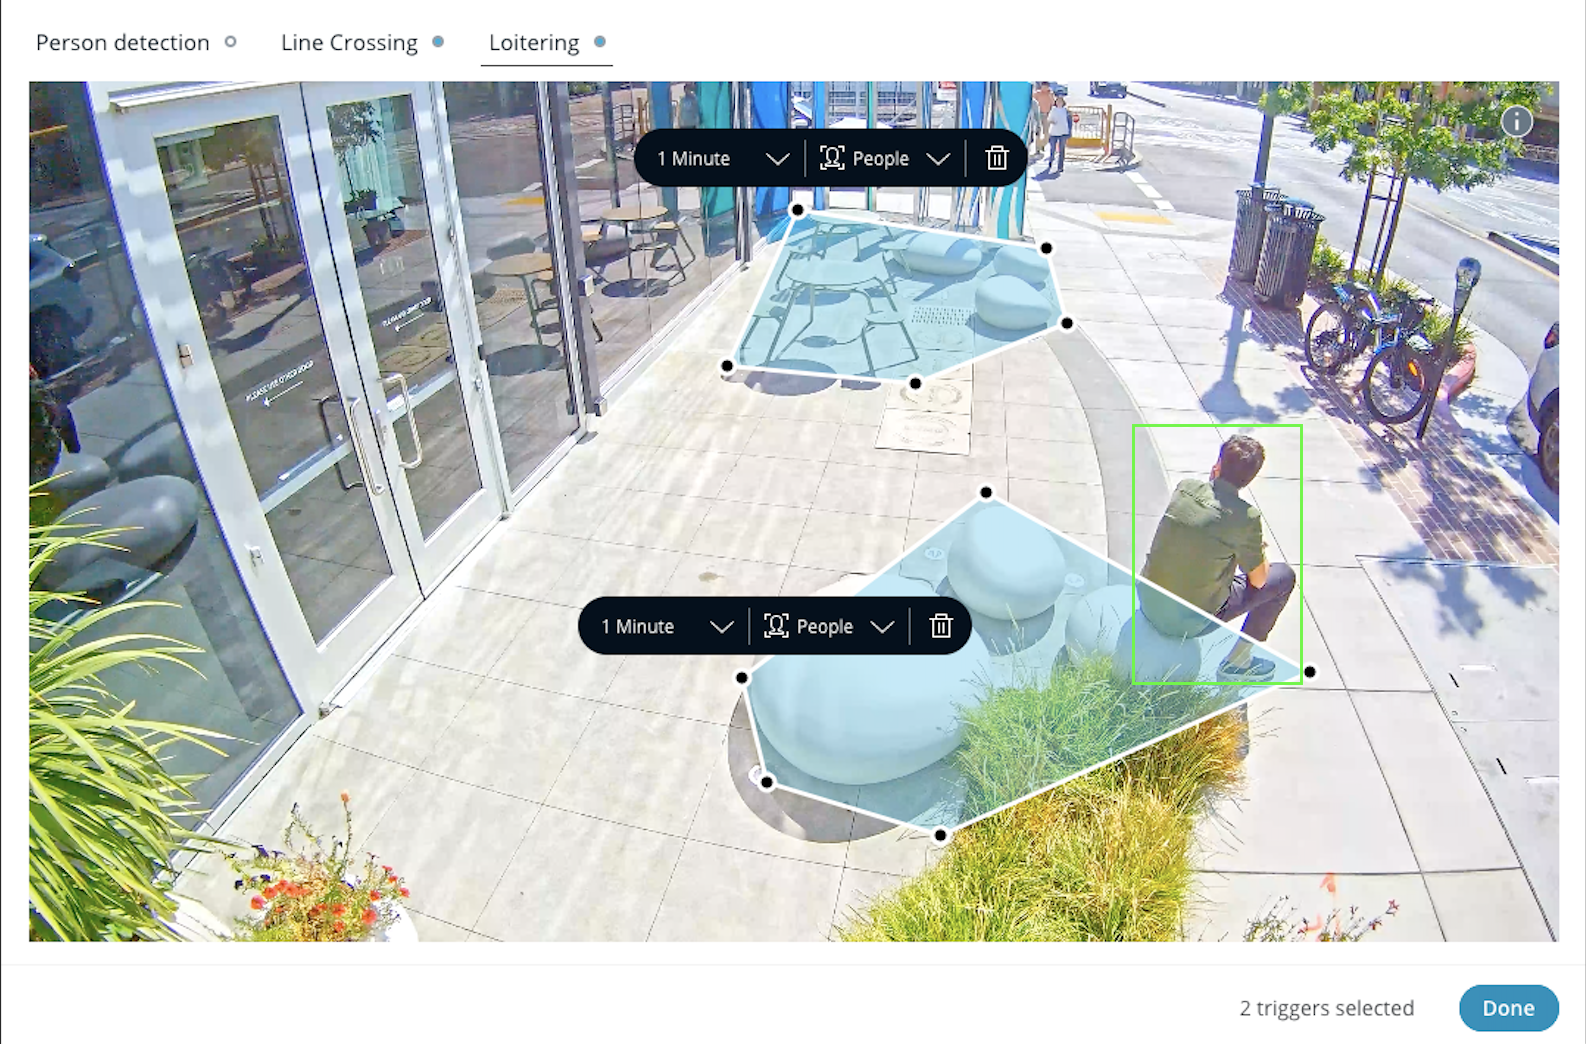
滞留検知では、自由形式のポリゴンで領域を定義し、人物がその領域にどれくらいの時間滞在すると検知が発生するかを設定できます。
最大4つの自由形式ポリゴン領域を定義し、人物がその領域にどれくらいの時間滞在すると検知が発生するかを設定できます。
#### 仕組み
{% stepper %}
{% step %}
**人物のトリガーポイントが滞留領域と交差すると、タイマーが開始されます。**
{% endstep %}
{% step %}
**トリガーポイントがこの領域に設定時間(デフォルトは1分)とどまると、検知イベントが発生します。**
{% endstep %}
{% step %}
**人物のトリガーポイントが4秒以内に一時的に滞留領域を出て再び入った場合、カウンターは継続します。**
{% endstep %}
{% step %}
**カメラが個人の追跡を見失う場合(たとえば、フレーム外へ歩き出た場合)や、トリガーポイントが4秒以上滞留領域の外にある場合、カウンターはリセットされます。**
{% endstep %}
{% endstepper %}
---
# Agent Instructions
This documentation is published with GitBook. GitBook is the documentation platform designed so that both humans and AI agents can read, navigate, and reason over technical content effectively. Learn more at gitbook.com.
## Querying This Documentation
If you need additional information that is not directly available in this page, you can query the documentation by asking a question.
Perform an HTTP GET request on the following URL with the `ask` and `goal` query parameters:
```
GET https://help.verkada.com/classic-alarms/ja/ibentotoarto/configure-alarms-event-alerts/configure-camera-alarm-trigger-events.md?ask=&goal=
```
`ask` is the immediate question: it should be specific, self-contained, and written in natural language.
`goal` is what the user is ultimately trying to achieve, the reason they need the answer. Sharing it helps GitBook give you a better, more relevant answer. A goal is most helpful when it describes the outcome the user wants rather than restating the question. For example, with `ask=how do I create an API token`, a goal like `automate deployments from our CI pipeline` lets GitBook tailor the answer to that use case.
The response will contain a direct answer to the question and relevant excerpts and sources from the documentation.
Use this mechanism when the answer is not explicitly present in the current page, you need clarification or additional context, or you want to retrieve related documentation sections.