> For the complete documentation index, see [llms.txt](https://help.verkada.com/llms.txt). Markdown versions of documentation pages are available by appending `.md` to page URLs; this page is available as [Markdown](https://help.verkada.com/classic-alarms/ja/toraburushtingu/troubleshoot-inrush-current-issues.md).
# 突入電流の問題をトラブルシューティング
AUX 出力の障害と AUX 電源無効の警告について学ぶ
{% hint style="success" %}
Verkadaは、Classic Alarmsの全世界での販売終了日(2026年8月1日)および製品終了日(2027年8月1日)を発表しました。対象のお客様は、2027年1月31日まで追加費用なしでNew Alarmsにアップグレードできます。アクセス [Verkada.com/alarms/upgrade](https://www.verkada.com/alarms/upgrade) 開始するには。
{% endhint %}
## 始める前に
ラッシュ電流の問題とその原因をトラブルシュートしやすくするために、次の用語に慣れておきましょう:
* **静電容量**—材料が電荷を蓄える能力です。コンデンサは、電気回路に静電容量を付加する物理部品です。
* **突入電流**—とも呼ばれます *入力サージ電流* または *電源投入時サージ*—電気機器の電源を初めて入れたときに流れる最大の瞬時入力電流です。一般的に、 **高い** 機器の静電容量が高いほど、 **高い** 個々の機器で発生する突入電流の大きさも大きくなります。
## 突入電流がどのように問題を引き起こすかを理解する
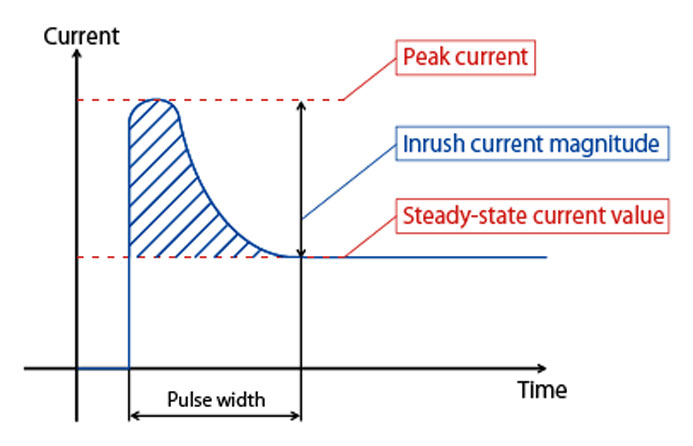
図は、機器の電源投入直後に大きな電流が流れ、その後定常電流へと減少する様子を示しています。ピーク値と突入電流の大きさは、 **数** と **種類** 電気回路内にあるコンデンサの
突入電流とは?
以下の図は、データシート上の電力要件が似ているにもかかわらず、静電容量レベルが異なる2つの異なるモーションセンサーの例です。
| | | |
| --------------------------------- | ---------------- | --------------------------------------------------------------------------------------------------------------------------------------------------------------------------------------------------------------------------------------- |
| **モーションセンサー** | **電源** | **例** |
| **Honeywell IS335(コンデンサ2個)** | 9–15VDC @ 12mA |  |
| **Honeywell DT7235T(コンデンサ10個以上)** | 7.5–16VDC @ 24mA |  |
Honeywell DT7235Tは、 **静電容量と突入電流が大幅に高く、** DUAL TEC機能を支えるために必要なコンデンサの数とサイズのため、Honeywell IS335よりも高くなっています。
## 静電容量の問題を特定する方法
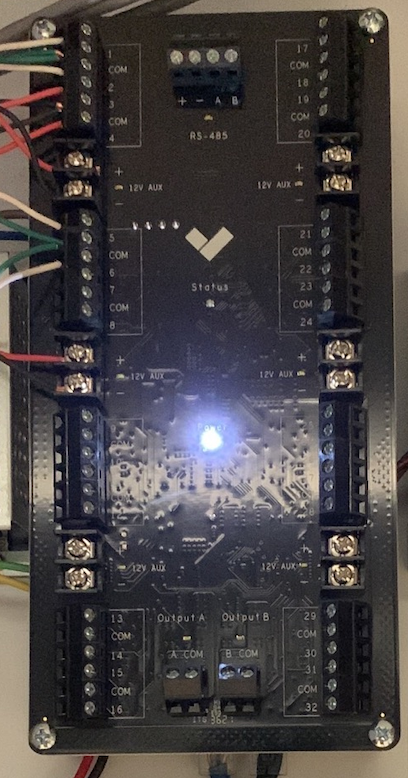
一般的に、静電容量の問題は2通りのうち1つの形で現れます。以下の例で示すように、 [BP41 アラームパネル](/classic-alarms/ja/she-zhi/alarm-setup-and-install-best-practices/configure-and-wire-inputsoutputs-on-the-bp41.md).
* **静電容量の高い機器を有線接続した直後**。機器の突入電流が非常に高いため、 **電圧低下** そこでパネルは **電源を失います** ショートからシステムを保護する内部保護機構により。
* **BP41で電源の再投入、再起動、またはファームウェアのアップグレード後に**。システム起動と **すべての機器** **を一度に** パネルが供給できる量を超え、再び電圧低下が発生してパネルが電源を失います。この問題が初回設置時には見られないのは、次の理由によります:
* パネルはすでに完全に起動した状態にあるためです。
* 外部センサーは1つずつ追加され、有線接続され、各コンポーネントにコンデンサを充電する十分な時間が与えられるためです。
* **デバイスには「AUX 出力障害」の警告が表示され、アラームサイトには「AUX 電源無効」の警告が表示されます。** AUX は、4線式センサーによる突入電流の問題を回避し、システムが起動を続けてオンライン状態を維持できるようにするために無効化されています。\
### 想定されること
これにより、パネルは次の状態になることがあります:
* センサーへの電源供給を停止するまで完全に起動しない
または
* 機器のコンデンサが内部保護機構を回避できる程度まで充電されるまで、起動が遅延する。
通常、パネルのステータス LED は(OFF)、Power LED は(ON)です。
## 突入電流の問題を解決する方法
{% stepper %}
{% step %}
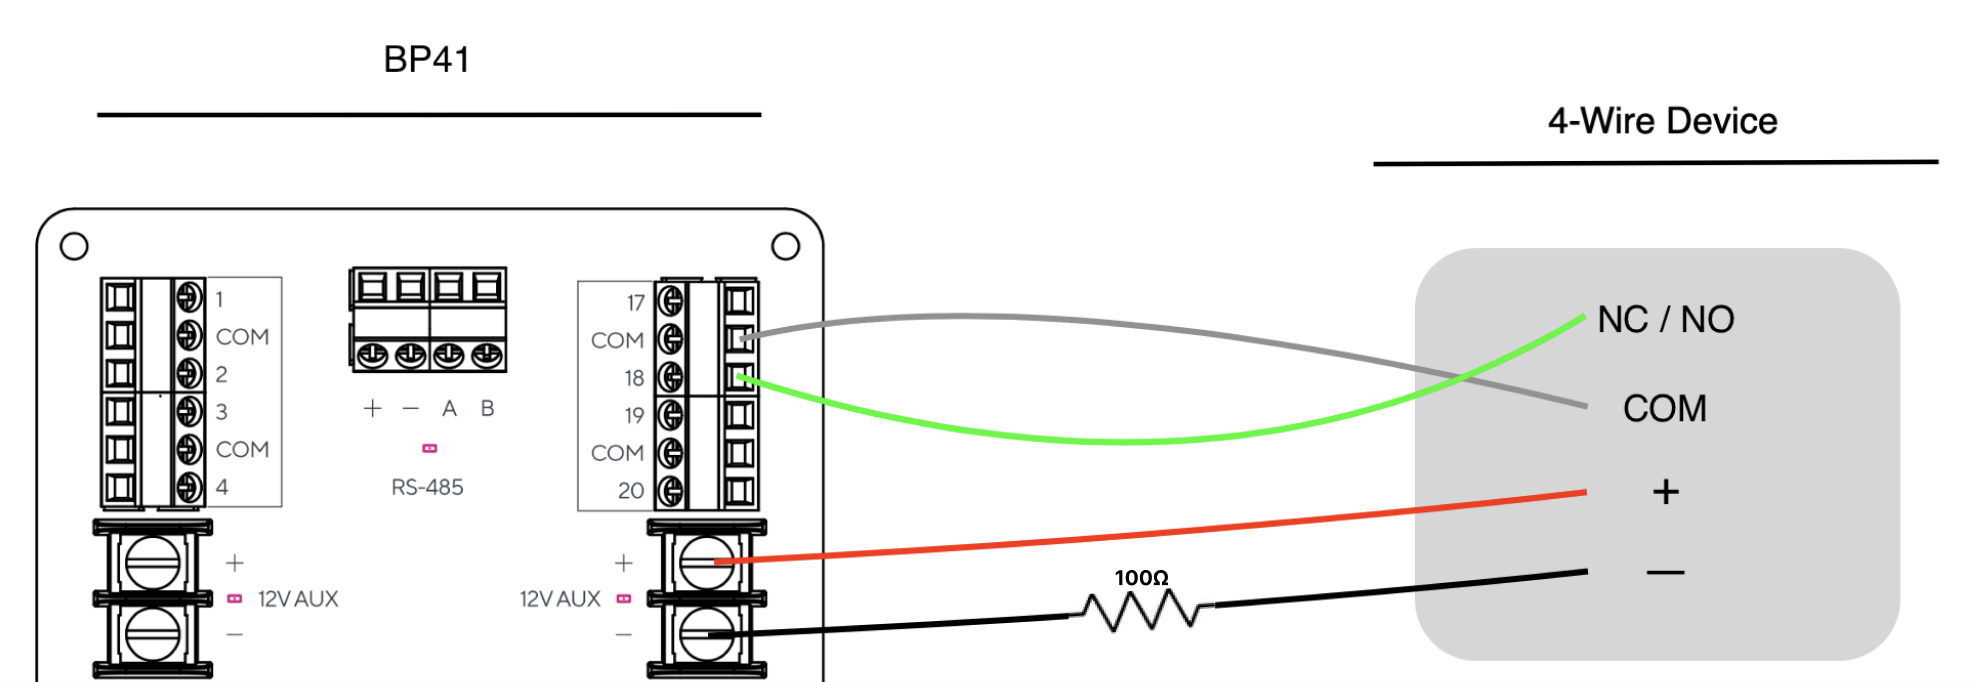
**各センサーの電源ラインに100Ωの抵抗器を直列に配線することを推奨します。これにより、センサーからの電流消費を抑え、電圧低下を回避できます。**
{% endstep %}
{% step %}
**抵抗器を配線した後は、パネルの電源を入れ直してシステムの動作を確認し、パネルが正常に起動することを確認してください。**
{% endstep %}
{% endstepper %}
---
# Agent Instructions
This documentation is published with GitBook. GitBook is the documentation platform designed so that both humans and AI agents can read, navigate, and reason over technical content effectively. Learn more at gitbook.com.
## Querying This Documentation
If you need additional information that is not directly available in this page, you can query the documentation by asking a question.
Perform an HTTP GET request on the following URL with the `ask` and `goal` query parameters:
```
GET https://help.verkada.com/classic-alarms/ja/toraburushtingu/troubleshoot-inrush-current-issues.md?ask=&goal=
```
`ask` is the immediate question: it should be specific, self-contained, and written in natural language.
`goal` is what the user is ultimately trying to achieve, the reason they need the answer. Sharing it helps GitBook give you a better, more relevant answer. A goal is most helpful when it describes the outcome the user wants rather than restating the question. For example, with `ask=how do I create an API token`, a goal like `automate deployments from our CI pipeline` lets GitBook tailor the answer to that use case.
The response will contain a direct answer to the question and relevant excerpts and sources from the documentation.
Use this mechanism when the answer is not explicitly present in the current page, you need clarification or additional context, or you want to retrieve related documentation sections.