> For the complete documentation index, see [llms.txt](https://help.verkada.com/llms.txt). Markdown versions of documentation pages are available by appending `.md` to page URLs; this page is available as [Markdown](https://help.verkada.com/verkada-cameras/ja/she-ding/view-and-edit-camera-settings/set-up-sentry-mode-on-a-ptz-camera/use-handheld-controllers-with-the-ptz.md).
# PTZでハンドヘルドコントローラーを使用する
ハンドヘルドコントローラーでPTZカメラを操作し、最適化されたユーザー体験を実現します
パン・チルト・ズーム(PTZ)カメラでは Verkada Command 内のコントロールを利用できますが、より快適な操作のために、お好みのハンドヘルドコントローラーも使用できます。すべての PTZ カメラには次の 2 つのオプションがあります:
* サードパーティ製ジョイスティック
* Microsoft Xbox コントローラー
***
## Xbox コントローラーを PTZ に接続する
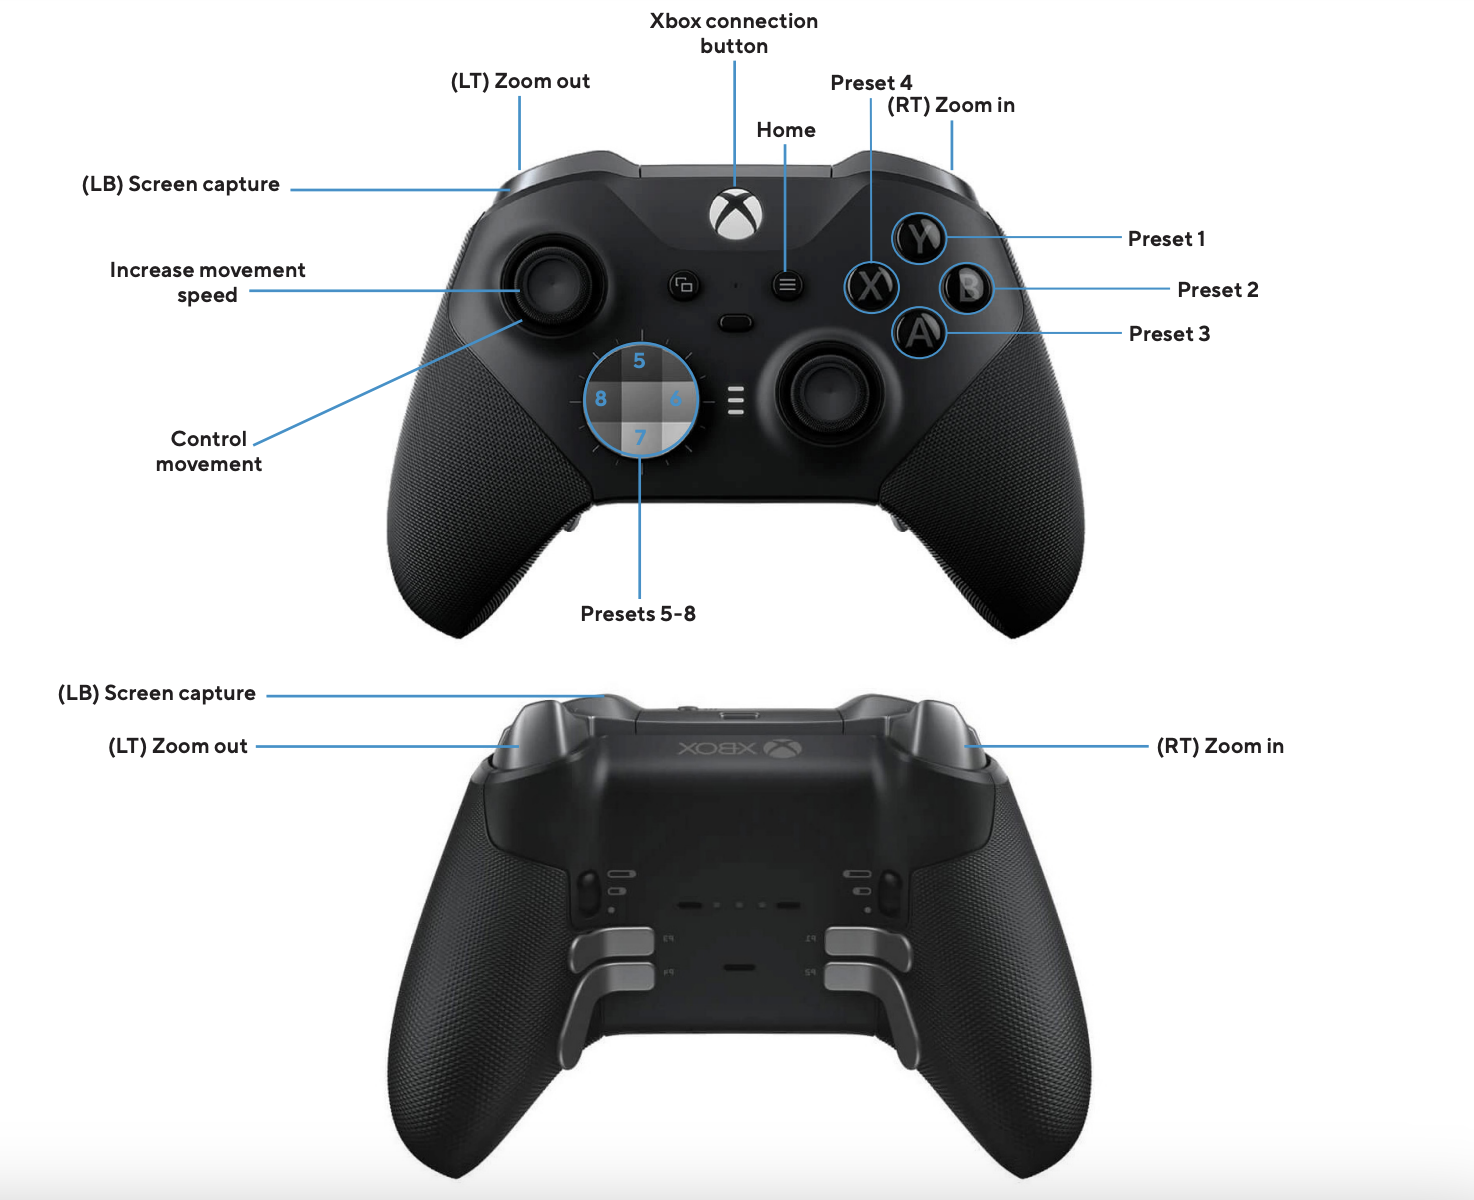
Verkada は、Xbox コントローラー専用に構築されたカスタマイズされた体験を開発しました。設定やボタンマッピングは不要で、Command ユーザーは Xbox コントローラーで PTZ カメラを簡単に操作できます。コントローラーが Xbox デバイスとして認識される限り、あらかじめ設定されたボタンマッピングとともに自動的にコンピューターにペアリングされ、下図のようになります。
### Xbox コントローラーを MacOS に接続する
{% stepper %}
{% step %}
**Bluetooth を使用して Xbox コントローラーを Mac に接続します。** [**詳細を見る**](https://support.apple.com/en-us/111101)
{% endstep %}
{% step %}
**Web ブラウザーが Xbox コントローラーの入力を読み取れるようにします:**
a. 〜に移動します **システム環境設定**。\
b. 選択します **セキュリティとプライバシー** > を選択します **プライバシー**。\
c. 〜に移動します **入力監視** お好みの Web ブラウザーを選択します。\
d. **保存** 変更。
{% endstep %}
{% endstepper %}
{% hint style="warning" %}
Xbox コントローラーは、充電中または USB で iOS コンピューターに接続されている場合は使用できません。コントローラーの接続で問題が発生した場合は、お問い合わせください。 [Verkadaサポート](https://www.verkada.com/contact/).
{% endhint %}
### Xbox コントローラーを Windows に接続する
Bluetooth または USB を使用して Xbox コントローラーを Windows に接続します。 [詳細を見る](https://www.microsoft.com/en-us/windows/learning-center/how-to-connect-xbox-controller-to-pc)
{% hint style="danger" %}
Bluetooth を使用して Xbox コントローラーを PC に接続するには、コンピューターで Windows 10 以降が実行されている必要があります。
{% endhint %}
***
## ジョイスティックを PTZ に接続する
Vivotek AJ-001 と Thrustmaster ジョイスティックを使用して、さまざまなジョイスティックを PTZ カメラに接続し、操作できます。
キーボードマッピングソフトウェアを使用すると、特定のニーズや好みに合わせてコントロールをカスタマイズできます。同じ手順を、任意のサードパーティ製ジョイスティックに適用できます。
### ジョイスティックを MacOS に接続する
#### Vivotek AJ-001
{% stepper %}
{% step %}
**を** [**Joystick Mapper**](https://apps.apple.com/us/app/joystick-mapper/id528183797?mt=12) **iOS App Store のアプリです。**
{% endstep %}
{% step %}
**AJ-001 ジョイスティックを USB 接続で iOS デバイスに接続します。**
{% endstep %}
{% step %}
**接続したら、Joystick Mapper アプリを開きます。**
{% endstep %}
{% step %}
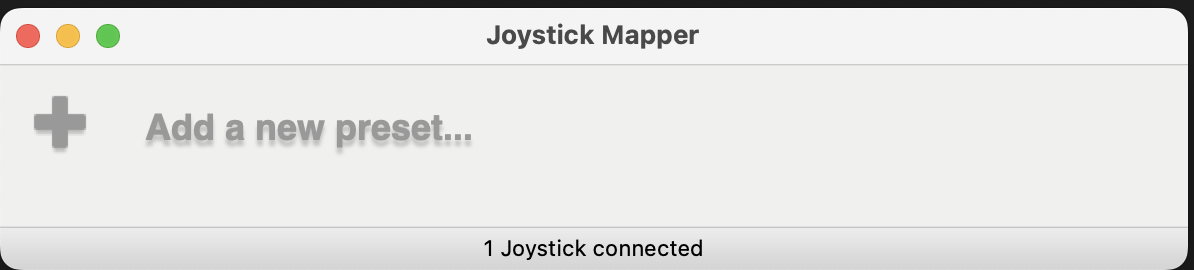
**[新しいプリセットを追加]をクリックして、カスタマイズしたボタンマッピングを作成します。**
{% hint style="warning" %}
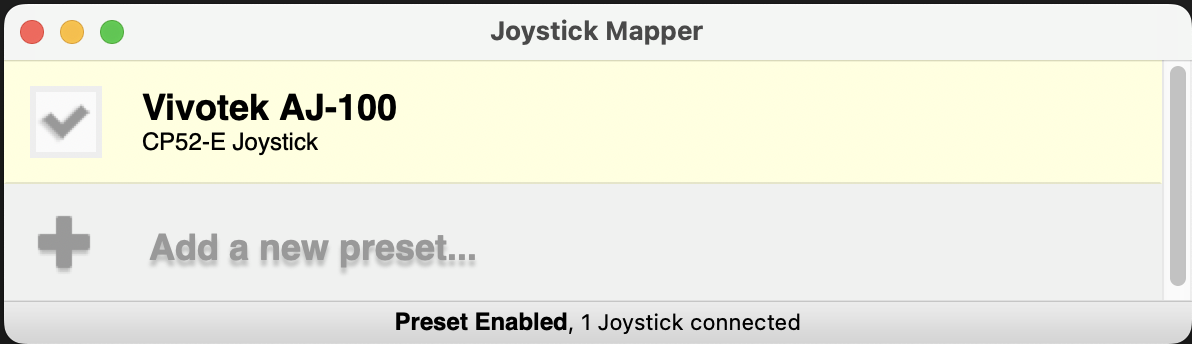
画面下部に「1 Joystick connected」というメッセージが表示されるはずです。以下に示すとおりです。表示されない場合は、ジョイスティックが USB でコンピューターに正しく接続されていることを確認してください\*.\*
{% endhint %}
{% endstep %}
{% step %}
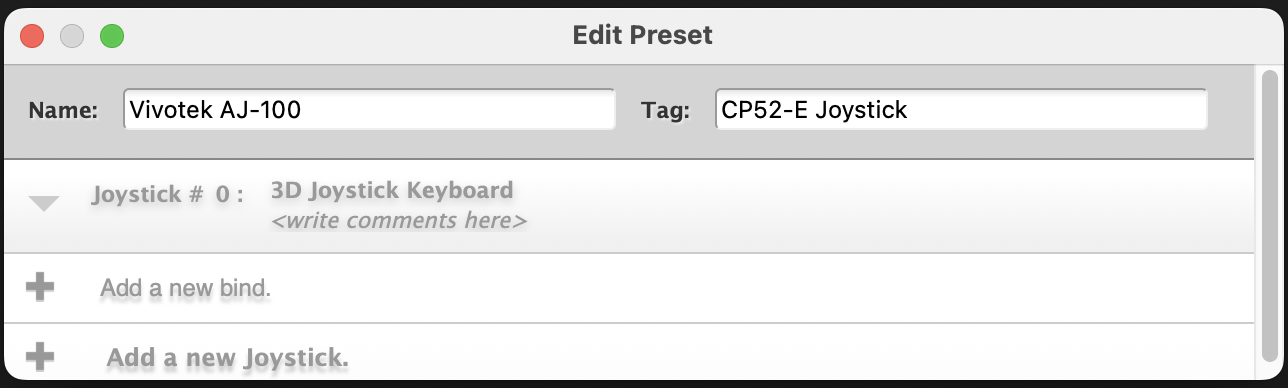
**[プリセットを編集]で:**
1. プリセットを編集し、カスタマイズしたボタンマッピングを作成します。
2. プリセットに名前を付け、必要に応じてタグも付けると、プリセットをより簡単に管理できます。
3. クリックします **新しい割り当てを追加** して、キーボードのキーとジョイスティックコントロール間の割り当てを作成します。
{% endstep %}
{% step %}
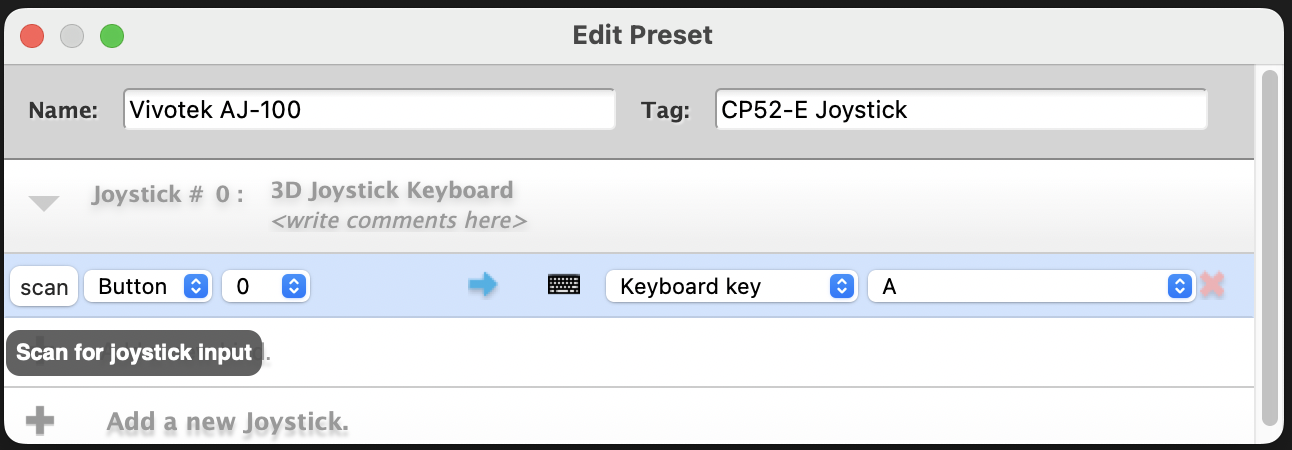
**[プリセットを編集]で[スキャン]をクリックし、新しい割り当てを作成します。**
1. 押したら、数秒以内にジョイスティック入力(軸または特定のボタン)を操作します。すると、その入力は Joystick Mapper によって自動的に検出されます。
2. 入力が検出されたら、ドロップダウンをクリックして、その入力に特定のキーボードの矢印キーを関連付けます。
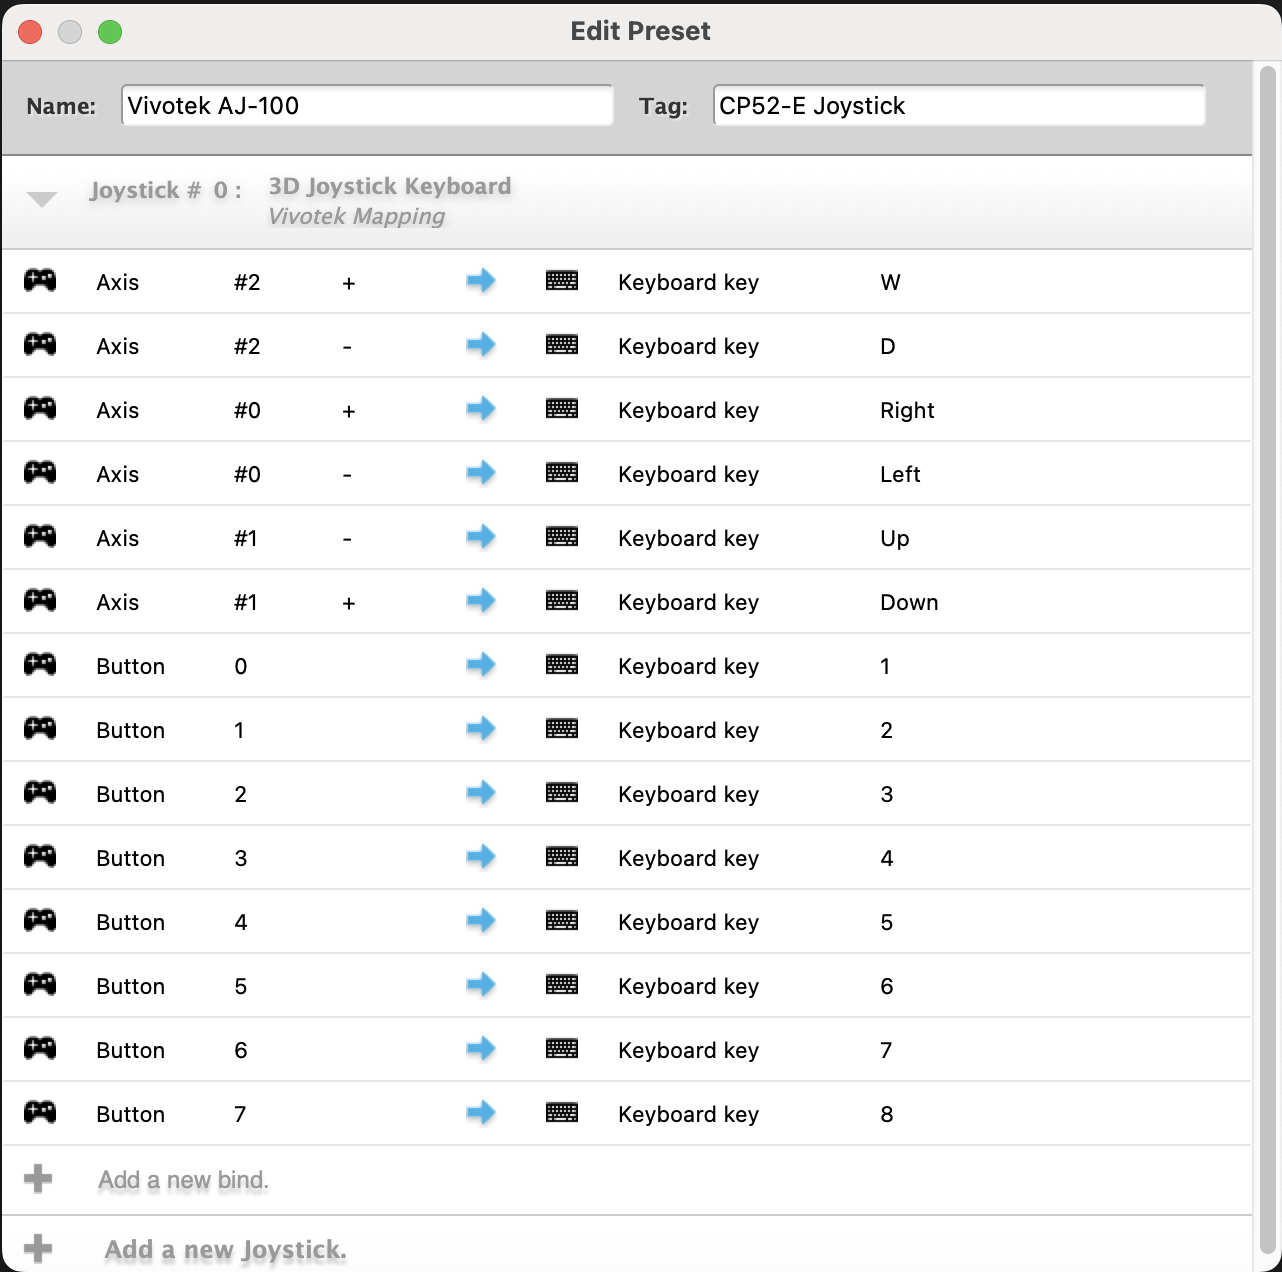
3. (任意)以下を使用してジョイスティックのすべてのボタンと軸の割り当てを作成します: **スキャン** または、ボタンや対応する軸を手動で入力します。
この例では(**推奨**)の PTZ カメラ向けの完全なマッピングを示しています:
{% endstep %}
{% step %}
**マッピングが完了したら、ダイアログを閉じます。変更は保存され、ホームウィンドウで新しく作成したプリセットに合わせて更新されます。**
{% endstep %}
{% step %}
**Joystick Mapper でプリセットのボックスにチェックを入れ、Command で PTZ カメラを開いてジョイスティックを使用します。**
{% endstep %}
{% endstepper %}
#### Thrustmaster HOTAS フライトスティック
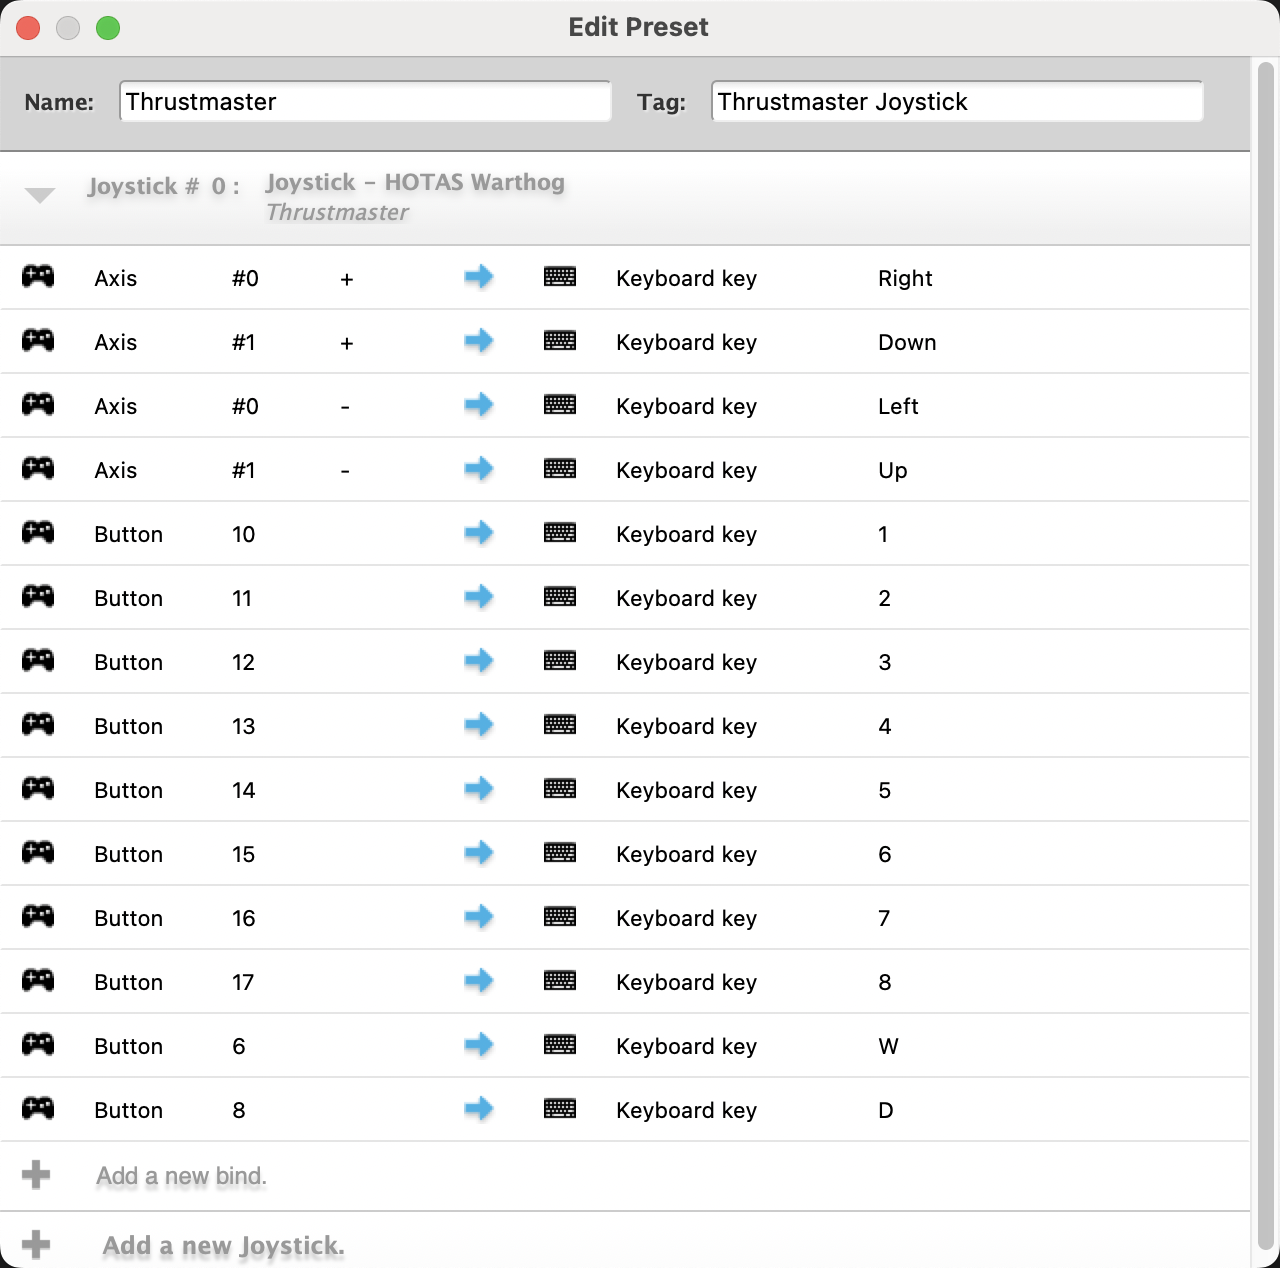
同じ手順に従うことができます [上記のとおり](#h_1b94b4fc3d)、Thrustmaster フライトスティック用のジョイスティックコントロールマッピングを作成できます。以下の画像に示すマッピングを推奨します。ただし、さまざまなユーザーの好みに対応できるよう、各導入環境ごとに固有のマッピングを作成することもできます。
***
### ジョイスティックを Windows に接続する
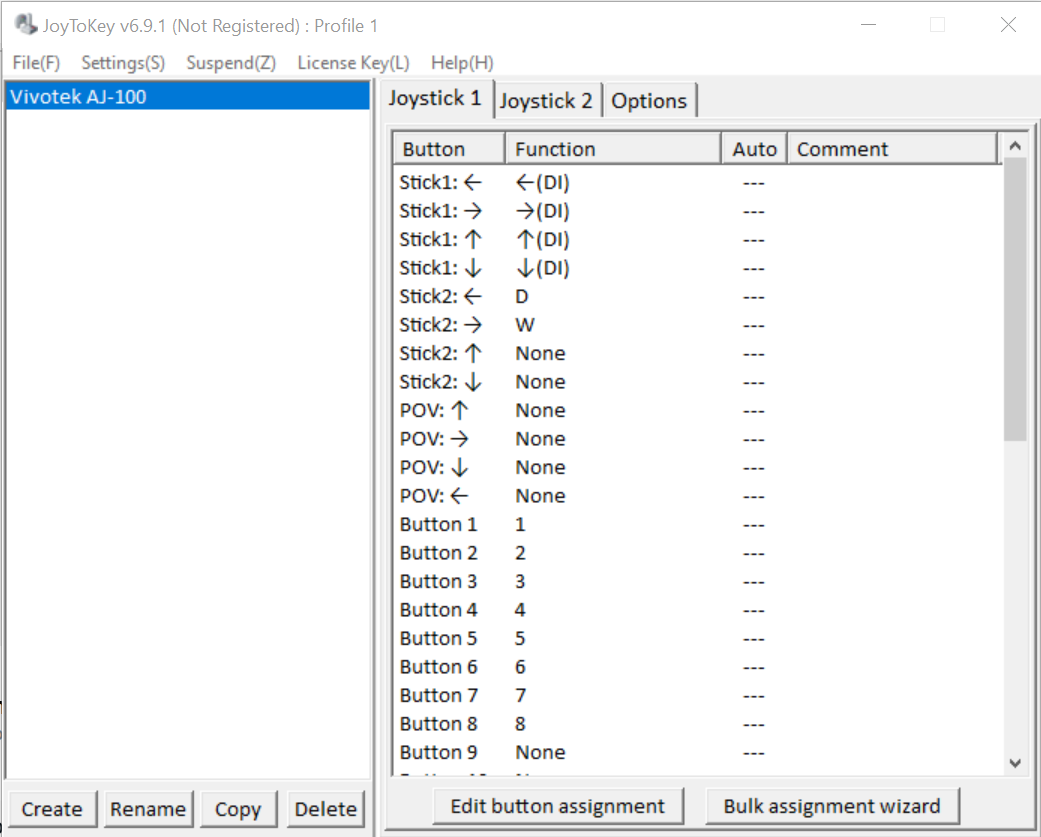
#### Vivotek AJ-100
{% stepper %}
{% step %}
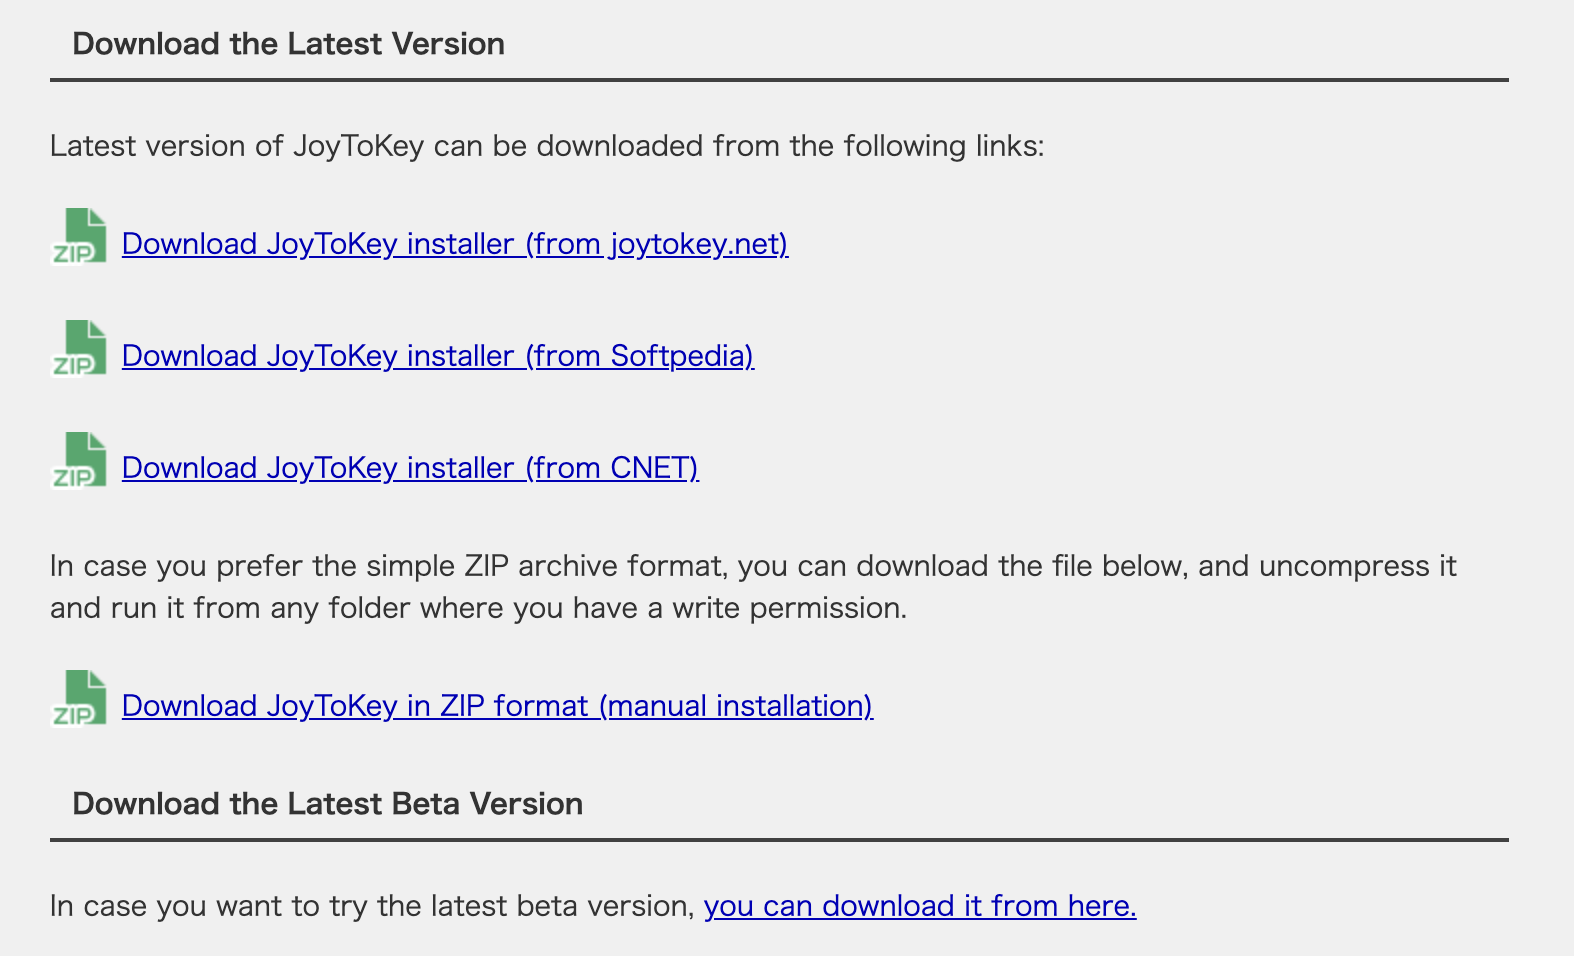
**を** [**JoyToKey**](https://joytokey.net/en/download) **を Web サイトから入手してください。**
{% endstep %}
{% step %}
**AJ-001 ジョイスティックを USB 接続で Windows コンピューターに接続します。USB 接続が確立されたことを示すメッセージが表示されるはずです。**
{% endstep %}
{% step %}
**接続したら、JoyToKey アプリケーションを開きます。**
1. JoyToKey ウィンドウ(左下)で、[ **作成** ]をクリックし、後で識別しやすい名前(たとえば「Vivotek AJ-100」)をプロファイルに付けます。
2. クリックします **OK** してプロファイルを保存します。
{% endstep %}
{% step %}
**プロファイルの作成が確認されたら、ジョイスティックの任意のボタンや軸をキーボードのキーに割り当てることができます。ジョイスティック入力をダブルクリックするか、[ボタン割り当ての編集]をクリックして、マッピング設定メニューを開きます。**
ボタンと軸のマッピングを設定するために、次のウィンドウが別途開きます。
{% endstep %}
{% step %}
**下の黄色で強調表示されたボックスを使用して、ジョイスティックの入力に関連付けるキーボードのキーを選択します(たとえば、左チルト軸を設定するときは、キーボードの左矢印をクリックしてコントロールをペアリングします)。**
{% endstep %}
{% step %}
**入力のマッピングが完了したら、OK をクリックします。**
{% endstep %}
{% step %}
**上記の方法を使用して、ジョイスティックのすべてのボタンと軸に割り当てを作成します。**
この例では(**推奨**)の PTZ カメラ向けの完全なマッピングを示しています:
{% endstep %}
{% step %}
**マッピングが完了したら、上部の[オプション]タブをクリックし、[更新]をクリックします。**
これで現在のプロファイルが保存され、接続されているジョイスティックにマッピングが適用されます。これで PTZ カメラをジョイスティックで操作できるようになりました。
{% endstep %}
{% endstepper %}
#### Thrustmaster HOTAS フライトスティック
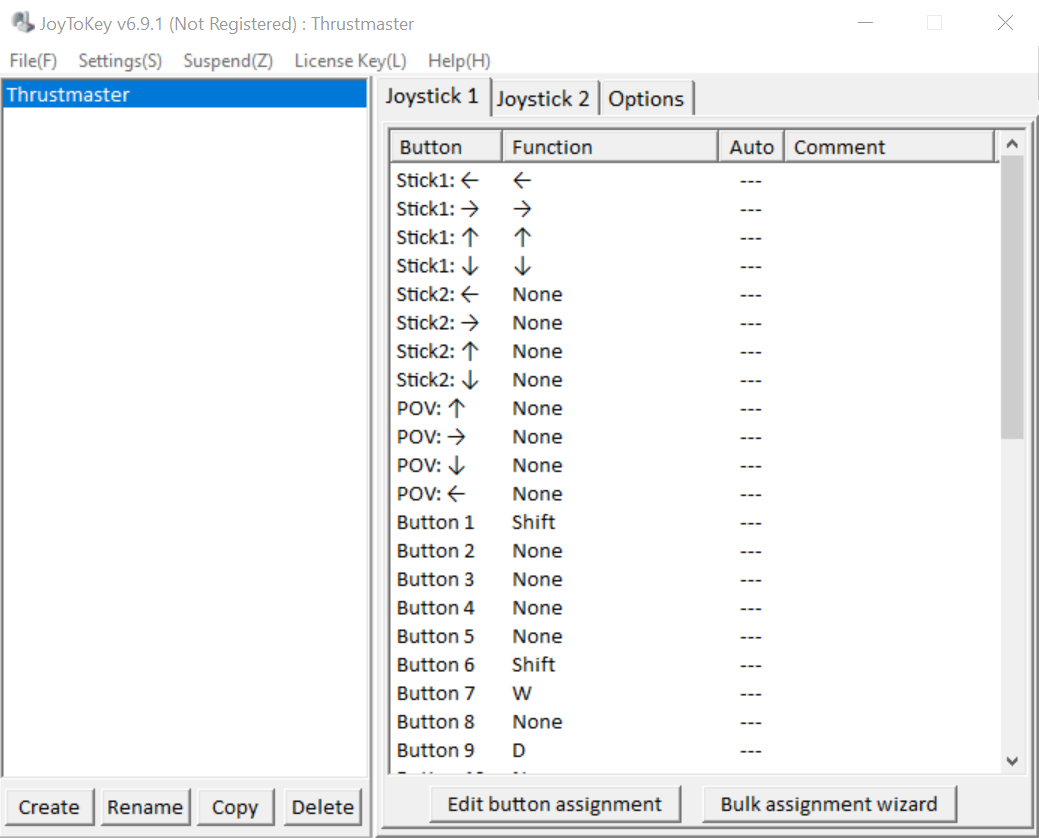
同じ手順に従うことができます [上記のとおり](#h_ec0751fa3a)、Thrustmaster フライトスティックのジョイスティックコントロールマッピングを作成します。下の画像に示すマッピングを推奨します。ただし、さまざまなユーザーの好みに対応するため、導入ごとに固有のマッピングを作成することもできます。
---
# Agent Instructions
This documentation is published with GitBook. GitBook is the documentation platform designed so that both humans and AI agents can read, navigate, and reason over technical content effectively. Learn more at gitbook.com.
## Querying This Documentation
If you need additional information that is not directly available in this page, you can query the documentation by asking a question.
Perform an HTTP GET request on the following URL with the `ask` and `goal` query parameters:
```
GET https://help.verkada.com/verkada-cameras/ja/she-ding/view-and-edit-camera-settings/set-up-sentry-mode-on-a-ptz-camera/use-handheld-controllers-with-the-ptz.md?ask=&goal=
```
`ask` is the immediate question: it should be specific, self-contained, and written in natural language.
`goal` is what the user is ultimately trying to achieve, the reason they need the answer. Sharing it helps GitBook give you a better, more relevant answer. A goal is most helpful when it describes the outcome the user wants rather than restating the question. For example, with `ask=how do I create an API token`, a goal like `automate deployments from our CI pipeline` lets GitBook tailor the answer to that use case.
The response will contain a direct answer to the question and relevant excerpts and sources from the documentation.
Use this mechanism when the answer is not explicitly present in the current page, you need clarification or additional context, or you want to retrieve related documentation sections.