> For the complete documentation index, see [llms.txt](https://help.verkada.com/llms.txt). Markdown versions of documentation pages are available by appending `.md` to page URLs; this page is available as [Markdown](https://help.verkada.com/verkada-cameras/ja/fen-xi/people-and-vehicle-motion-search.md).
# 人と車両のモーション検索
高度なモーション検索で人と車両の移動経路を検索する方法を学びます
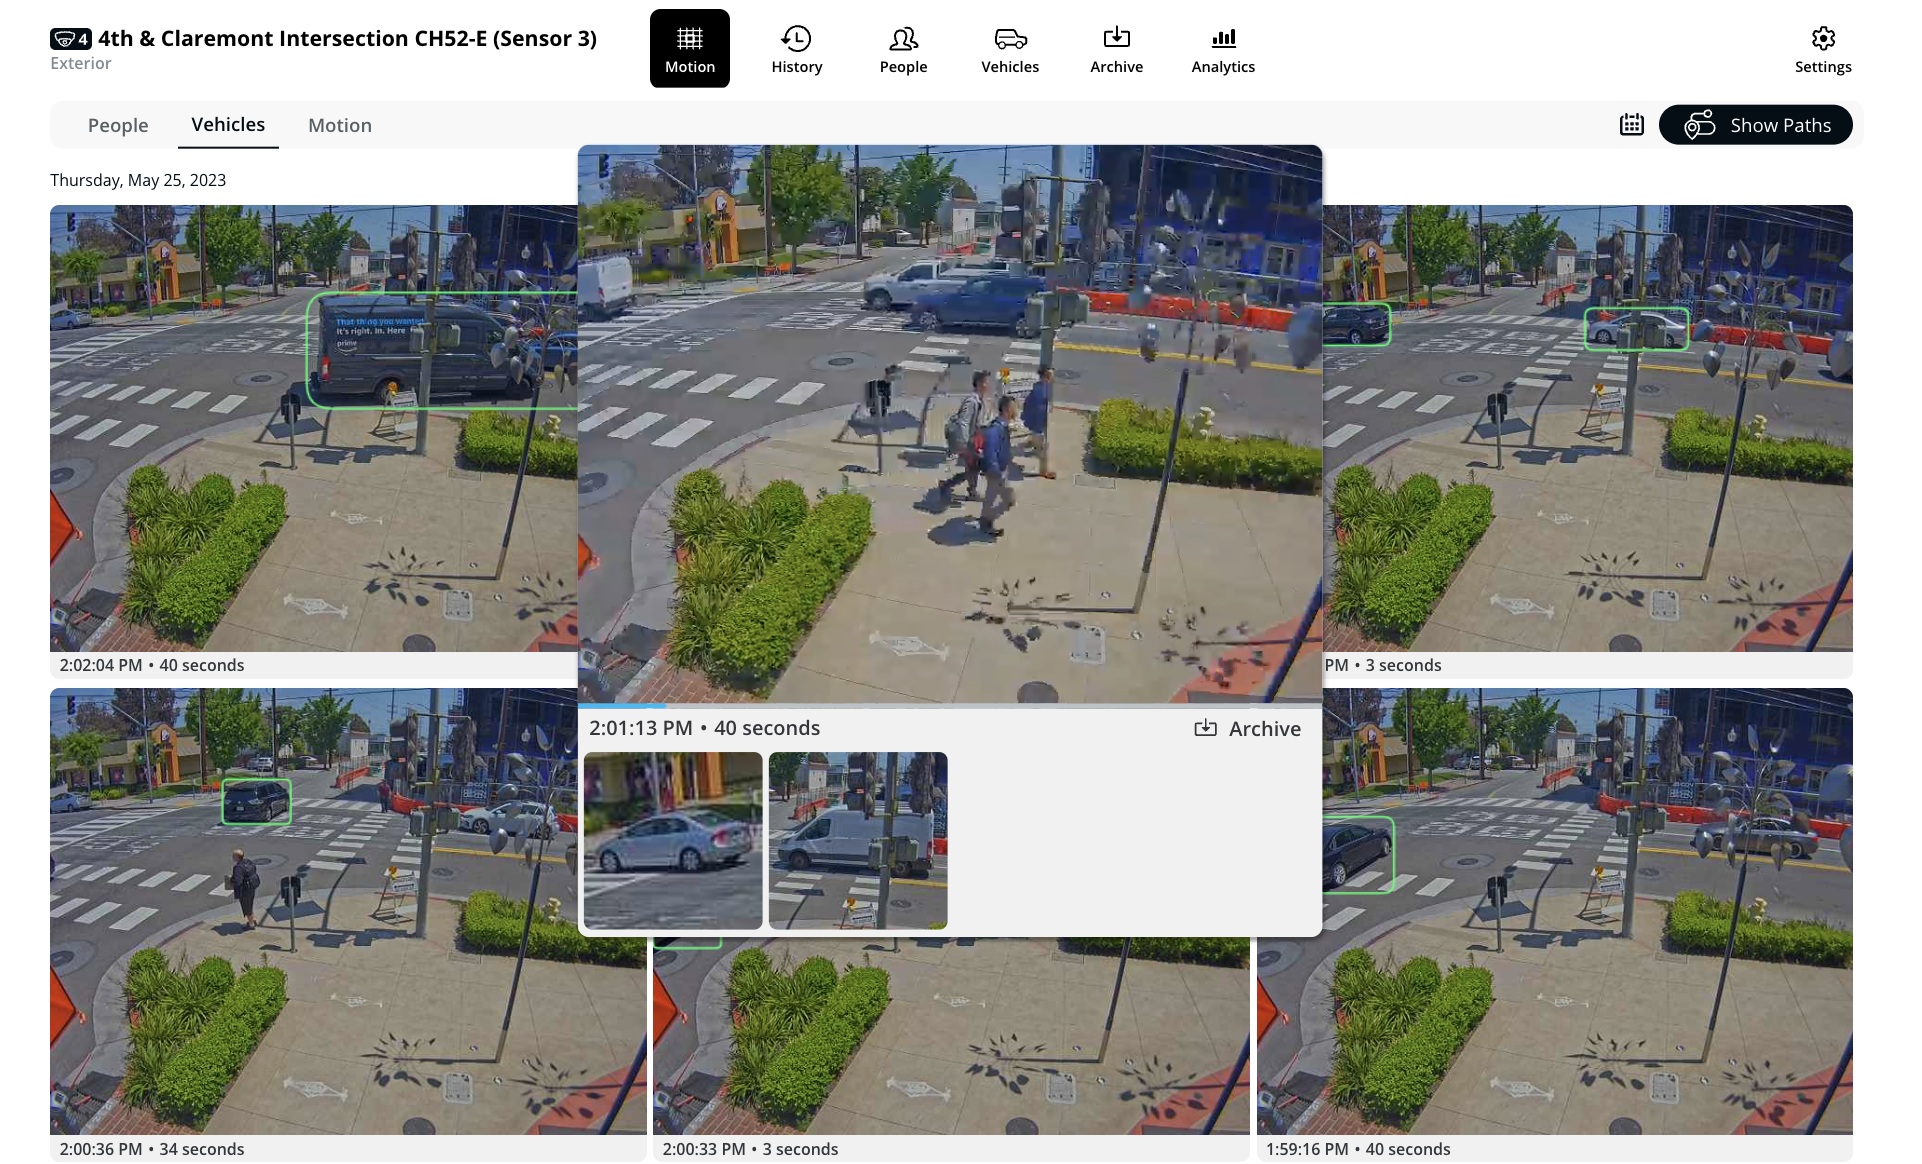
Verkadaの人物および車両検索機能は、高度なコンピュータービジョン機能を使用して、カメラの視野内の人物と車両を識別し、関連するイベントをすばやく見つけます。
Verkada Command のUIでは、即時のビデオ再生プレビューと軌跡表示が可能です。軌跡分析機能により、イベント検索、検出漏れの削減、検出距離の向上、重複の削減が可能になります。
***
## タイムライン上で人物と車両を表示
{% hint style="danger" %}
表示するには、Site Viewer と Site Admin のアクセス権が必要です **動体検知** カメラフィードの下にあるタブ。詳細はこちら [カメラの役割と権限](/verkada-cameras/ja/hajimeni/roles-and-permissions-for-cameras.md).
{% endhint %}
Verkadaカメラによって検出された人物と車両を、過去の映像内で表示できます。
{% stepper %}
{% step %}
**Verkada Command で、\[All Products] > \[Cameras] に移動します。**
{% endstep %}
{% step %}
**フィードを表示するには、カメラを選択します。**
{% endstep %}
{% step %}
**[Motion]タブを選択します。**
{% endstep %}
{% step %}
**右側で[Show Paths]をクリックして、機能のオン/オフを切り替えます。**
アイコンが黒の場合、機能はオンです。
* ビデオフィード上をクリックしてドラッグし、そのエリアの動きを検索するためのグリッドを作成します。
* より詳細に検索するには、人物、車両、日付のフィルターを使用します。
{% endstep %}
{% step %}
**人物または車両タブが選択されているときにサムネイルにカーソルを合わせると、フレーム内の人物または車両の数と、クリップをアーカイブするオプションが表示されます。**
{% hint style="warning" %}
人物および/または車両は、カメラフレーム内で検出された場合にのみ利用できます。
{% endhint %}
{% endstep %}
{% step %}
**プレビューにカーソルを合わせると、個別の軌跡を表示できます。**
{% endstep %}
{% step %}
**サムネイルをクリックすると、録画された映像の該当時刻に移動します。**
{% endstep %}
{% endstepper %}
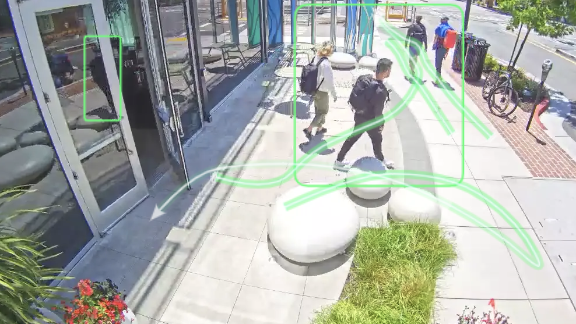
### 人物の軌跡(パス)を表示
人物の軌跡機能は、シーン内を移動する人物の経路を可視化し、検出された各人物の軌跡を表示します。
軌跡により、モーションイベントの再現率が大幅に向上し、カメラはより遠距離の人物と車両を認識できるようになります。各モデルの検出範囲の詳細な内訳については、 [People Analytics ガイド](https://docs.verkada.com/docs/people-analytics-guide.pdf).
{% stepper %}
{% step %}
**Verkada Command で、\[All Products] > \[Cameras] に移動します。**
{% endstep %}
{% step %}
**フィードを表示するには、カメラを選択します。**
{% endstep %}
{% step %}
**[Motion]タブを選択します。**
{% endstep %}
{% step %}
**(任意)ビデオプレーヤーのグリッド上で範囲を選択して、そのエリアの動きを検索します。**
{% endstep %}
{% step %}
**軌跡を表示するには、人物または車両フィルターを選択します。**
{% endstep %}
{% endstepper %}
### MotionXの高度な検索
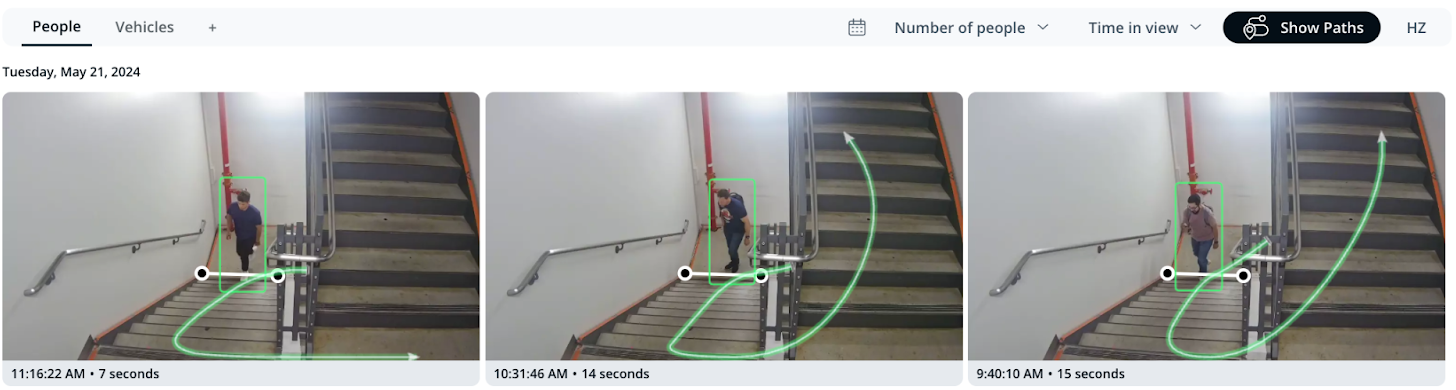
Verkadaは、特定のイベントに基づく高度な検索をサポートしています。フィルターを使用して、次の条件を満たす人物または車両のクリップをすばやく取得できます:
* 特定のラインを横切った
* 表示中の人数が最小人数以上
* 最小時間以上表示されている
各フィルターを個別および組み合わせて使用する方法の詳細は、以下をご覧ください。
#### ライン横断の設定
{% hint style="warning" %}
のみ [CB53-E](https://docs.verkada.com/docs/video-security-cb53-e-datasheet.pdf)/[CB63-E](https://docs.verkada.com/docs/video-security-cb63-e-datasheet.pdf), [CB52-E/CB62-E](https://www.verkada.com/security-cameras/bullet#models), [CD22](https://www.verkada.com/au/security-cameras/dome/cd22/)/[CD22-E](https://www.verkada.com/au/security-cameras/dome/cd22-e/), [CD32](https://www.verkada.com/au/security-cameras/dome/cd32/)/[CD32-E](https://www.verkada.com/au/security-cameras/dome/cd32-e/), [CD42](https://www.verkada.com/security-cameras/dome/cd42/)/[CD42-E](https://www.verkada.com/security-cameras/dome/cd42-e/), [CD43](https://docs.verkada.com/docs/video-security-cd43-datasheet.pdf)/[CD43-E](https://docs.verkada.com/docs/video-security-cd43-e-datasheet.pdf), [CD52](https://www.verkada.com/security-cameras/dome/cd52/)/[CD52-E](https://www.verkada.com/security-cameras/bullet/cb52-e/), [CD53](https://docs.verkada.com/docs/video-security-cd53-datasheet.pdf)/[CD53-E](https://docs.verkada.com/docs/video-security-cd53-e-datasheet.pdf), [CD62](https://www.verkada.com/security-cameras/dome/cd62/)/[CD62-E](https://www.verkada.com/security-cameras/bullet/cb62-e/), [CD63](https://docs.verkada.com/docs/video-security-cd63-datasheet.pdf)/[CD63-E](https://docs.verkada.com/docs/video-security-cd63-e-datasheet.pdf), [CH52-E](https://www.verkada.com/security-cameras/multisensor/ch52-e/), [CH53-E](https://docs.verkada.com/docs/video-security-ch53-e-datasheet.pdf), [CH63-E](https://docs.verkada.com/docs/video-security-ch63-e-datasheet.pdf), [CM22](https://docs.verkada.com/docs/cm22-mini-dome-datasheet.pdf), [CM42](https://www.verkada.com/security-cameras/mini/cm42/), [CM42-S](https://www.verkada.com/security-cameras/mini/cm42-s/), [CR63-E](https://docs.verkada.com/docs/video-security-cr63-e-datasheet.pdf)/[CR63-TE](https://docs.verkada.com/docs/video-security-cr63-te-datasheet.pdf), [CY53-E](https://docs.verkada.com/docs/video-security-cy53-e-datasheet.pdf)、および [CY63-E](https://docs.verkada.com/docs/video-security-cy63-e-datasheet.pdf) カメラのみがこの機能をサポートしています。
{% endhint %}
{% stepper %}
{% step %}
**Verkada Command で、\[All Products] > \[Cameras] に移動します。**
{% endstep %}
{% step %}
**カメラを選択します。**
{% endstep %}
{% step %}
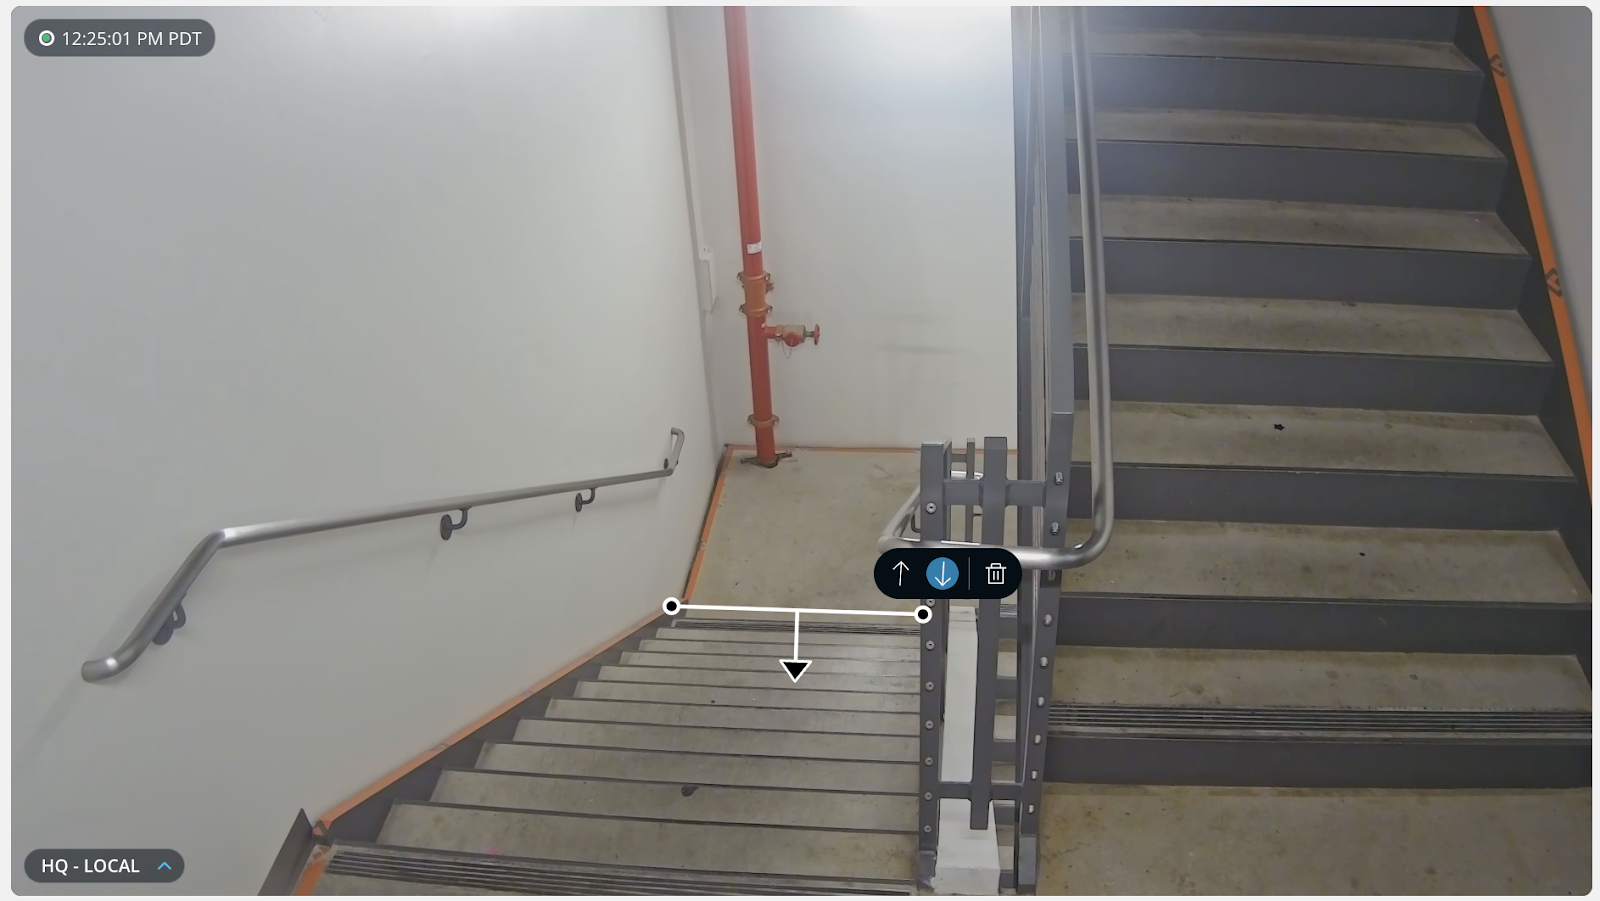
**右側のメニューで、Camera Overlays > Line Crossing Search をクリックします。**
{% endstep %}
{% step %}
**ラインを追加するには:**
a. ライブフィードをクリックして、ラインの開始位置にポイントを置きます。\
b. マウスをドラッグし、ラインの終了位置をクリックします。\
c. ラインを描画した後、方向を選択します。
{% endstep %}
{% step %}
**生成されたモーションのサムネイルには、描画したラインを横切った検出済みオブジェクトが表示されます。**
{% endstep %}
{% endstepper %}
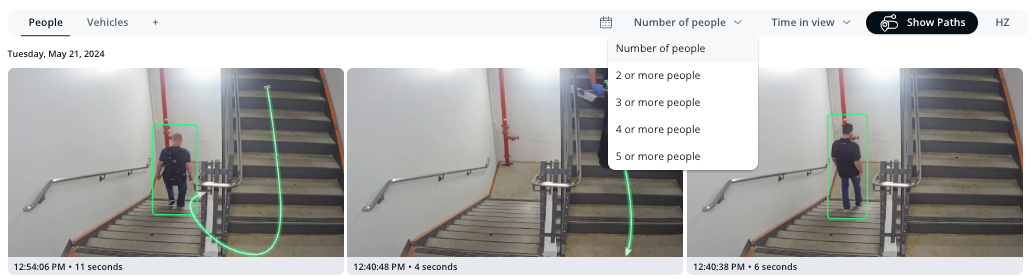
#### フレーム内の人数でフィルター
{% hint style="warning" %}
この機能はすべてのカメラで利用できます。
{% endhint %}
{% stepper %}
{% step %}
**Verkada Command で、\[All Products] > \[Cameras] に移動します。**
{% endstep %}
{% step %}
**[Motion]タブを表示するには、カメラを選択します。**
{% endstep %}
{% step %}
**[Number of People]ドロップダウンからオプションを選択します。**
{% endstep %}
{% step %}
**フィルター適用後の結果には、次の条件に該当するケースのサムネイルが表示されます: *****少なくとも***** 選択した人数以上の人物がフレーム内にいる。**
{% endstep %}
{% endstepper %}
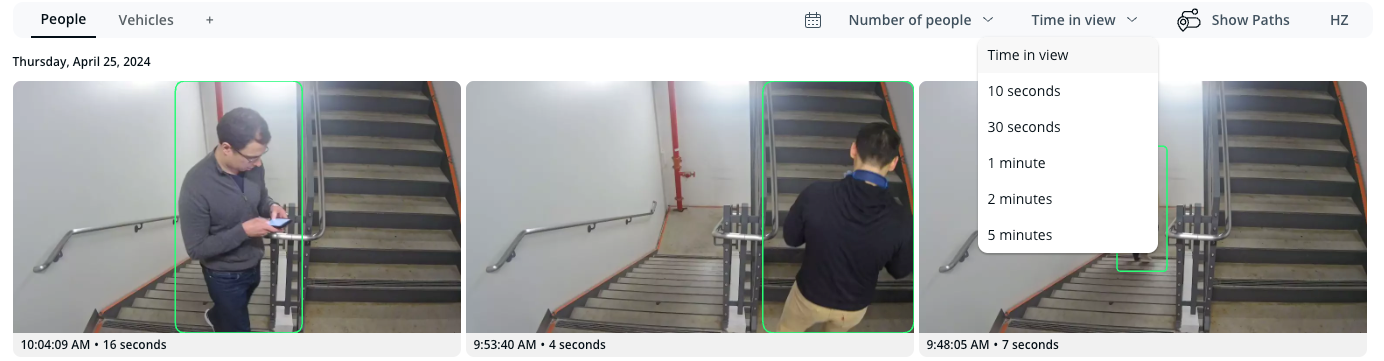
#### 人物/車両が表示されていた時間でフィルター
{% hint style="warning" %}
のみ [CB53-E](https://docs.verkada.com/docs/video-security-cb53-e-datasheet.pdf)/[CB63-E](https://docs.verkada.com/docs/video-security-cb63-e-datasheet.pdf), [CB52-E/CB62-E](https://www.verkada.com/security-cameras/bullet#models), [CD22](https://www.verkada.com/au/security-cameras/dome/cd22/)/[CD22-E](https://www.verkada.com/au/security-cameras/dome/cd22-e/), [CD32](https://www.verkada.com/au/security-cameras/dome/cd32/)/[CD32-E](https://www.verkada.com/au/security-cameras/dome/cd32-e/), [CD42](https://www.verkada.com/security-cameras/dome/cd42/)/[CD42-E](https://www.verkada.com/security-cameras/dome/cd42-e/), [CD43](https://docs.verkada.com/docs/video-security-cd43-datasheet.pdf)/[CD43-E](https://docs.verkada.com/docs/video-security-cd43-e-datasheet.pdf), [CD52](https://www.verkada.com/security-cameras/dome/cd52/)/[CD52-E](https://www.verkada.com/security-cameras/bullet/cb52-e/), [CD53](https://docs.verkada.com/docs/video-security-cd53-datasheet.pdf)/[CD53-E](https://docs.verkada.com/docs/video-security-cd53-e-datasheet.pdf), [CD62](https://www.verkada.com/security-cameras/dome/cd62/)/[CD62-E](https://www.verkada.com/security-cameras/bullet/cb62-e/), [CD63](https://docs.verkada.com/docs/video-security-cd63-datasheet.pdf)/[CD63-E](https://docs.verkada.com/docs/video-security-cd63-e-datasheet.pdf), [CH52-E](https://www.verkada.com/security-cameras/multisensor/ch52-e/), [CH53-E](https://docs.verkada.com/docs/video-security-ch53-e-datasheet.pdf), [CH63-E](https://docs.verkada.com/docs/video-security-ch63-e-datasheet.pdf), [CM22](https://docs.verkada.com/docs/cm22-mini-dome-datasheet.pdf), [CM42](https://www.verkada.com/security-cameras/mini/cm42/), [CM42-S](https://www.verkada.com/security-cameras/mini/cm42-s/), [CR63-E](https://docs.verkada.com/docs/video-security-cr63-e-datasheet.pdf)/[CR63-TE](https://docs.verkada.com/docs/video-security-cr63-te-datasheet.pdf), [CY53-E](https://docs.verkada.com/docs/video-security-cy53-e-datasheet.pdf)、および [CY63-E](https://docs.verkada.com/docs/video-security-cy63-e-datasheet.pdf) カメラのみがこの機能をサポートしています。
{% endhint %}
{% stepper %}
{% step %}
**Verkada Command で、\[All Products] > \[Cameras] に移動します。**
{% endstep %}
{% step %}
**カメラを選択します。**
{% endstep %}
{% step %}
**[Motion]タブで、右上の[Time in view]ドロップダウンをクリックし、時間範囲を選択します。**
{% endstep %}
{% step %}
**フィルター適用後の結果には、次の時間だけ表示されていた一致項目がすべて表示されます: *****少なくとも***** 選択した期間。**
{% endstep %}
{% endstepper %}
{% hint style="info" %}
これらのフィルターを組み合わせると、論理AND演算になります。つまり、すべての条件がすべてのサムネイルに対して同時に真でなければなりません。たとえば、次の条件を設定すると:
* カメラオーバーレイにラインを描画した
* 選択済み **人数:3人以上**
* 選択済み **表示時間:10秒**
結果は、少なくとも3人の人物がラインを横切る記録済みの軌跡を持ち、かつ少なくとも3人の人物がフレーム内におり、かつ少なくとも3人の人物がフレーム内に10秒以上いたケースに絞り込まれます。
{% endhint %}
***
## 対応カメラ
以下の表では、どのカメラモデルが Motion Events をサポートしているか、どのモデルが Motion Trajectories をサポートしているか、またモーションモデルがどこで実行されているかを示します。新しいカメラモデルではモーション検出モデルをローカルで実行できますが、Dシリーズカメラでは引き続き Verkada Cloud に依存して実行されます。
| | | | |
| ---------------------------------------------------------------------------------------------------------------------------------------------------------------------------------------- | ------------- | ----------- | ------------ |
| **モデル** | **モーションイベント** | **モーション軌跡** | **モーションモデル** |
| CB53-E, CB63-E,
CB52-E, CB62-E, CD22, CD32, CD42, CD43, CD52, CD53, CD62, CD63, CF81-E, CF83-E, CH52, CH53, CH63, CM42, CM42-S, CP52-E, CP63-E, CR63-E, CR63-TE, CY53, CY63
| サポートされています | サポートされています | カメラ上で実行 |
| CD31, CD41, CD51, CD61, CM41, CM61 | サポートされています | サポート対象外 | カメラ上で実行 |
| D30, D40, D50, D80 | サポートされています | サポート対象外 | クラウド上で実行 |
***
{% hint style="info" %}
**実際の動作をご覧になりますか?** こちらをご覧ください: [動画チュートリアル](https://www.youtube.com/watch?v=H4f0hVifcWs\&list=PL3USUWfBbtdJpB2F8sOOJOdvv2qlWcfpk\&index=1).
{% endhint %}
---
# Agent Instructions
This documentation is published with GitBook. GitBook is the documentation platform designed so that both humans and AI agents can read, navigate, and reason over technical content effectively. Learn more at gitbook.com.
## Querying This Documentation
If you need additional information that is not directly available in this page, you can query the documentation by asking a question.
Perform an HTTP GET request on the following URL with the `ask` and `goal` query parameters:
```
GET https://help.verkada.com/verkada-cameras/ja/fen-xi/people-and-vehicle-motion-search.md?ask=&goal=
```
`ask` is the immediate question: it should be specific, self-contained, and written in natural language.
`goal` is what the user is ultimately trying to achieve, the reason they need the answer. Sharing it helps GitBook give you a better, more relevant answer. A goal is most helpful when it describes the outcome the user wants rather than restating the question. For example, with `ask=how do I create an API token`, a goal like `automate deployments from our CI pipeline` lets GitBook tailor the answer to that use case.
The response will contain a direct answer to the question and relevant excerpts and sources from the documentation.
Use this mechanism when the answer is not explicitly present in the current page, you need clarification or additional context, or you want to retrieve related documentation sections.