> For the complete documentation index, see [llms.txt](https://help.verkada.com/llms.txt). Markdown versions of documentation pages are available by appending `.md` to page URLs; this page is available as [Markdown](https://help.verkada.com/verkada-cameras/ja/fen-xi/create-camera-event-alerts/occlusion-alerts.md).
# 遮蔽アラート
オクルージョン アラートは、カメラの視界が遮られたり見えにくくなったりした場合にユーザーへ通知し、セキュリティ チームがすべてのカメラで重要な領域を明瞭に監視できるよう支援します。
{% hint style="warning" %}
* オクルージョン アラートは、システムがシーンを学習して基準となる参照画像を作成するため、キャリブレーションに最大 1 日かかる場合があります。このベースラインが確立されると、カメラの視界が妨げられたときにアラートの生成を開始します。
* 遮蔽が発生すると、誤検知を最小限に抑えるため、カメラはアラートを送信する前に約 2 分待機します。
{% endhint %}
{% hint style="danger" %}
* 必要です [Site Admin 権限](/command/ja/yzto/roles-and-permissions-for-command.md) オクルージョン アラートを設定するには、カメラが設置されているサイトで。
* LPR モードのカメラはオクルージョン アラートをサポートしていません。
{% endhint %}
***
## オクルージョン アラートを設定
### **アラートを作成 > イベント**
{% stepper %}
{% step %}
**Command ホームページの左側ナビゲーションで、アラート をクリックします。**
{% endstep %}
{% step %}
**上部で、\[新しいアラート] をクリックします。**
{% endstep %}
{% step %}
**[イベントの選択]で、[カメラ > オクルージョン検出]を選択します。**
{% endstep %}
{% step %}
**[カメラ]で:**
1. アラートの受信元として次を選択します **サイト** または **個別のカメラ**.
2. クリック **完了** して続行します。
{% endstep %}
{% step %}
**[完了]をクリックし、アラートの設定を続行します。** [**通知スケジュール**](#create-alert-greater-than-cameras)**.**
{% endstep %}
{% endstepper %}
### アラートの作成 > 通知スケジュール
{% stepper %}
{% step %}
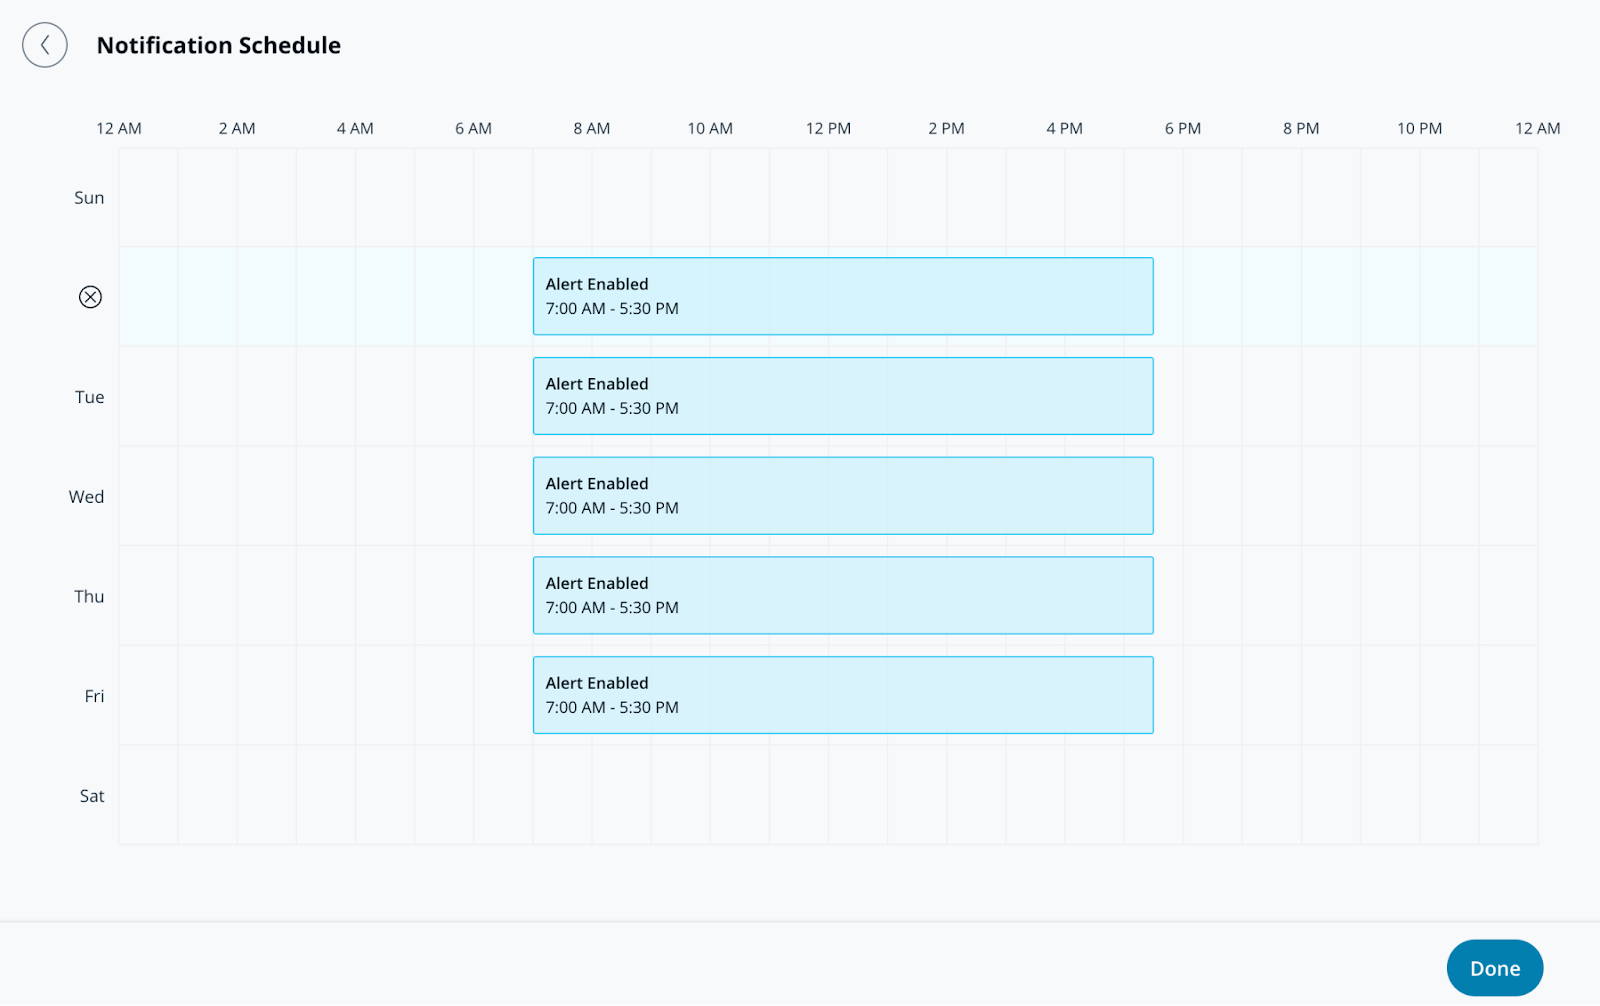
**通知スケジュールでは、アラートが通知を送信する曜日と時刻を指定します。アラートは既定で24時間365日送信されます。**
{% endstep %}
{% step %}
**「完了」をクリックして、アラートの設定を続行します** [**通知**](#create-alert-greater-than-notification)**.**
{% endstep %}
{% endstepper %}
### アラートの作成 > 通知
{% stepper %}
{% step %}
**通知では、ユーザーを個別に追加するか、アラートをグループに割り当てます。**
{% endstep %}
{% step %}
**ユーザーまたはグループの横にあるドロップダウンメニューを選択して、通知方法を選びます。受信者には、プッシュ通知、SMS、メッセージングプラットフォームのアラート、またはメール通知で通知できます。**
{% hint style="info" %}
このアラートに追加された受信者には、以下の **共有アラート** 各自の **アラート** ページ。
{% endhint %}
{% endstep %}
{% step %}
**(オプション)既定では、あなたはアラートの受信者になります。ドロップダウンメニューを選択し、「削除」をクリックして自分を削除します。**
{% endstep %}
{% step %}
**「完了」をクリックして、アラートの** [**オプション設定**](#optional-settings)**、または** [**アラートを完了します**](#finish-the-alert)**.**
{% endstep %}
{% endstepper %}
### オプション設定
#### アラートの作成 > 運用
{% stepper %}
{% step %}
**アラートからチケットを作成するには、[運用へルーティング]をオンにします。**
{% endstep %}
{% step %}
**(オプション)[チケットの手順]を選択してチケットに情報を追加し、「完了」をクリックします。**
{% endstep %}
{% step %}
**「完了」をクリックして次へ進みます** [**アラートを完了します**](#finish-the-alert)**.**
{% endstep %}
{% endstepper %}
#### アラートの作成 > デバイスアクション
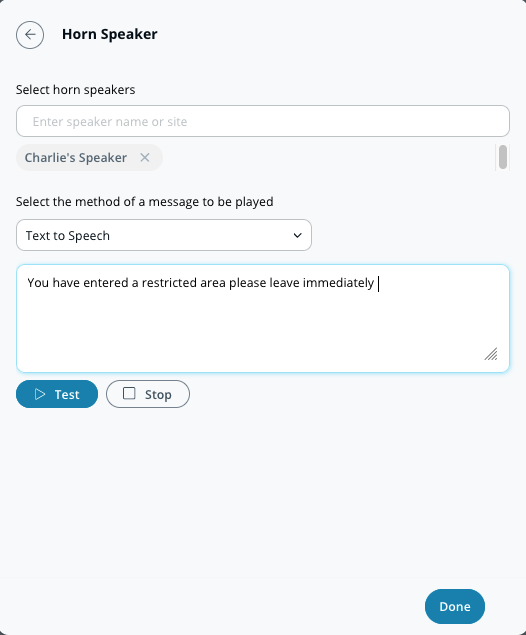
個人への通知に加えて、アラートがトリガーされたときにホーンスピーカーを再生するよう設定できます。これらのアラートは、テキスト読み上げまたはアップロードしたMP3ファイルを使用できます。
{% stepper %}
{% step %}
**デバイスアクションでは、メッセージを再生したいホーンスピーカーを選択します。**
{% endstep %}
{% step %}
**通知の設定を選択します(テキスト読み上げまたは音声ファイル)。**
a. **テキスト読み上げ、** 200文字以内のメッセージを入力します。\
b. **音声ファイル、** ファイルをドラッグ&ドロップするか、 **ファイルを選択** して音声クリップをアップロードします。
{% endstep %}
{% step %}
**「完了」をクリックして次へ進みます** [**アラートを完了します**](#finish-the-alert)**.**
{% endstep %}
{% endstepper %}
### アラートを完了する
{% stepper %}
{% step %}
**構成ウィンドウの右下で、「次へ」をクリックします。**
{% endstep %}
{% step %}
**アラートの説明的な名前を入力します。**
{% endstep %}
{% step %}
**設定を完了するには、「完了」をクリックします。**
{% endstep %}
{% endstepper %}
---
# Agent Instructions
This documentation is published with GitBook. GitBook is the documentation platform designed so that both humans and AI agents can read, navigate, and reason over technical content effectively. Learn more at gitbook.com.
## Querying This Documentation
If you need additional information that is not directly available in this page, you can query the documentation by asking a question.
Perform an HTTP GET request on the following URL with the `ask` and `goal` query parameters:
```
GET https://help.verkada.com/verkada-cameras/ja/fen-xi/create-camera-event-alerts/occlusion-alerts.md?ask=&goal=
```
`ask` is the immediate question: it should be specific, self-contained, and written in natural language.
`goal` is what the user is ultimately trying to achieve, the reason they need the answer. Sharing it helps GitBook give you a better, more relevant answer. A goal is most helpful when it describes the outcome the user wants rather than restating the question. For example, with `ask=how do I create an API token`, a goal like `automate deployments from our CI pipeline` lets GitBook tailor the answer to that use case.
The response will contain a direct answer to the question and relevant excerpts and sources from the documentation.
Use this mechanism when the answer is not explicitly present in the current page, you need clarification or additional context, or you want to retrieve related documentation sections.