> For the complete documentation index, see [llms.txt](https://help.verkada.com/llms.txt). Markdown versions of documentation pages are available by appending `.md` to page URLs; this page is available as [Markdown](https://help.verkada.com/verkada-cameras/ja/bideonosutorminguto/view-historical-footage/history-player-search-and-unified-timeline.md).
# 統合タイムライン
AI 搭載検索を使用して、異なるカメラのビデオイベントを自動的に特定し、地図ベースの 1 つのタイムラインにまとめます。
History Player Searchを使うと、複数のカメラを横断して人物や車両をすばやく特定し、その移動のタイムラインを作成できます。これにより、映像を手動で早送りしながら探す必要がなくなり、注目対象の人物や車両をシームレスかつ効率的に追跡できます。
AIを活用したUnified Timelineは、すべてのカメラのビデオイベントを1つの地図ベースのビューに統合します。イベントの前後6時間(合計12時間)の範囲を自動で検索し、人物や車両の移動全体を再構築して、調査時間を短縮します。
{% hint style="warning" %}
各Unified Timelineには、1人の人物、1台の車両、またはその両方の組み合わせを含めることができます。1人の移動を追跡したり、車両のルートを追ったり、同じタイムライン内で人物と車両がどのようにやり取りするかを確認できます。
{% endhint %}
***
### 人物を検索
{% hint style="danger" %}
この機能を使用するには、カメラで顔検出および/または人物属性、ならびに既定のHistory Player Search設定を有効にする必要があります。最適な精度を得るには、顔がはっきり見えるようにしてください。帽子やマスクなどの遮蔽物は検出品質に影響する可能性があります。参照 [People Analytics のユーザーガイド](https://docs.verkada.com/docs/people-analytics-guide.pdf) ベストプラクティスのガイドライン。
{% endhint %}
{% stepper %}
{% step %}
**Verkada Command で、\[All Products] > \[Cameras] に移動します。**
{% endstep %}
{% step %}
**カメラを選択し、[履歴]をクリックします。**
{% hint style="info" %}
顔検出、属性検索、またはAIを活用した検索を使って、History Player Searchにアクセスすることもできます。
{% endhint %}
{% endstep %}
{% step %}
**右下で、** :gear: **そしてUnified Timelineを選択します。**
使用する検索モデルを選択します:
* **顔検出:** 顔認識に基づいて人物を特定します。
* **外見検索:** 服装や身体的特徴に基づいて人物を特定します。
{% hint style="danger" %}
両方のモデルを同時に使用するには、カメラで顔検出と人物属性の両方が有効になっていることを確認してください。
{% endhint %}
{% endstep %}
{% step %}
**確認したい日付と時刻を選択します。**
{% endstep %}
{% step %}
**対象の人物が表示されたら、History Playerを一時停止します。**
{% endstep %}
{% step %}
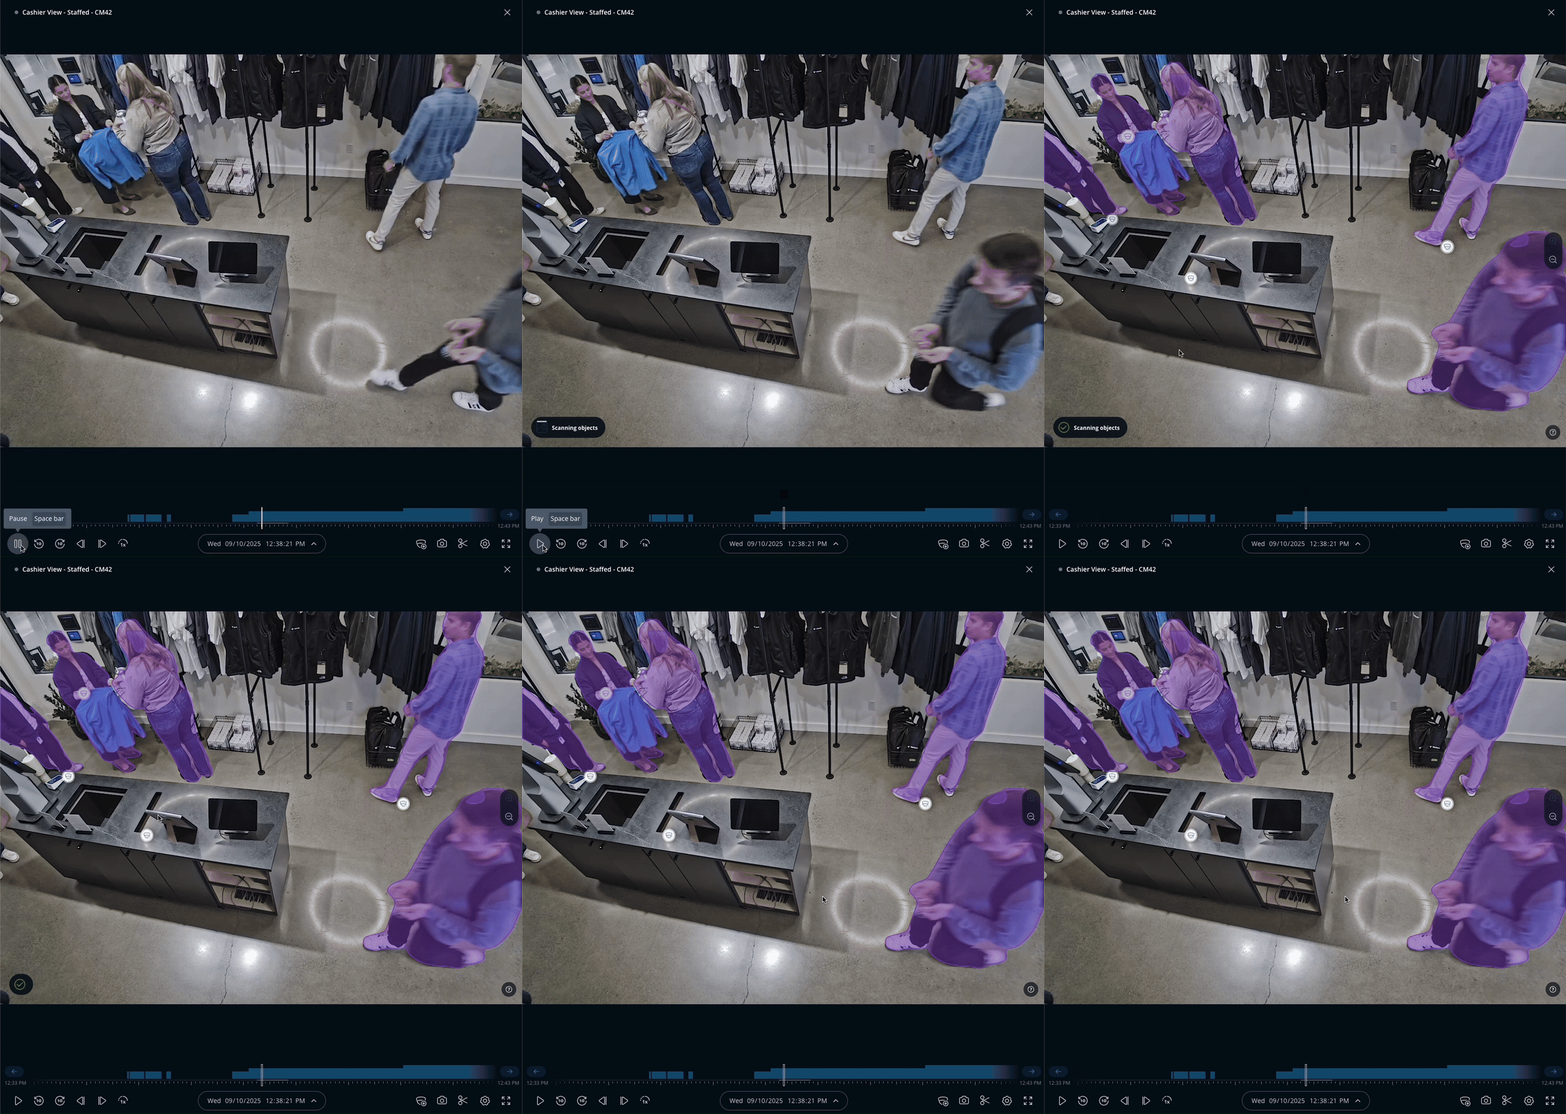
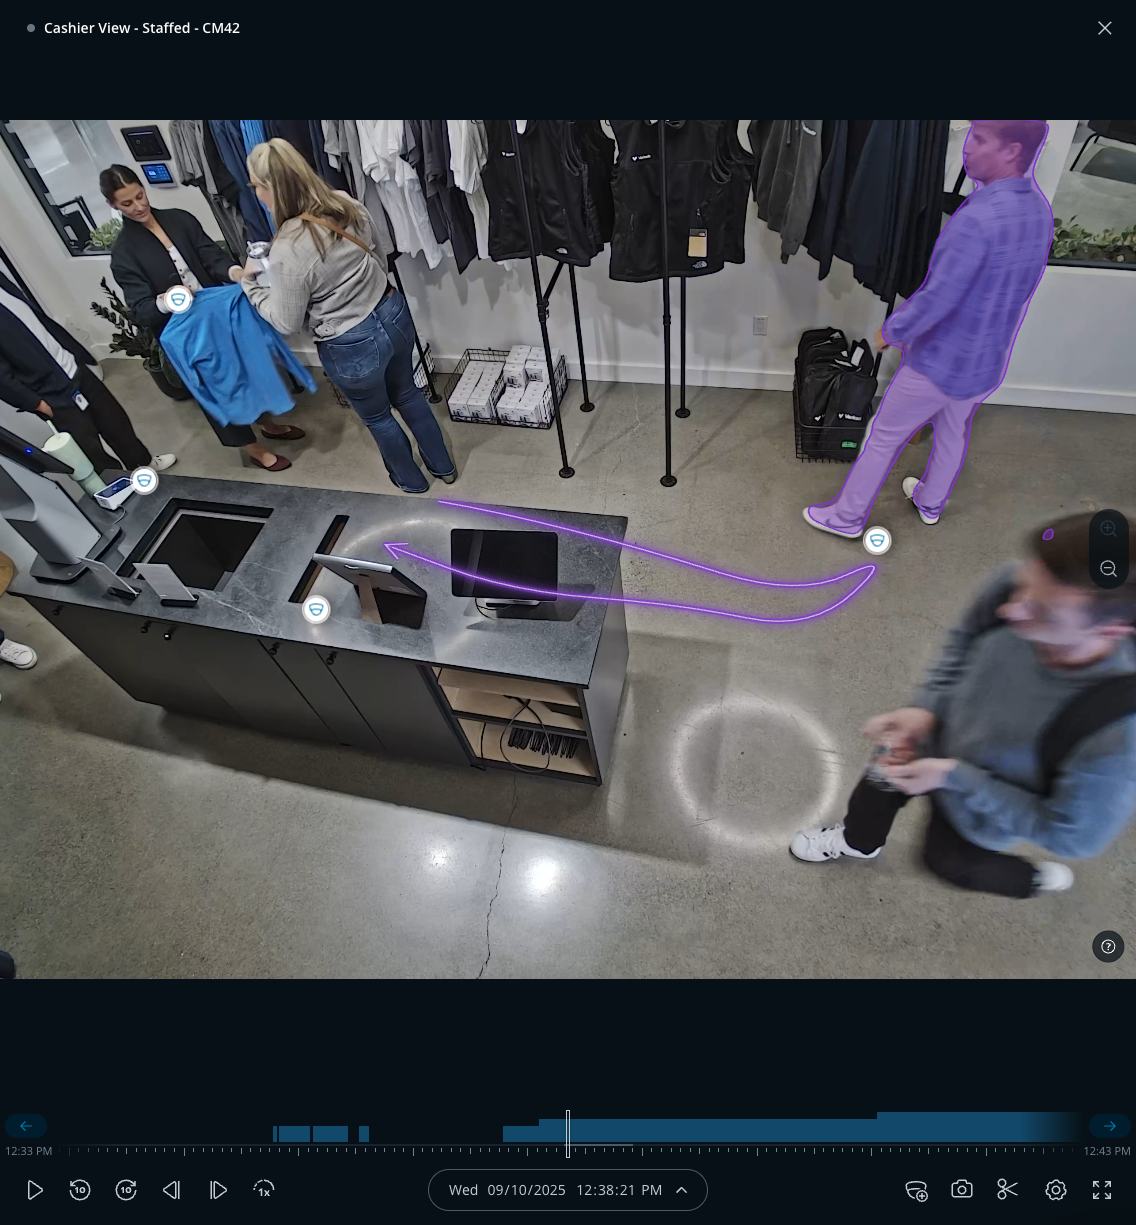
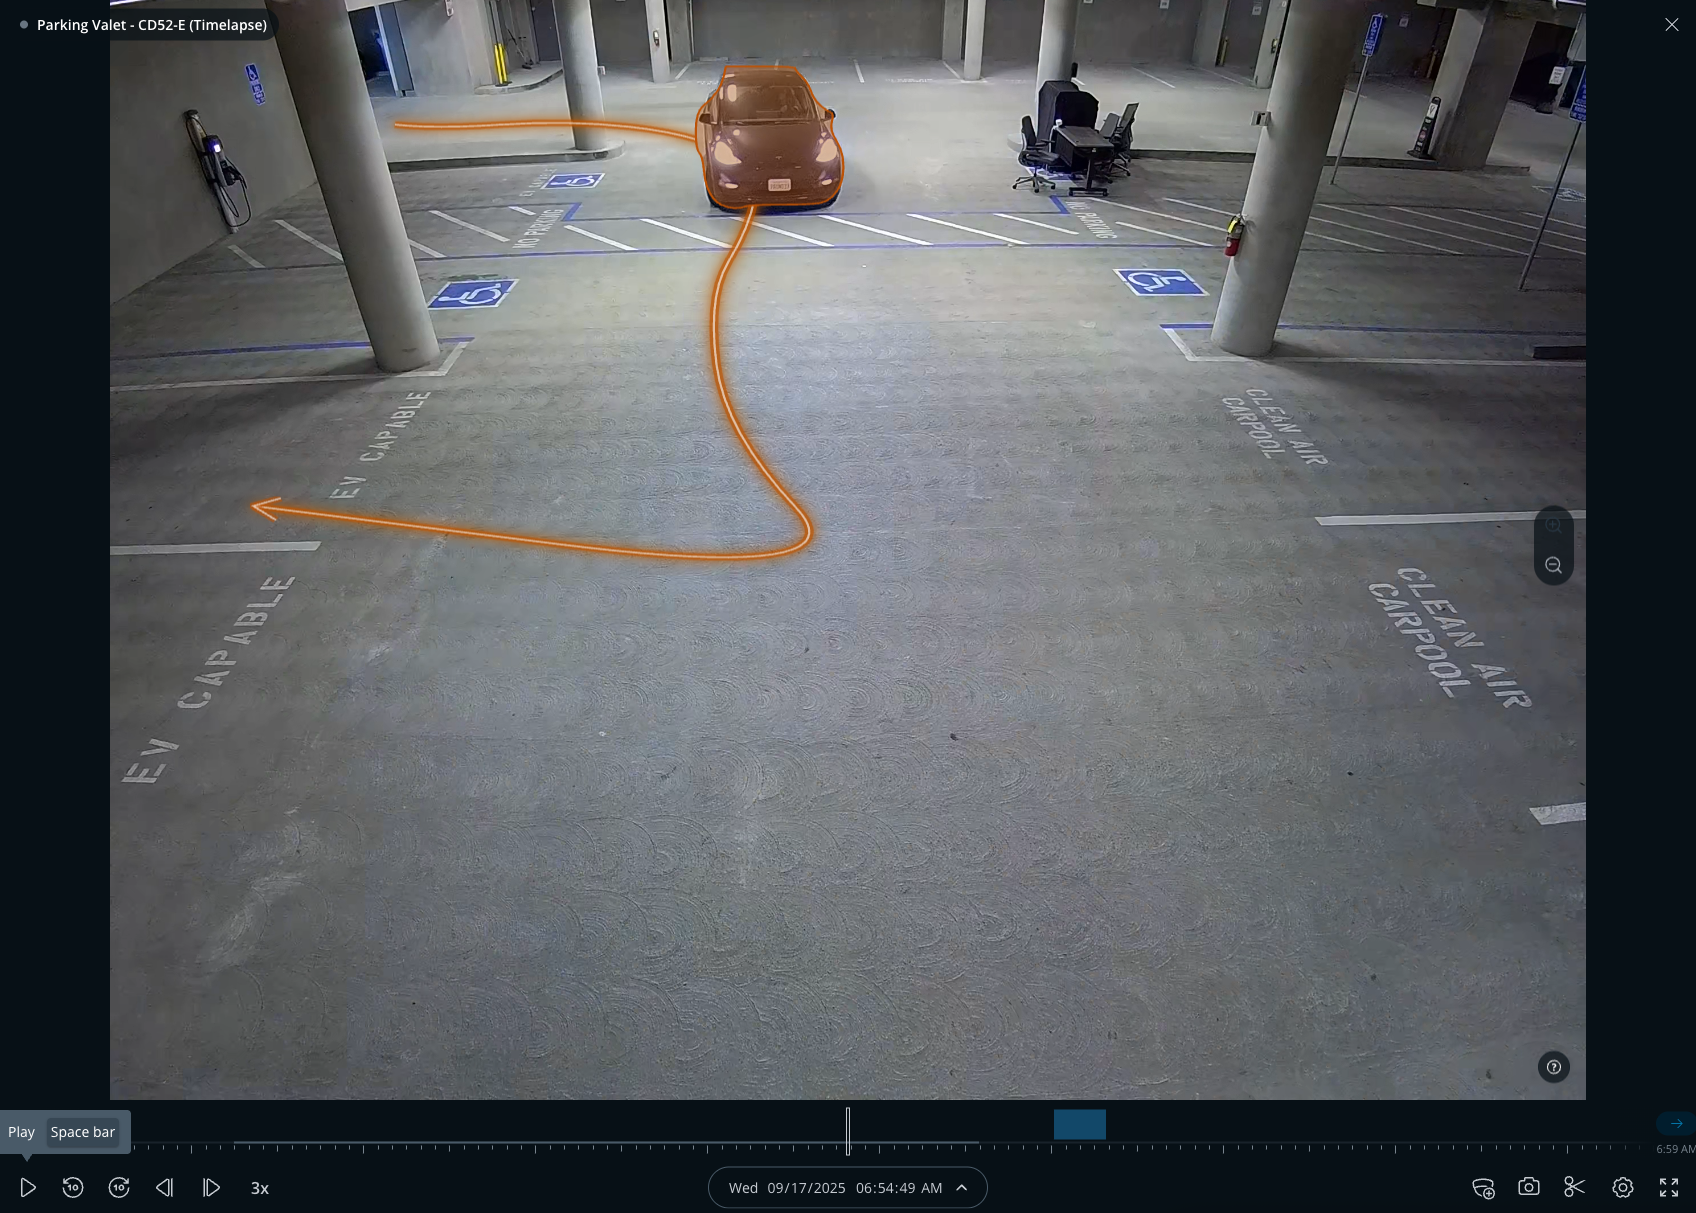
**フレーム内で検出されたすべての人物が自動的にハイライト表示されます。**
{% hint style="info" %}
ハイライトは、カーソルがビデオフィード上にある場合にのみ表示されます。
{% endhint %}
{% endstep %}
{% step %}
**ハイライトされた人物の上にカーソルをドラッグすると、カメラのフレーム内での軌跡と動きを確認できます。**
{% endstep %}
{% step %}
**ハイライトされた人物をクリックすると、目撃情報と関連する映像のタイムラインが生成されます。**
{% endstep %}
{% step %}
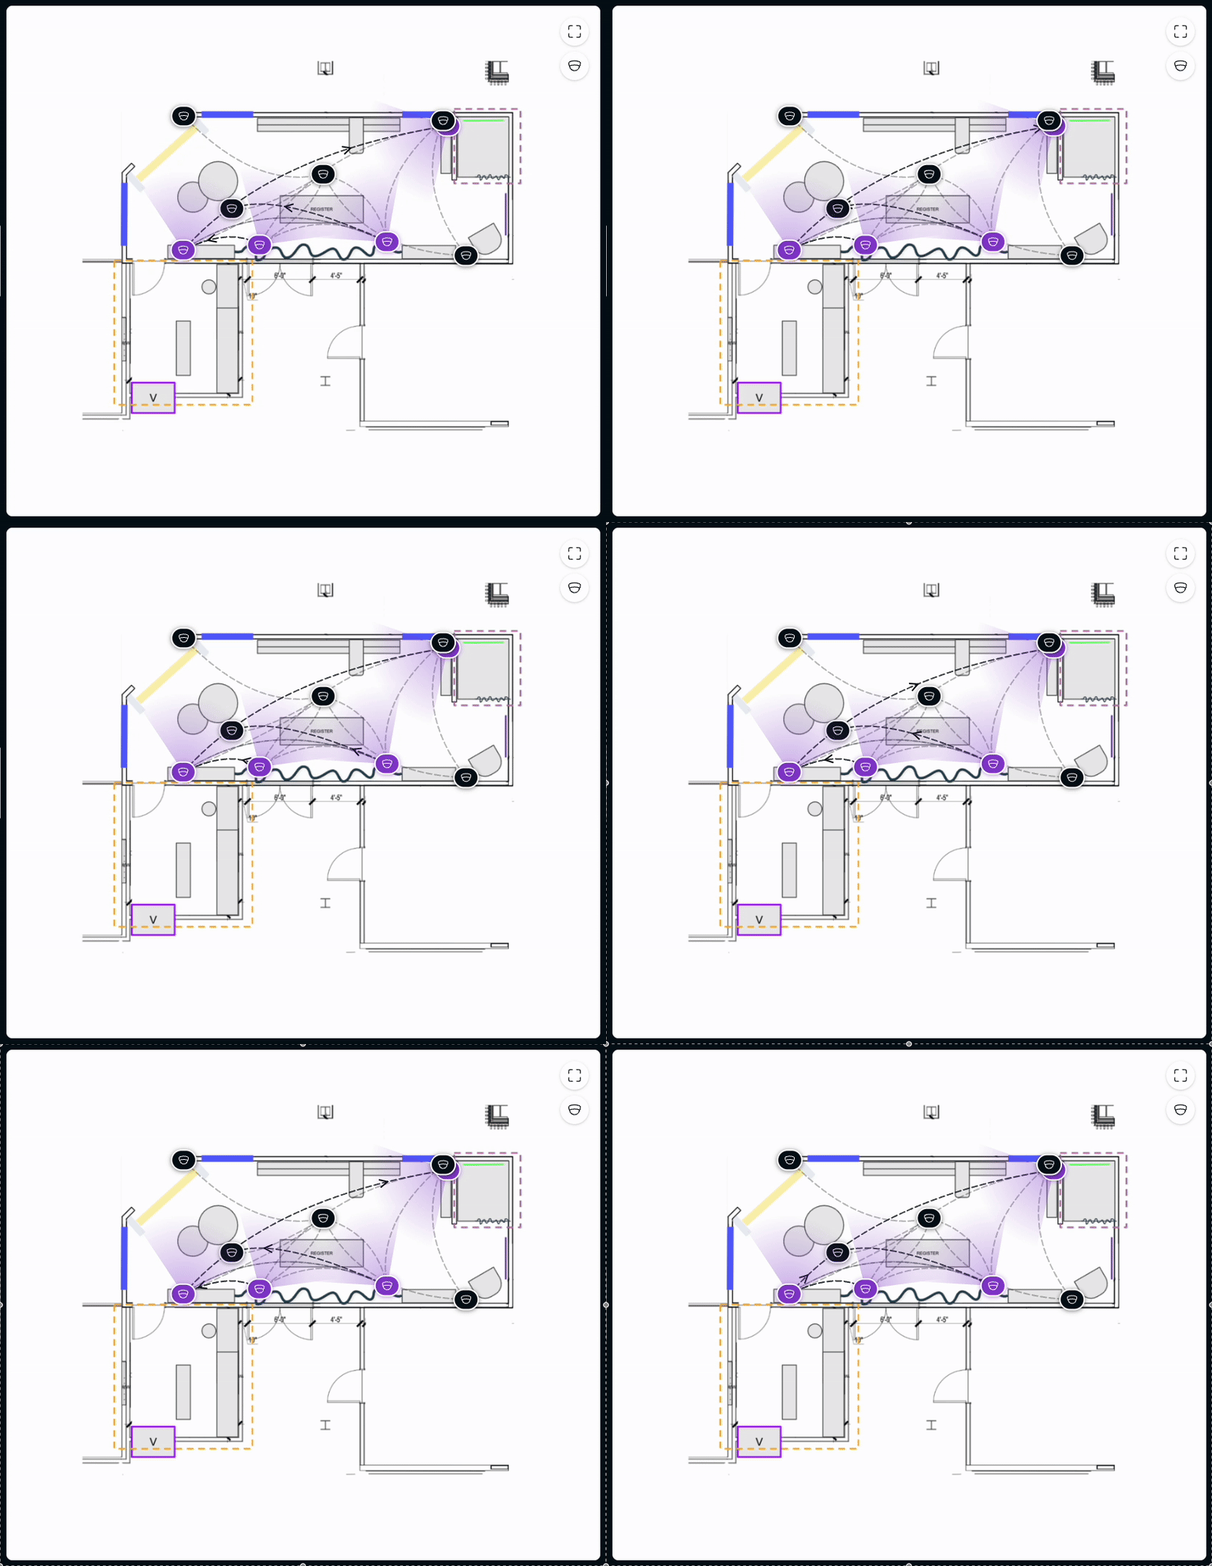
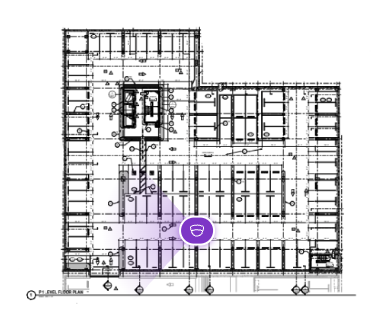
**目撃が発生したカメラがフロアプランに追加されている場合、紫でハイライト表示され、Command内でビデオフローが表示されます。**
{% endstep %}
{% step %}
**タイムライン内のサムネイルをクリックすると、History Playerで映像が再生されます。人物が複数のカメラに同時に表示されている場合は、映像はマルチカメラビューで再生されます。** [**マルチカメラ再生速度の制限**](/verkada-cameras/ja/bideonosutorminguto/view-historical-footage/add-cameras-to-a-multicamera-view.md#multi-camera-playback-speed-limits) **表示されているカメラの数に応じて適用されます。**
{% endstep %}
{% step %}
**右側で、日付/時刻のドロップダウンを選択して範囲を調整します。**
{% endstep %}
{% step %}
**Locateをクリックすると、人物の詳細な目撃情報を表示できます。**
{% endstep %}
{% step %}
**もう一度Locateをクリックすると、すべてのクリップの概要表示と詳細な目撃表示を切り替えられます。**
{% endstep %}
{% endstepper %}
***
## 車両を検索
{% hint style="danger" %}
この機能を使用するには、カメラで車両分析と既定のHistory Player Search設定を有効にする必要があります。最適な精度を得るには、車両がはっきり見えるようにしてください。遮蔽物は検出品質に影響する場合があります。参照 [車両分析](/verkada-cameras/ja/fen-xi/vehicle-analytics.md) 詳細については、
{% endhint %}
{% stepper %}
{% step %}
**Verkada Command で、\[All Products] > \[Cameras] に移動します。**
{% endstep %}
{% step %}
**カメラを選択し、[履歴]をクリックします。**
{% endstep %}
{% step %}
**右下でクリックし、Unified Timelineを選択します。**
{% endstep %}
{% step %}
**確認したい日付と時刻を選択します。**
{% endstep %}
{% step %}
**車両が表示されたら、History Playerを一時停止します。**
{% endstep %}
{% step %}
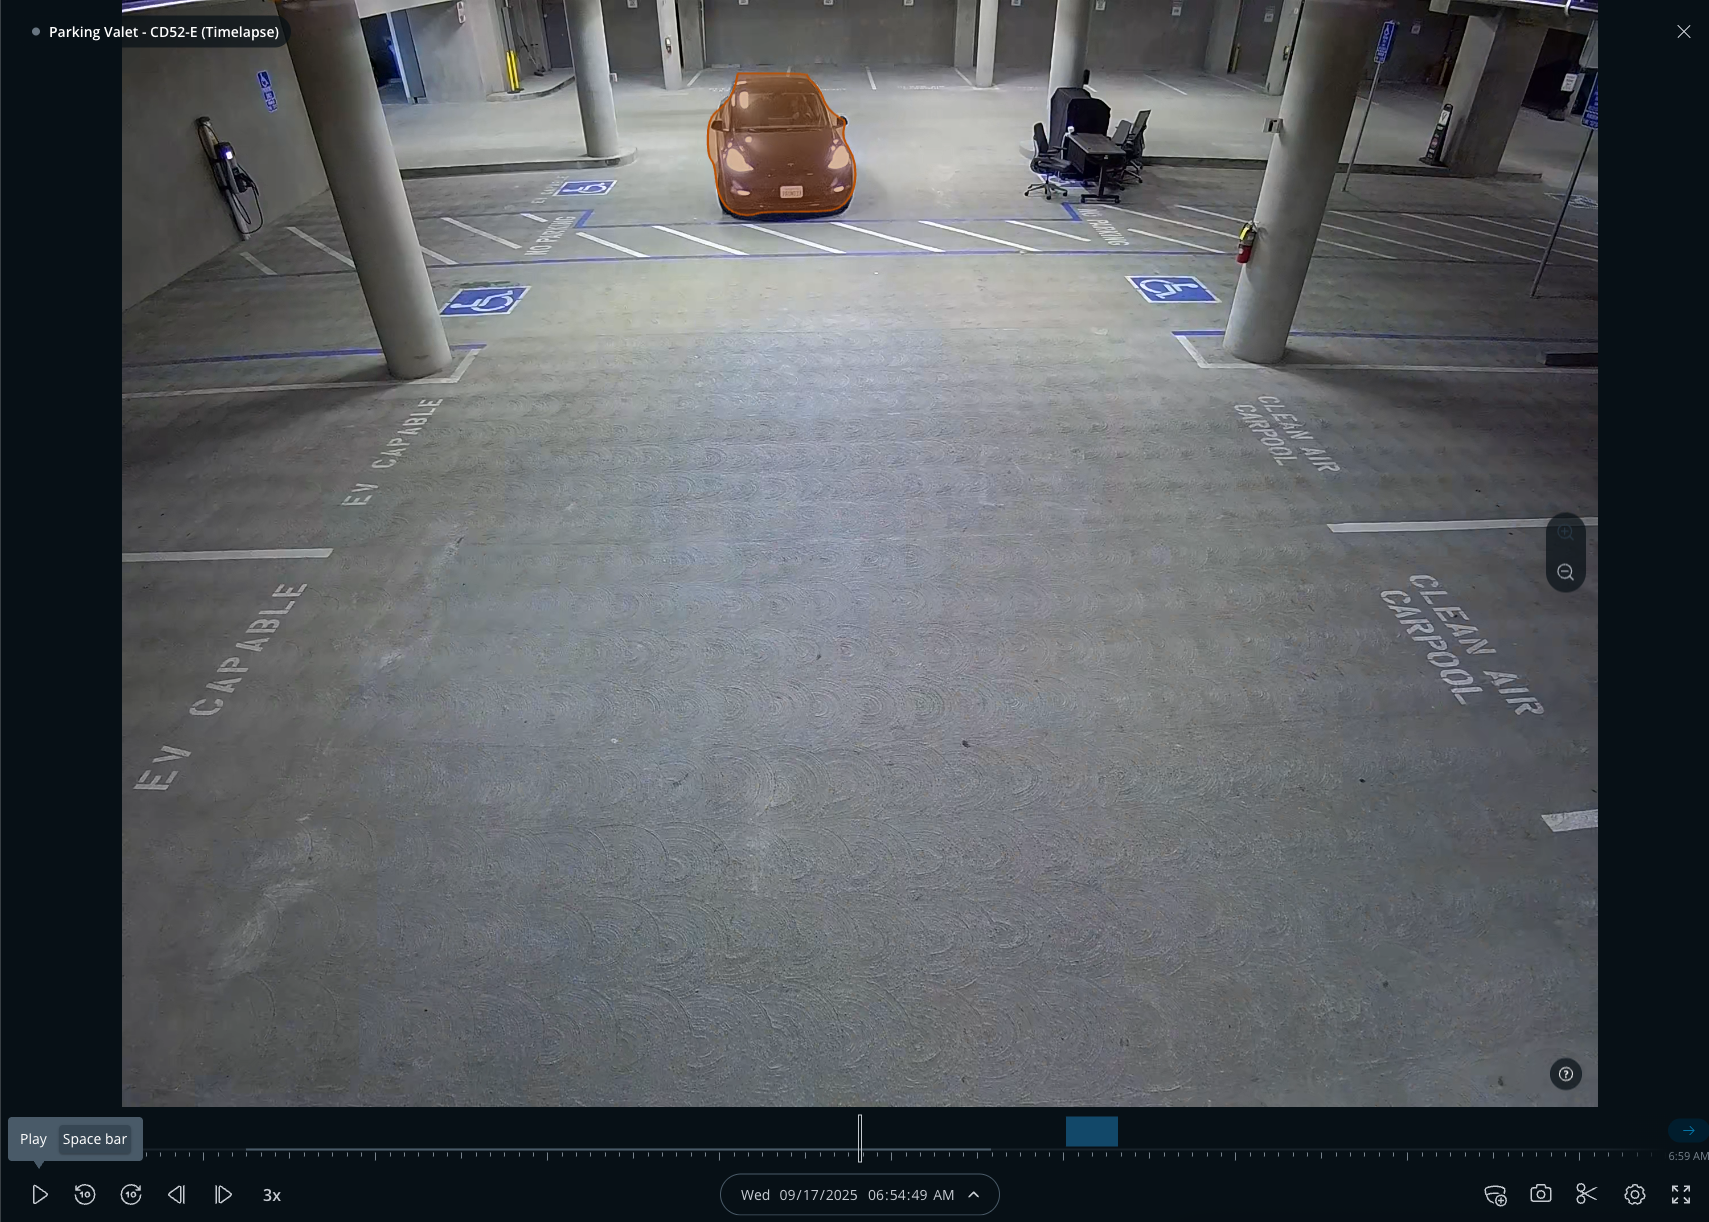
**フレーム内で検出されたすべての車両が自動的にハイライト表示されます。**
**注:** ハイライトは、カーソルがビデオフィード上にある場合にのみ表示されます。
{% endstep %}
{% step %}
**ハイライトされた車両の上にカーソルをドラッグすると、カメラのフレーム内での軌跡と動きを確認できます。**
{% endstep %}
{% step %}
**ハイライトされた車両をクリックすると、目撃情報と関連する映像のタイムラインが生成されます。**
{% endstep %}
{% step %}
**目撃が発生したカメラがフロアプランに追加されている場合、紫でハイライト表示され、Command内でビデオフローが表示されます。**
{% endstep %}
{% step %}
**タイムライン内のサムネイルをクリックすると、History Playerで映像が再生されます。車両が複数のカメラに同時に表示されている場合は、映像はマルチカメラビューで再生されます。** [**マルチカメラ再生速度の制限**](/verkada-cameras/ja/bideonosutorminguto/view-historical-footage/add-cameras-to-a-multicamera-view.md#multi-camera-playback-speed-limits) **表示されているカメラの数に応じて適用されます。**
{% endstep %}
{% step %}
**車両の色、メーカー、モデルを変更するには、Refresh Vehicle Searchをクリックします。有効になっている場合は、ナンバープレートでフィルタすることもできます。**
{% endstep %}
{% endstepper %}
***
## タイムラインをIncidentにエクスポート
Unified Timelineで再構成された行程全体を、新規または既存のIncidentにエクスポートして、調査や報告に利用できます。
{% hint style="danger" %}
Incidentにエクスポートされたタイムラインは、Incidentが削除されるまでCommandに保持されます。
{% endhint %}
{% stepper %}
{% step %}
**生成されたUnified Timelineの左側ナビゲーションで、Export to Incidentをクリックします**  .
{% endstep %}
{% step %}
**Create New Incidentを選択するか、一覧から既存のIncidentを選択します。**
{% endstep %}
{% step %}
**確認メッセージが表示されたら、Go to Incidentをクリックしてエクスポートしたタイムラインを開きます。**
{% hint style="info" %}
Incidentにエクスポートした後は、対象名を編集したり、メモを追加したり、アーカイブを添付したりして、証拠をさらに整理できます。
{% endhint %}
{% endstep %}
{% endstepper %}
## オーガナイゼーション'のHistory Player Searchを無効にする
{% stepper %}
{% step %}
**Verkada Commandで、All Products > Cameras > Camera Settings に移動します。**
{% endstep %}
{% step %}
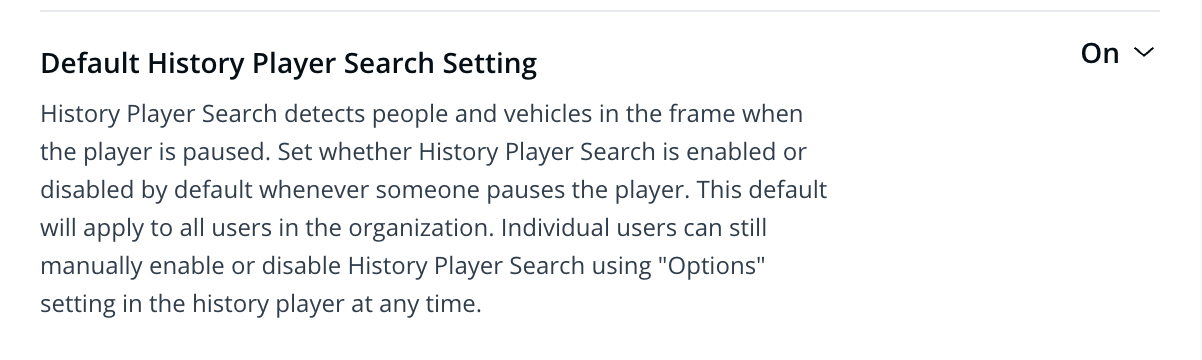
**既定のHistory Player Search設定を変更できます。オフにすると、History Playerで動画を一時停止してもHistory Player Searchは自動的に起動しません。この設定はオーガナイゼーション'内のすべてのユーザーに影響します。**
{% endstep %}
{% endstepper %}
{% hint style="warning" %}
既定設定がオフでも、ユーザーは必要に応じてクリックして
.
{% endstep %}
{% step %}
**Create New Incidentを選択するか、一覧から既存のIncidentを選択します。**
{% endstep %}
{% step %}
**確認メッセージが表示されたら、Go to Incidentをクリックしてエクスポートしたタイムラインを開きます。**
{% hint style="info" %}
Incidentにエクスポートした後は、対象名を編集したり、メモを追加したり、アーカイブを添付したりして、証拠をさらに整理できます。
{% endhint %}
{% endstep %}
{% endstepper %}
## オーガナイゼーション'のHistory Player Searchを無効にする
{% stepper %}
{% step %}
**Verkada Commandで、All Products > Cameras > Camera Settings に移動します。**
{% endstep %}
{% step %}
**既定のHistory Player Search設定を変更できます。オフにすると、History Playerで動画を一時停止してもHistory Player Searchは自動的に起動しません。この設定はオーガナイゼーション'内のすべてのユーザーに影響します。**
{% endstep %}
{% endstepper %}
{% hint style="warning" %}
既定設定がオフでも、ユーザーは必要に応じてクリックして  History Player内で選択して **History Player Search**.
{% endhint %}
***
## ユーザーごとにHistory Player Searchを管理する
{% stepper %}
{% step %}
**Verkada Command で、\[All Products] > \[Cameras] に移動します。**
{% endstep %}
{% step %}
**カメラを選択し、[履歴]をクリックします。**
{% endstep %}
{% step %}
**をクリック** :gear: **History Player Search、Unified Timelineを選択するか、History Player Searchのチェックを外してこの機能を無効にします。**
{% endstep %}
{% step %}
**(任意)検索モデルを選択:**
* **顔検出:** 顔検出が有効なカメラを横断して検索します。
* **外見検索:** 人物属性が有効なカメラを横断して検索します。
{% endstep %}
{% endstepper %}
{% hint style="warning" %}
この設定を変更しても、変更を行ったユーザーにのみ影響します。この選択は、ユーザーがアクセスできるすべてのカメラに適用されます。
{% endhint %}
***
### 考慮事項
* D30、D40、D50、D80、CD22、CD22-E、CM22モデルを除くすべてのVerkadaカメラモデルがHistory Player Searchをサポートしています。
* この機能は現在、モバイル(Webおよびアプリ)ではサポートされていません。
---
# Agent Instructions
This documentation is published with GitBook. GitBook is the documentation platform designed so that both humans and AI agents can read, navigate, and reason over technical content effectively. Learn more at gitbook.com.
## Querying This Documentation
If you need additional information that is not directly available in this page, you can query the documentation dynamically by asking a question.
Perform an HTTP GET request on the current page URL with the `ask` query parameter, and the optional `goal` query parameter:
```
GET https://help.verkada.com/verkada-cameras/ja/bideonosutorminguto/view-historical-footage/history-player-search-and-unified-timeline.md?ask=&goal=
```
`ask` is the immediate question: it should be specific, self-contained, and written in natural language.
`goal` is optional and describes the broader end goal you are ultimately trying to accomplish on behalf of the user. GitBook uses it to tailor the answer towards what is most useful for that goal.
The response will contain a direct answer to the question and relevant excerpts and sources from the documentation.
Use this mechanism when the answer is not explicitly present in the current page, you need clarification or additional context, or you want to retrieve related documentation sections.
History Player内で選択して **History Player Search**.
{% endhint %}
***
## ユーザーごとにHistory Player Searchを管理する
{% stepper %}
{% step %}
**Verkada Command で、\[All Products] > \[Cameras] に移動します。**
{% endstep %}
{% step %}
**カメラを選択し、[履歴]をクリックします。**
{% endstep %}
{% step %}
**をクリック** :gear: **History Player Search、Unified Timelineを選択するか、History Player Searchのチェックを外してこの機能を無効にします。**
{% endstep %}
{% step %}
**(任意)検索モデルを選択:**
* **顔検出:** 顔検出が有効なカメラを横断して検索します。
* **外見検索:** 人物属性が有効なカメラを横断して検索します。
{% endstep %}
{% endstepper %}
{% hint style="warning" %}
この設定を変更しても、変更を行ったユーザーにのみ影響します。この選択は、ユーザーがアクセスできるすべてのカメラに適用されます。
{% endhint %}
***
### 考慮事項
* D30、D40、D50、D80、CD22、CD22-E、CM22モデルを除くすべてのVerkadaカメラモデルがHistory Player Searchをサポートしています。
* この機能は現在、モバイル(Webおよびアプリ)ではサポートされていません。
---
# Agent Instructions
This documentation is published with GitBook. GitBook is the documentation platform designed so that both humans and AI agents can read, navigate, and reason over technical content effectively. Learn more at gitbook.com.
## Querying This Documentation
If you need additional information that is not directly available in this page, you can query the documentation dynamically by asking a question.
Perform an HTTP GET request on the current page URL with the `ask` query parameter, and the optional `goal` query parameter:
```
GET https://help.verkada.com/verkada-cameras/ja/bideonosutorminguto/view-historical-footage/history-player-search-and-unified-timeline.md?ask=&goal=
```
`ask` is the immediate question: it should be specific, self-contained, and written in natural language.
`goal` is optional and describes the broader end goal you are ultimately trying to accomplish on behalf of the user. GitBook uses it to tailor the answer towards what is most useful for that goal.
The response will contain a direct answer to the question and relevant excerpts and sources from the documentation.
Use this mechanism when the answer is not explicitly present in the current page, you need clarification or additional context, or you want to retrieve related documentation sections.