> For the complete documentation index, see [llms.txt](https://help.verkada.com/llms.txt). Markdown versions of documentation pages are available by appending `.md` to page URLs; this page is available as [Markdown](https://help.verkada.com/verkada-cameras/analytics/create-camera-event-alerts/helix-alerts.md).
# Helix Alerts
Helix is Verkada’s customizable video search and integration engine that brings third-party data from on-premises or cloud-based systems into Command. This data indexes footage with user-defined attributes, making searching and identifying specific events easier.
With Helix alerts, users can receive proactive notifications in Command for integrated events, either for all new Helix events or only those that meet defined thresholds.
***
## Configuration
### Create Alert > Events
{% stepper %}
{% step %}
**On the Command homepage, left navigation, click Alerts.**
{% endstep %}
{% step %}
**At the top, click New Alert.**
{% endstep %}
{% step %}
**On Select Event, choose Camera > Helix.**
{% endstep %}
{% step %}
**On Cameras:**
1. Choose to receive alerts from **Sites** or **Individual Cameras**.
2. Click **Done** to continue.
{% hint style="warning" %}
Helix alerts are tied to specific Helix event types. We recommend selecting all cameras to ensure no important events are missed.
{% endhint %}
{% endstep %}
{% step %}
**On Helix Event Type:**
1. Select a Helix Event Type.
{% hint style="info" %}
The event types listed are the ones [you configured](https://apidocs.verkada.com/reference/getting-started).
{% endhint %}
2. Click **Done** to continue.
{% endstep %}
{% step %}
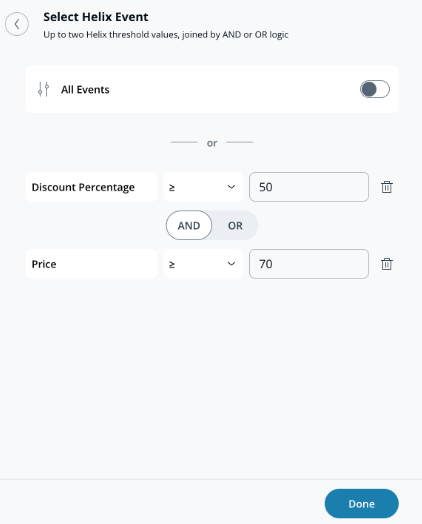
**On Thresholds:**
1. Enable the **All Events** toggle to receive alerts whenever a new Helix Event is generated.
2. For more granular control, define up to two thresholds joined by **AND** or **OR** logic. An alert will be triggered whenever a Helix event meets the specified threshold conditions.
3. Click **Done** to continue.
{% endstep %}
{% step %}
**Click Done and continue with the alert** [**notification schedule**](#create-alert-greater-than-cameras)**.**
{% endstep %}
{% endstepper %}
### Create Alert > Notification Schedule
{% stepper %}
{% step %}
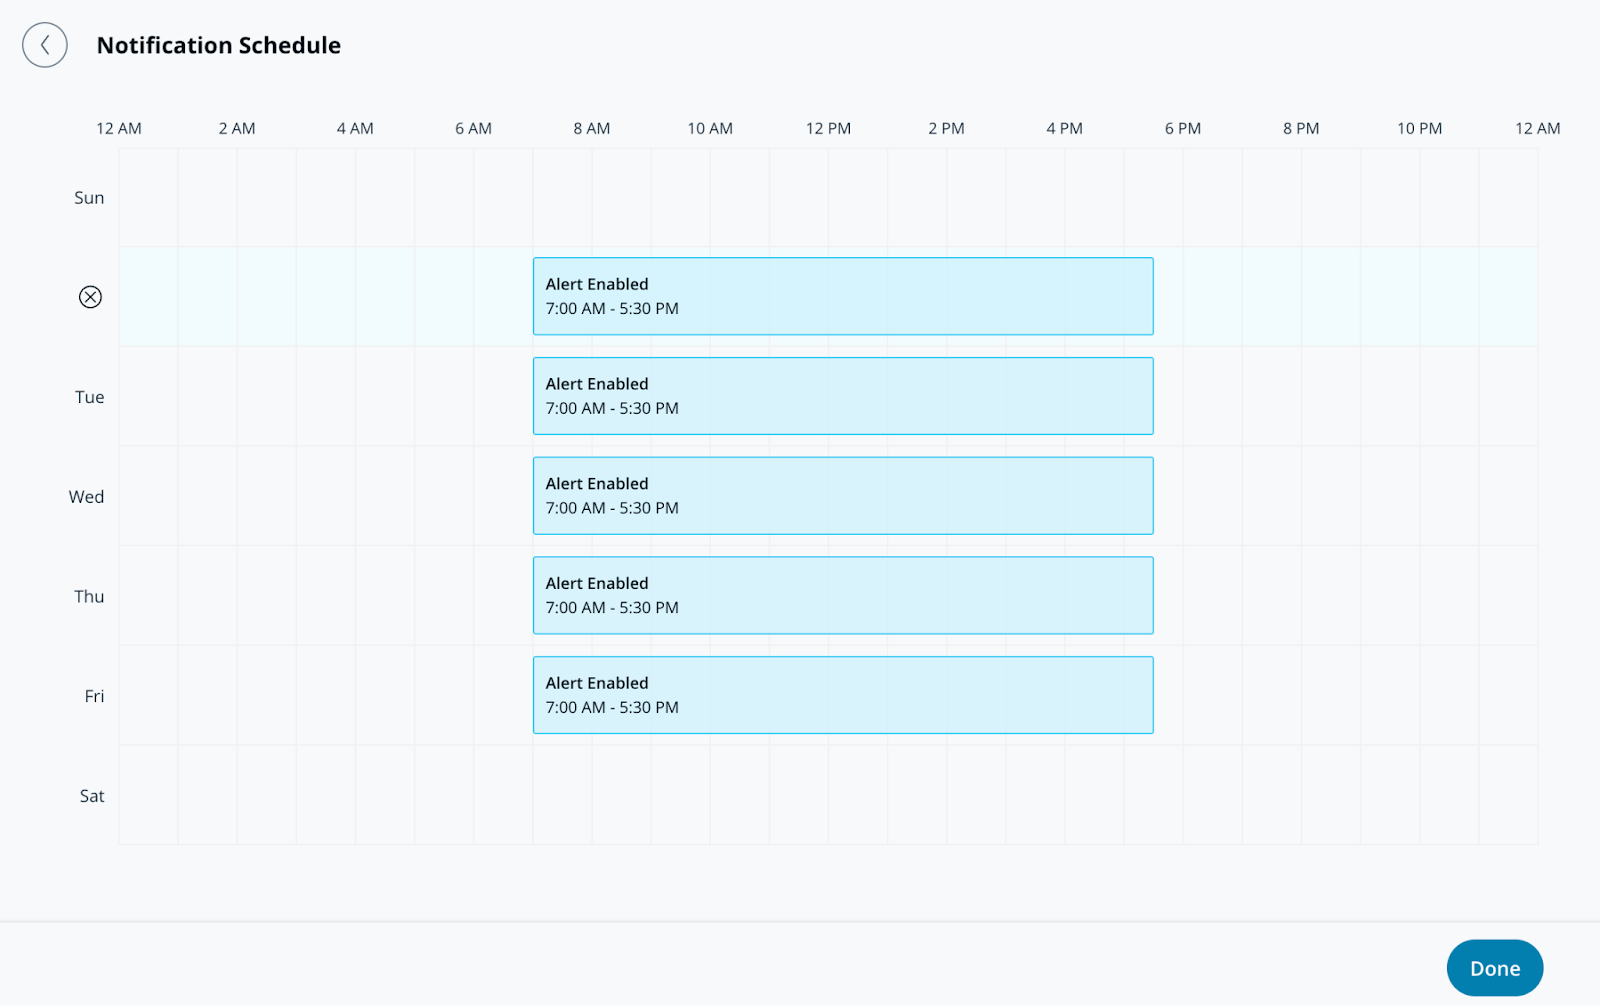
**On Notification Schedule, specify the days and times for the alerts to send notifications. Alerts generate 24/7 by default.**
{% endstep %}
{% step %}
**Click Done and continue with the alert** [**notification**](#create-alert-greater-than-notification)**.**
{% endstep %}
{% endstepper %}
### Create Alert > Notification
{% stepper %}
{% step %}
**On Notification, add users individually or assign the alert to a group.**
{% endstep %}
{% step %}
**Select the dropdown menu next to a user or group to choose their notification method(s). Recipients can be notified via push, SMS, messaging platform alerts, or email notifications.**
{% hint style="info" %}
Any recipient added to this alert will see it appear under the **Shared Alerts** section of their **Alerts** page.
{% endhint %}
{% endstep %}
{% step %}
**(Optional) By default, you will be an alert recipient. Select the dropdown menu and click Delete to remove yourself.**
{% endstep %}
{% step %}
**Click Done and continue with the alert's** [**optional settings**](#optional-settings)**, or** [**finish the alert**](#finish-the-alert)**.**
{% endstep %}
{% endstepper %}
### Optional settings
#### Create Alert > Operations
{% stepper %}
{% step %}
**Toggle on Route to Operations to create a ticket from the alert.**
{% endstep %}
{% step %}
**(Optional) Select Ticket Instructions to add information to the ticket and click Done.**
{% endstep %}
{% step %}
**Click Done and continue to** [**finish the alert**](#finish-the-alert)**.**
{% endstep %}
{% endstepper %}
#### Create Alert > Device Action
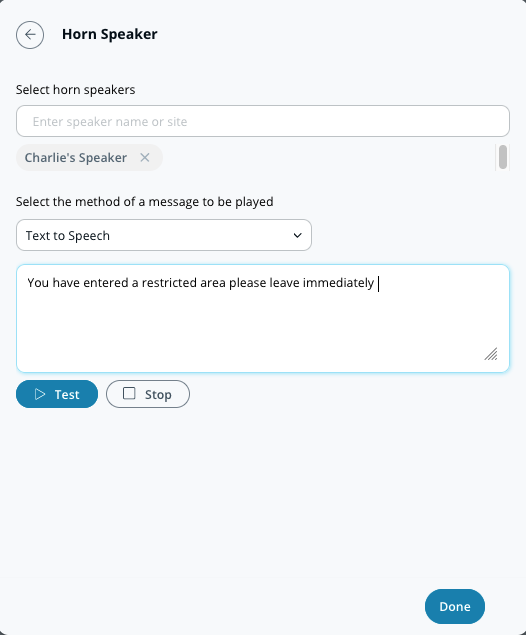
In addition to notifying individuals, you can configure your horn speaker to play when an alert is triggered. These alerts can be text-to-speech or an uploaded MP3 file.
{% stepper %}
{% step %}
**On Device Action, select the horn speaker(s) you want to play your message.**
{% endstep %}
{% step %}
**Select your notification preference (Text to Speech or Audio File).**
a. For **Text to Speech,** enter a message up to 200 characters.\
b. For **Audio File,** drag and drop the file or click **choose a file** to upload your audio clip.
{% endstep %}
{% step %}
**Click Done and continue to** [**finish the alert**](#finish-the-alert)**.**
{% endstep %}
{% endstepper %}
### Finish the alert
{% stepper %}
{% step %}
**In the bottom right of the configuration window, click Next.**
{% endstep %}
{% step %}
**Enter a descriptive name for the alert.**
{% endstep %}
{% step %}
**Click Done to complete the setup.**
{% endstep %}
{% endstepper %}
---
# Agent Instructions
This documentation is published with GitBook. GitBook is the documentation platform designed so that both humans and AI agents can read, navigate, and reason over technical content effectively. Learn more at gitbook.com.
## Querying This Documentation
If you need additional information that is not directly available in this page, you can query the documentation by asking a question.
Perform an HTTP GET request on the following URL with the `ask` and `goal` query parameters:
```
GET https://help.verkada.com/verkada-cameras/analytics/create-camera-event-alerts/helix-alerts.md?ask=&goal=
```
`ask` is the immediate question: it should be specific, self-contained, and written in natural language.
`goal` is what the user is ultimately trying to achieve, the reason they need the answer. Sharing it helps GitBook give you a better, more relevant answer. A goal is most helpful when it describes the outcome the user wants rather than restating the question. For example, with `ask=how do I create an API token`, a goal like `automate deployments from our CI pipeline` lets GitBook tailor the answer to that use case.
The response will contain a direct answer to the question and relevant excerpts and sources from the documentation.
Use this mechanism when the answer is not explicitly present in the current page, you need clarification or additional context, or you want to retrieve related documentation sections.