> For the complete documentation index, see [llms.txt](https://help.verkada.com/llms.txt). Markdown versions of documentation pages are available by appending `.md` to page URLs; this page is available as [Markdown](https://help.verkada.com/new-alarms/ja/she-ding/configure-camera-alarm-trigger-events-for-new-alarms.md).
# 新しいアラームのカメラアラームトリガーイベントを構成する
アラームトリガーイベント用にカメラを構成する方法を学ぶ
{% hint style="success" %}
この記事は新しいアラームのガイドです。従来のアラームをお使いの場合は、こちらを参照してください。 [記事](/classic-alarms/ja/ibentotoarto/configure-alarms-event-alerts/configure-camera-alarm-trigger-events.md) 従来のアラームをお使いの場合。 [新しいアラームと従来のアラームの比較を参照](/new-alarms/ja/hajimeni/new-alarms-vs-classic-alarms.md) どのバージョンのアラームを使用しているかわからない場合。
{% endhint %}
***
## 設定
{% stepper %}
{% step %}
**Verkada Command で、全製品 > 新しいアラーム に移動します。**
{% endstep %}
{% step %}
**設定するアラームサイトを選択します。**
{% endstep %}
{% step %}
**左側のナビゲーションで、パーティション > 対象のカメラパーティションを選択します。**
{% endstep %}
{% step %}
**デバイス内:**
1. 右上で、クリックします **カメラを追加します。**
2. 設定するカメラを選択し、クリックします **次のステップ**.
3. カメラフィードの任意の場所をクリックし、トリガータイプを選択します:
* 検知エリア(人物検知または滞留用)
* ライン通過
4. 検知エリアまたはラインを描画します
{% hint style="info" %}
検知エリアのトリガータイプでは、デフォルト設定は15秒の滞留です。
{% endhint %}
{% endstep %}
{% step %}
**人物トリガーから車両トリガーに切り替えるには、ラインを描画した後で Look for アイコンを車に切り替えます。**
" %}
{% endstep %}
{% endstepper %}
***
## アラームトリガーを編集
{% stepper %}
{% step %}
**Verkada Command で、全製品 > 新しいアラーム に移動します。**
{% endstep %}
{% step %}
**編集するアラームサイトを選択します。**
{% endstep %}
{% step %}
**左側のナビゲーションで、パーティション > 対象のカメラパーティションを選択します。**
{% endstep %}
{% step %}
**デバイス内:**
1. カメラにカーソルを合わせて、クリックします :ellipsis: > **トリガーを編集します。**
2. 設定済みの検知エリアまたはラインをクリックし、必要な変更を行います。
3. クリックします **カメラを保存します。**
{% endstep %}
{% endstepper %}
### アラームトリガーを削除
{% stepper %}
{% step %}
**Verkada Command で、全製品 > 新しいアラーム に移動します。**
{% endstep %}
{% step %}
**編集するアラームサイトを選択します。**
{% endstep %}
{% step %}
**左側のナビゲーションで、パーティション > 対象のカメラパーティションを選択します。**
{% endstep %}
{% step %}
**デバイス内:**
1. カメラにカーソルを合わせて、クリックします :ellipsis: > **トリガーを編集します。**
2. 設定済みの検知エリアまたはラインをクリック > :trash-can: .
3. クリックします **カメラを保存します。**
{% endstep %}
{% endstepper %}
### **アラームトリガーとしてのカメラを削除**
{% stepper %}
{% step %}
**Verkada Command で、全製品 > 新しいアラーム に移動します。**
{% endstep %}
{% step %}
**編集するアラームサイトを選択します。**
{% endstep %}
{% step %}
**左側のナビゲーションで、パーティション > 対象のカメラパーティションを選択します。**
{% endstep %}
{% step %}
**デバイス内:**
1. カメラにカーソルを合わせて、クリックします :ellipsis: > **カメラを削除します。**
{% endstep %}
{% endstepper %}
### カメラのアラームトリガーをミュートする
{% stepper %}
{% step %}
**Verkada Command で、全製品 > 新しいアラーム に移動します。**
{% endstep %}
{% step %}
**設定するアラームサイトを選択します。**
{% endstep %}
{% step %}
**左側のナビゲーションで、デバイス > 対象のカメラを選択します。**
{% endstep %}
{% step %}
右側の **デバイス詳細**、選択します **デバイスをミュートする期間**、次に期間を選択します。
{% endstep %}
{% endstepper %}
### **カメラのアラームトリガーのミュートを解除**
{% stepper %}
{% step %}
**Verkada Command で、全製品 > 新しいアラーム に移動します。**
{% endstep %}
{% step %}
**設定するアラームサイトを選択します。**
{% endstep %}
{% step %}
**左側のナビゲーションで、デバイス > 対象のカメラを選択します。**
{% endstep %}
{% step %}
右側の **デバイス詳細**、選択します **ミュートを解除します。**
{% endstep %}
{% endstepper %}
***
## 検知はいつ発生すべきですか?
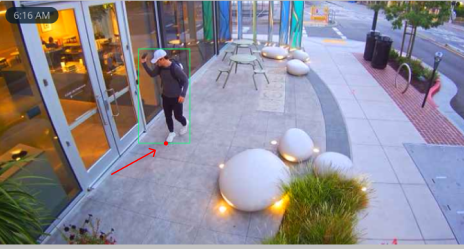
Verkada カメラがオブジェクトを検知すると、検知されたオブジェクトの上に緑色のバウンディングボックスが表示されます。これらのバウンディングボックスは、カメラの [人物および車両のモーション検索](/verkada-cameras/ja/fen-xi/people-and-vehicle-motion-search.md) または、カメラの履歴動画をスクラブ再生しているときに確認できます。
検知は、人物のバウンディングボックスの下中央がラインを横切るか、滞留領域内にあるときに成立します(ほとんどの場合、これは人物の足です)。
***
## アラームトリガー
### 人物検知
人物検知は、人物のバウンディングボックスの一部が設定済みの検知エリアと交差するたびに成立します。
{% hint style="warning" %}
人物検知では、カメラごとに最大 4 つの自由形式の多角形検知エリアを定義できます。
{% endhint %}
#### PTZ カメラ
{% hint style="danger" %}
PTZ カメラでサポートされているトリガーは、フルフレームの人物検知のみです。
{% endhint %}
* PTZ カメラは対応できます [複数のアクティブ領域](/verkada-cameras/ja/she-ding/view-and-edit-camera-settings/set-up-sentry-mode-on-a-ptz-camera.md)、ただし、カメラをアラームトリガーとして設定する際は、アクティブ領域は 1 つだけ使用してください。複数の領域があると、アラート直後にカメラが即座に再配置され、対象を追跡しにくくなることがあります。
* 視野は、制限区域のみをカバーするように設定してください。PTZ カメラはフルフレームの人物検知を使用するため、歩道、公共の通路、その他人通りの多いゾーンは含めないでください。
### 滞留検知
滞留検知では、自由形式の多角形で領域を定義し、検知が発生するまで人物がその領域に留まる時間を設定できます。
{% hint style="warning" %}
滞留検知は、10秒、15秒、30秒、1分、または2分に設定できます。
{% endhint %}
#### 仕組み
{% stepper %}
{% step %}
**人物のトリガーポイントが滞留領域と交差すると、タイマーが開始されます。**
{% endstep %}
{% step %}
**トリガーポイントがこの領域に設定された時間(デフォルトでは 1 分)留まると、検知イベントが発生します。**
{% endstep %}
{% step %}
**人物のトリガーポイントが一時的に滞留領域を離れても、4 秒以内に再び入れば、カウンターは継続します。**
{% endstep %}
{% step %}
**カメラが個人の追跡を失った場合(たとえばフレーム外に歩き去った場合)や、トリガーポイントが 4 秒以上滞留領域の外にある場合、カウンターはリセットされます。**
{% hint style="warning" %}
滞留では、カメラごとに最大 4 つの自由形式の多角形検知エリアを定義できます。
{% endhint %}
{% endstep %}
{% endstepper %}
### ライン通過
ライン通過では、一方向または双方向のラインを定義でき、人物がそれを越えるまで検知が発生しないようにすることで、トリガーをより細かく制御できます。
{% hint style="warning" %}
最大 5 本のラインを定義し、人物が通過すると想定する方向を選択できます。
{% endhint %}
#### サードパーティ製カメラ
{% hint style="warning" %}
**高度な分析** ライン通過および滞留トリガーを使用するには、有効にする必要があります。
{% endhint %}
サードパーティ製カメラで高度な分析を有効にするには:
{% stepper %}
{% step %}
Verkada Command で、全製品 > デバイス に移動します。
{% endstep %}
{% step %}
設定するサードパーティ製カメラを選択します。
{% endstep %}
{% step %}
右下で、設定をクリックします
{% endstep %}
{% step %}
分析の下で、高度な分析をオンにします
{% endstep %}
{% endstepper %}
***
## **誤アラームを減らす**
保護エリアを設定すると、先週の警戒設定スケジュールと保護対象エリアに基づいて、選択したカメラから何件のアラームが発生すると予想されるかを確認できます。
{% hint style="info" %}
正確なアラーム予測のために、カメラはオンラインで、少なくとも 1 週間同じ FOV を向いている必要があります。
{% endhint %}
{% stepper %}
{% step %}
**Verkada Command で、全製品 > 新しいアラーム に移動します。**
{% endstep %}
{% step %}
**設定するアラームサイトを選択します。**
{% endstep %}
{% step %}
**左側のナビゲーションで、パーティション > カメラパーティションを選択します。**
{% endstep %}
{% step %}
**デバイス内:**
a. クリックします **カメラを追加** 新しいカメラトリガーを追加するには。\
b. カメラにカーソルを合わせて、> をクリックします **トリガーを編集** 既存のカメラトリガーを編集するには。
{% endstep %}
{% step %}
**現在の警戒設定スケジュールに基づく先週の検知を表示するには、Show Examples をクリックします。**
{% endstep %}
{% step %}
**この警戒設定スケジュールをクリックすると、タイムラインが表示されます。タイムライン上の灰色の曲線は過去の検知を表します。曲線の任意の部分をクリックして検知を表示し、何がアラームを引き起こしたのかを把握できます。**
{% endstep %}
{% step %}
**必要に応じてスケジュールやトリガー設定(エリア/滞留時間/ライン)を調整し、誤アラームや過剰なアラームを減らします。たとえば、滞留時間を延ばしたり、保護対象エリアを絞り込んで人通りの多いエリアを除外したりできます。**
{% endstep %}
{% endstepper %}
---
# Agent Instructions
This documentation is published with GitBook. GitBook is the documentation platform designed so that both humans and AI agents can read, navigate, and reason over technical content effectively. Learn more at gitbook.com.
## Querying This Documentation
If you need additional information that is not directly available in this page, you can query the documentation by asking a question.
Perform an HTTP GET request on the following URL with the `ask` and `goal` query parameters:
```
GET https://help.verkada.com/new-alarms/ja/she-ding/configure-camera-alarm-trigger-events-for-new-alarms.md?ask=&goal=
```
`ask` is the immediate question: it should be specific, self-contained, and written in natural language.
`goal` is what the user is ultimately trying to achieve, the reason they need the answer. Sharing it helps GitBook give you a better, more relevant answer. A goal is most helpful when it describes the outcome the user wants rather than restating the question. For example, with `ask=how do I create an API token`, a goal like `automate deployments from our CI pipeline` lets GitBook tailor the answer to that use case.
The response will contain a direct answer to the question and relevant excerpts and sources from the documentation.
Use this mechanism when the answer is not explicitly present in the current page, you need clarification or additional context, or you want to retrieve related documentation sections.
%20copy.png?alt=media&token=a84be76b-bf3f-44eb-8dbd-118de3b08e9c)




.png?alt=media&token=b91c3b2b-4b6f-4e4e-90d3-69dca34a7bb3)