> For the complete documentation index, see [llms.txt](https://help.verkada.com/llms.txt). Markdown versions of documentation pages are available by appending `.md` to page URLs; this page is available as [Markdown](https://help.verkada.com/new-alarms/ja/she-ding/alarm-sites/configure-partitions/walk-test-for-sensor-partitions.md).
# センサーパーティションのウォークテスト
ウォークテストを使用すると、設置業者とお客様は実際のアラームを発報せずに、アラームシステムが正常に機能していることを確認できます。
ウォークテストは、パーティション内のすべてのセンサーが正しく動作していることを確認します。通常は次の目的で使用します:
* システムの設置後に、正しく設定されていることを確認するため。
* 保守や保険のコンプライアンスのため。
{% hint style="danger" %}
ウォークテスト中、センサーパーティションは、次のように設定されているものも含め、アラームを発報しません: *常時警戒。* カメラパーティション **は解除状態のままである必要があります**、またウォークテストではサポートされていません。
{% endhint %}
***
## ウォークテストを実施する
{% hint style="danger" %}
ウォークテストを実施するには、サイト管理者権限が必要です。
{% endhint %}
{% stepper %}
{% step %}
**Verkada Command で、すべての製品 > アラーム に移動します。**
{% endstep %}
{% step %}
**テストを実施したいアラームサイトを選択します。**
{% endstep %}
{% step %}
**左側で[システムステータス]をクリックします。**
a. 右上で、選択します **ウォークテスト**. ここから、過去のテストレポートを表示またはダウンロードできます。\nb. 右上で、クリックします **テスト開始**.
{% endstep %}
{% step %}
**サイト内を巡回し、アラームトリガーとして設定されている場合はアクセスコントローラードアを含め、すべてのセンサーを作動させます。**
a. 各センサーは最初、 **トリガー待機中** 状態になります。トリガーされると、そのステータスはリアルタイムで更新されます。\nb. すべてのセンサーがトリガーされたら、 **テスト終了**.
{% endstep %}
{% step %}
**結果をダウンロードするには、PDF要約を作成するために[レポートを生成]を選択します。**
{% endstep %}
{% endstepper %}
{% hint style="warning" %}
ウォークテストのセッションは、手動で停止しない限り4時間後に自動的に終了します。
{% endhint %}
***
## デバイスイベントの成功基準
### 有線および無線センサー
* センサーがトリガーされると、成功イベントとして記録されます。
* 無線センサーについては、システムはRSSI信号強度とバッテリーレベルの両方を記録します。
* センサーが正しくトリガーされれば、バッテリー残量低下や弱い信号は成功に影響しません。
### アクセスコントロール(AC)ドア
ドアがDoor Held OpenまたはDoor Forced Openに設定されていても、成功したテストとしてカウントされるのはDoor Openイベントのみです。
### 全体の成功基準
* すべてのデバイスが少なくとも1回トリガーされると、テスト成功です。
* バッテリー残量低下や信号不良などの警告は表示されますが、全体の成功には影響しません。
***
## デバイスの問題
### 警告
* 各センサーには現在のステータスが表示されます。警告が有効な場合は、センサーの現在のライブ状態を反映します。
* ウォークテスト中に警告が解消された場合、最終レポートには表示されません。
* 終了時まで続く場合は、レポートに記録されます。
これにより、ユーザーは問題をリアルタイムで対処でき、一時的な警告が最終結果に影響するのを防げます。
**警告は次の項目で表示される場合があります:**
{% stepper %}
{% step %}
**バッテリー残量低下**
{% endstep %}
{% step %}
**RSSI低下**
{% endstep %}
{% step %}
**デバイスオフライン**
{% endstep %}
{% endstepper %}
### 問題のデバッグ
ウォークテストを離れずにデバイスをクリックすると、デバイス詳細ページを開けます。ここから次のことができます:
* カメラのコンテキスト、RSSIの推移、ペアリング時に検出されたハブ、バッテリー状態を使って、問題をライブで診断します。
* 感度の調整、再ペアリング、センサーのミュート、コンテキストカメラの追加、または映像検証の有効化により、問題をすぐに解決します。
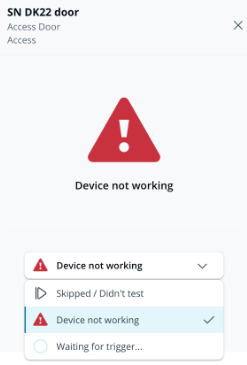
### センサー状態の上書き
ウォークテスト中にセンサーが動作しない場合は、ウォークテストページから結果を手動で設定できます:
* 選択 **デバイスが動作していません** 後で対応するようにマークします。
* 選択 **スキップ / テストしなかった** センサーをテストしていない場合。
---
# Agent Instructions
This documentation is published with GitBook. GitBook is the documentation platform designed so that both humans and AI agents can read, navigate, and reason over technical content effectively. Learn more at gitbook.com.
## Querying This Documentation
If you need additional information that is not directly available in this page, you can query the documentation by asking a question.
Perform an HTTP GET request on the following URL with the `ask` and `goal` query parameters:
```
GET https://help.verkada.com/new-alarms/ja/she-ding/alarm-sites/configure-partitions/walk-test-for-sensor-partitions.md?ask=&goal=
```
`ask` is the immediate question: it should be specific, self-contained, and written in natural language.
`goal` is what the user is ultimately trying to achieve, the reason they need the answer. Sharing it helps GitBook give you a better, more relevant answer. A goal is most helpful when it describes the outcome the user wants rather than restating the question. For example, with `ask=how do I create an API token`, a goal like `automate deployments from our CI pipeline` lets GitBook tailor the answer to that use case.
The response will contain a direct answer to the question and relevant excerpts and sources from the documentation.
Use this mechanism when the answer is not explicitly present in the current page, you need clarification or additional context, or you want to retrieve related documentation sections.