> For the complete documentation index, see [llms.txt](https://help.verkada.com/llms.txt). Markdown versions of documentation pages are available by appending `.md` to page URLs; this page is available as [Markdown](https://help.verkada.com/new-alarms/configuration/configure-camera-alarm-trigger-events-for-new-alarms.md).
# Configure Camera Alarm Trigger Events for New Alarms
Learn how to configure your camera for alarm trigger events
{% hint style="success" %}
This article is a guide for New Alarms. Refer to this [article](/classic-alarms/events-and-alerts/configure-alarms-event-alerts/configure-camera-alarm-trigger-events.md) if you have classic Alarms. [See New Alarms vs Classic Alarms](/new-alarms/getting-started/new-alarms-vs-classic-alarms.md) if you are unsure which version of Alarms you have.
{% endhint %}
***
## Configuration
{% stepper %}
{% step %}
**In Verkada Command, go to All Products > New Alarms.**
{% endstep %}
{% step %}
**Select the Alarm site that you want to configure.**
{% endstep %}
{% step %}
**In the left navigation, select Partitions > your camera partition.**
{% endstep %}
{% step %}
**Under Devices:**
1. In the top right, click **Add Camera.**
2. Select the camera(s) to configure and click **Next Step**.
3. Click anywhere on the camera feed and select a trigger type:
* Detection Area (for person detection or loitering)
* Line Crossing
4. Draw the Detection area or a line
{% hint style="info" %}
For the Detection Area trigger type, the default setting is loitering for 15 seconds.
{% endhint %}
{% endstep %}
{% step %}
**To switch from a people trigger to a vehicle trigger, toggle the Look for icon to the car after drawing the line.**
{% endstep %}
{% step %}
Click **Save Camera(s).**
{% embed url="" %}
{% endstep %}
{% endstepper %}
***
## Edit alarm triggers
{% stepper %}
{% step %}
**In Verkada Command, go to All Products > New Alarms.**
{% endstep %}
{% step %}
**Select the Alarm site that you want to edit.**
{% endstep %}
{% step %}
**In the left navigation, select Partitions > your camera partition.**
{% endstep %}
{% step %}
**Under Devices:**
1. Hover over a camera and click :ellipsis: > **Edit triggers.**
2. Click on the configured detection area or line and make the necessary changes.
3. Click **Save Cameras.**
{% endstep %}
{% endstepper %}
### Delete alarm triggers
{% stepper %}
{% step %}
**In Verkada Command, go to All Products > New Alarms.**
{% endstep %}
{% step %}
**Select the Alarm site that you want to edit.**
{% endstep %}
{% step %}
**In the left navigation, select Partitions > your camera partition.**
{% endstep %}
{% step %}
**Under Devices:**
1. Hover over a camera and click :ellipsis: > **Edit triggers.**
2. Click on the configured detection area or line > :trash-can:.
3. Click **Save Cameras.**
{% endstep %}
{% endstepper %}
### **Remove a camera as an alarm trigger**
{% stepper %}
{% step %}
**In Verkada Command, go to All Products > New Alarms.**
{% endstep %}
{% step %}
**Select the Alarm site that you want to edit.**
{% endstep %}
{% step %}
**In the left navigation, select Partitions > your camera partition.**
{% endstep %}
{% step %}
**Under Devices:**
1. Hover over a camera and click :ellipsis: > **Remove camera.**
{% endstep %}
{% endstepper %}
### Mute a camera alarm trigger
{% stepper %}
{% step %}
**In Verkada Command, go to All Products > New Alarms.**
{% endstep %}
{% step %}
**Select the alarm site that you want to configure.**
{% endstep %}
{% step %}
**In the left navigation, select Devices > your camera.**
{% endstep %}
{% step %}
On the right, under **Device Details**, select **Mute device for**, then choose the duration.
{% endstep %}
{% endstepper %}
### **Unmute a camera alarm trigger**
{% stepper %}
{% step %}
**In Verkada Command, go to All Products > New Alarms.**
{% endstep %}
{% step %}
**Select the alarm site that you want to configure.**
{% endstep %}
{% step %}
**In the left navigation, select Devices > your camera.**
{% endstep %}
{% step %}
On the right, under **Device Details**, select **Unmute.**
{% endstep %}
{% endstepper %}
***
## When should a detection occur?
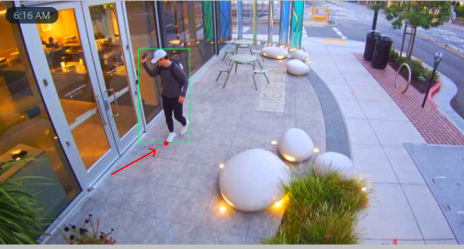
When a Verkada camera detects an object, green bounding boxes appear over the detected object(s). You can see these bounding boxes when scrubbing through a camera’s [people and vehicle motion search](/verkada-cameras/analytics/people-and-vehicle-motion-search.md) or when scrubbing through a camera’s historical video.
Detection is determined when the center bottom of a person’s bounding box crosses a line or lies within a loitering region (in most cases, this is a person’s feet).
***
## Alarm triggers
### Person detection
Person detection is determined whenever any part of a person’s bounding box intersects with the configured detection area.
{% hint style="warning" %}
You can define up to 4 freeform polygon detection areas per camera for person detection.
{% endhint %}
#### PTZ cameras
{% hint style="danger" %}
Full-frame person detection is the only supported trigger for PTZ cameras.
{% endhint %}
* PTZ cameras can support [multiple active regions](/verkada-cameras/configuration/view-and-edit-camera-settings/set-up-sentry-mode-on-a-ptz-camera.md), but use only one active region when configuring a camera as an alarm trigger. Multiple regions can cause the camera to reposition immediately after an alert, making it harder to track subjects.
* Set the field of view to cover only restricted areas. Because PTZ cameras use full-frame person detection, avoid including sidewalks, public walkways, or other high-traffic zones.
### Loitering detection
Loitering detection allows you to define a region with a freeform polygon and set how long a person must stay in that region before detection occurs.
{% hint style="warning" %}
Loitering detection can be set for 10s, 15s, 30s, 1 min, or 2min.
{% endhint %}
#### How it works
{% stepper %}
{% step %}
**Once the person’s trigger point intersects the loitering region, the timer begins.**
{% endstep %}
{% step %}
**If the trigger point remains in this region for the configured time (one minute by default), a detection event occurs.**
{% endstep %}
{% step %}
**If the person’s trigger point briefly exits and re-enters the loitering region within 4 seconds, the counter continues.**
{% endstep %}
{% step %}
**If the camera loses track of an individual (for example, walking out of frame) or the trigger point is outside the loitering region for more than 4 seconds, the counter resets.**
{% hint style="warning" %}
You can define up to 4 freeform polygon detection areas per camera for loitering.
{% endhint %}
{% endstep %}
{% endstepper %}
### Line Crossing
Line crossing provides more control and granularity in a trigger by allowing you to define a unidirectional or bidirectional line that a person has to cross before detection occurs.
{% hint style="warning" %}
You can define up to 5 lines and select the direction you expect people to cross.
{% endhint %}
#### Third-party cameras
{% hint style="warning" %}
**Advanced Analytics** must be enabled to use Line Crossing and Loitering triggers.
{% endhint %}
To enable Advanced Analytics on a third-party camera:
{% stepper %}
{% step %}
In Verkada Command, go to All Products > Devices.
{% endstep %}
{% step %}
Select the 3rd party camera you want to configure.
{% endstep %}
{% step %}
At the bottom right, click Settings
{% endstep %}
{% step %}
Under Analytics, Toggle on Advanced Analytics
{% endstep %}
{% endstepper %}
***
## **Reduce false alarms**
Once the protected area is configured, you can see how many alarms are expected to be raised from the selected camera based on the arm schedule and area to protect in the last week.
{% hint style="info" %}
The camera should be online and looking at the same FOV for at least one week for accurate alarm prediction.
{% endhint %}
{% stepper %}
{% step %}
**In Verkada Command, go to All Products > New Alarms.**
{% endstep %}
{% step %}
**Select the Alarm site that you want to configure.**
{% endstep %}
{% step %}
**In the left navigation, select Partitions > Select a camera partition.**
{% endstep %}
{% step %}
**Under Devices:**
a. Click **Add Camera** to add a new camera trigger.\
b. Hover over a camera and click > **Edit triggers** to edit an existing camera trigger.
{% endstep %}
{% step %}
**Click Show Examples to view detections from the past week based on the current arm schedule.**
{% endstep %}
{% step %}
**Click this arm schedule, and a timeline will appear. A gray curve on the timeline represents past detections. Click on any section of the curve to view the detections and gain insight into what would have triggered the alarm.**
{% endstep %}
{% step %}
**Adjust the schedule or trigger settings (area/loitering time/line) as needed to reduce false or excessive alarms. For example, you can increase the loitering duration or refine the Area to Protect to exclude high-traffic areas.**
{% endstep %}
{% endstepper %}
---
# Agent Instructions
This documentation is published with GitBook. GitBook is the documentation platform designed so that both humans and AI agents can read, navigate, and reason over technical content effectively. Learn more at gitbook.com.
## Querying This Documentation
If you need additional information that is not directly available in this page, you can query the documentation by asking a question.
Perform an HTTP GET request on the following URL with the `ask` and `goal` query parameters:
```
GET https://help.verkada.com/new-alarms/configuration/configure-camera-alarm-trigger-events-for-new-alarms.md?ask=&goal=
```
`ask` is the immediate question: it should be specific, self-contained, and written in natural language.
`goal` is what the user is ultimately trying to achieve, the reason they need the answer. Sharing it helps GitBook give you a better, more relevant answer. A goal is most helpful when it describes the outcome the user wants rather than restating the question. For example, with `ask=how do I create an API token`, a goal like `automate deployments from our CI pipeline` lets GitBook tailor the answer to that use case.
The response will contain a direct answer to the question and relevant excerpts and sources from the documentation.
Use this mechanism when the answer is not explicitly present in the current page, you need clarification or additional context, or you want to retrieve related documentation sections.
%20copy.png?alt=media&token=a84be76b-bf3f-44eb-8dbd-118de3b08e9c)




.png?alt=media&token=b91c3b2b-4b6f-4e4e-90d3-69dca34a7bb3)