> For the complete documentation index, see [llms.txt](https://help.verkada.com/llms.txt). Markdown versions of documentation pages are available by appending `.md` to page URLs; this page is available as [Markdown](https://help.verkada.com/intercom/ja/she-zhi/configure-a-second-generation-intercom-as-a-1-door-ac.md).
# 第2世代インターコムを 1 ドア AC として設定する
Verkada Command のセットアップを開始する前に、ハードウェアを設定してください。
第2世代のインターコムを使用している場合は、 [インストールガイド](https://www.verkada.com/docs/?product=intercom\&contentType=setupGuide) を続行する前に参照してください。
***
## Verkada リーダー
第2世代の Verkada インターコム(TD33、TD53、TD63)には、内蔵リーダーが搭載されています。TD63 では、訪問者はキーパッドで入室コードを入力し、その後に **#** 解錠するには(たとえば、 **1234#**)。詳細は [訪問キーで一時的なインターコムアクセスを付与する](/intercom/ja/she-ding/grant-temporary-access-with-visit-keys.md) をご覧ください。TD52 を使用している場合は、 [この記事](/intercom/ja/she-ding/configure-a-video-intercom-as-a-1-door-ac.md) を参照して、リーダーを取り付け、デバイスを 1 ドアのアクセスコントローラーとして構成する方法を確認してください。
***
## 出力配線
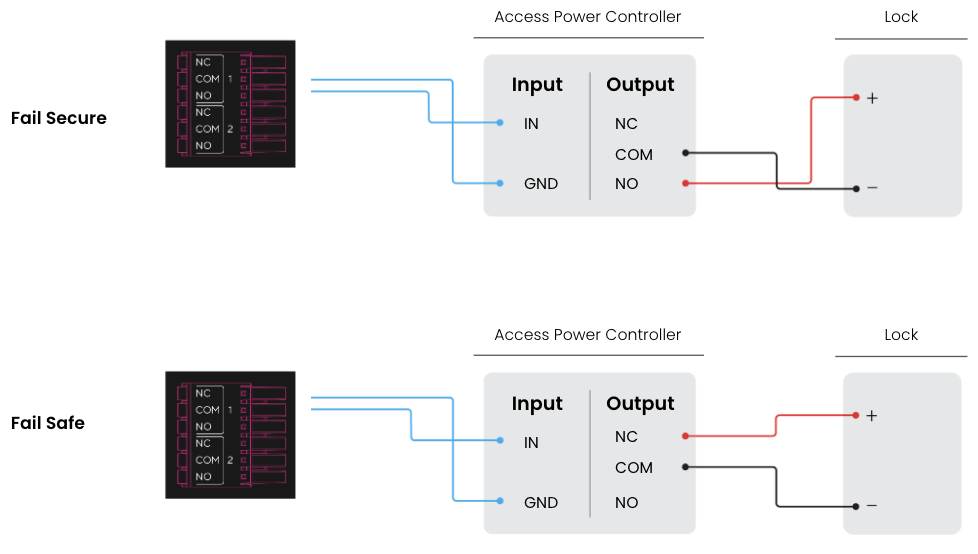
第2世代の Verkada インターコムには、アクセスコントローラーとして構成できる無電圧 C 接点リレー出力があります。これには、下図のようにインターコムを補助電源コントローラーとロックに配線します。
***
## ドア設定
{% stepper %}
{% step %}
**Intercom Settings > Door に移動します。**
{% endstep %}
{% step %}
**[ドアを追加]をクリック**
{% endstep %}
{% step %}
**[インターコムに直接]を選択**
{% endstep %}
{% endstepper %}
### リーダー
| | |
| ---------------------- | ----------------------------------------- |
| **バッジリーダー** | RFC と NFC のサポートを切り替えます(Bluetooth は含まれません) |
| **NFC 解錠** | NFC サポートを切り替えます |
| **Bluetooth 解錠** | Bluetooth サポートを切り替えます |
| **Bluetooth 解錠トリガー** | アクセスを取得するために必要な距離と操作を設定します |
| **Bluetooth クールダウン** | Bluetooth によるドア解錠の最小間隔 |
| **Bluetooth 解錠時にビープ音** | アクセス許可時にビープ音 |
### I/O
| | |
| -------- | ---------------------- |
| **入力 1** | DPI または通話トリガーを設定 |
| **入力 2** | REX または通話トリガーを設定 |
| **入力 3** | REX または通話トリガーを設定 |
| **出力** | 解錠 - 1 ドア AC モードでは変更不可 |
| **出力 2** | チャイムまたは通話中を設定 |
### 解錠
| | |
| ---------- | ----------------------------------------------- |
| **解錠時間** | 解錠後にドアを開けたままにする時間を設定します |
| **解錠音** | 受信機によってドアが解錠されたときに音を再生するかどうかを切り替えます |
| **リモート解錠** | Command または Pass アプリの対象ユーザーがドアを解錠できるかどうかを切り替えます |
***
## インターコムのドアへのユーザーアクセスを割り当てる
Command でインターコムにドアを追加した後、 [アクセスコントロールメニューでアクセスレベルを割り当てることができます](/access-control/ja/yzto/add-a-user-to-the-verkada-access-system/assign-a-user-access-to-a-door.md).
---
# Agent Instructions
This documentation is published with GitBook. GitBook is the documentation platform designed so that both humans and AI agents can read, navigate, and reason over technical content effectively. Learn more at gitbook.com.
## Querying This Documentation
If you need additional information that is not directly available in this page, you can query the documentation by asking a question.
Perform an HTTP GET request on the following URL with the `ask` and `goal` query parameters:
```
GET https://help.verkada.com/intercom/ja/she-zhi/configure-a-second-generation-intercom-as-a-1-door-ac.md?ask=&goal=
```
`ask` is the immediate question: it should be specific, self-contained, and written in natural language.
`goal` is what the user is ultimately trying to achieve, the reason they need the answer. Sharing it helps GitBook give you a better, more relevant answer. A goal is most helpful when it describes the outcome the user wants rather than restating the question. For example, with `ask=how do I create an API token`, a goal like `automate deployments from our CI pipeline` lets GitBook tailor the answer to that use case.
The response will contain a direct answer to the question and relevant excerpts and sources from the documentation.
Use this mechanism when the answer is not explicitly present in the current page, you need clarification or additional context, or you want to retrieve related documentation sections.