> For the complete documentation index, see [llms.txt](https://help.verkada.com/llms.txt). Markdown versions of documentation pages are available by appending `.md` to page URLs; this page is available as [Markdown](https://help.verkada.com/intercom/ja/she-ding/wire-a-video-intercom/set-up-td63-keypad-directory.md).
# TD63 キーパッドディレクトリを設定する
TD63 のキーパッドを使用して、異なる通話フローをダイヤルする
TD63 のキーパッドディレクトリでは、内線番号をダイヤルすることでテナントに連絡できます。各内線番号を通話フローに割り当てることができるため、通話を適切な宛先へ簡単に振り分けられます。
{% hint style="info" %}
**始める前に:** 次の方法を確認します [インターホン受信機を設定する](/intercom/ja/she-ding/add-and-configure-receivers-in-intercom.md).
{% endhint %}
***
## キーパッドディレクトリを有効にする
{% stepper %}
{% step %}
**Verkada Command で、\[すべての製品] > \[インターホン] に移動します。**
{% endstep %}
{% step %}
**インターホンを選択し、\[設定] をクリックします。**
{% endstep %}
{% step %}
**\[デバイス] の下で、\[マルチテナント ディレクトリ] をオンにします。**
{% endstep %}
{% endstepper %}
### 長い通話コードを有効にする
既定では、内線番号は 3 桁以下に制限されており、アクセス PIN コード(4 桁以上)との競合を防ぎます。長い内線番号を使用できるように、アクセス PIN コードを無効にできます。
{% stepper %}
{% step %}
**Verkada Command で、\[すべての製品] > \[インターホン] に移動します。**
{% endstep %}
{% step %}
**インターホンを選択し、\[設定] をクリックします。**
{% endstep %}
{% step %}
**\[デバイス] の下で、\[長い通話コードを有効にする] をオンにします。**
{% endstep %}
{% endstepper %}
***
## ディレクトリを設定する
{% stepper %}
{% step %}
**Verkada Command で、\[すべての製品] > \[インターホン] に移動します。**
{% endstep %}
{% step %}
**インターホンを選択し、\[受信機] をクリックします。**
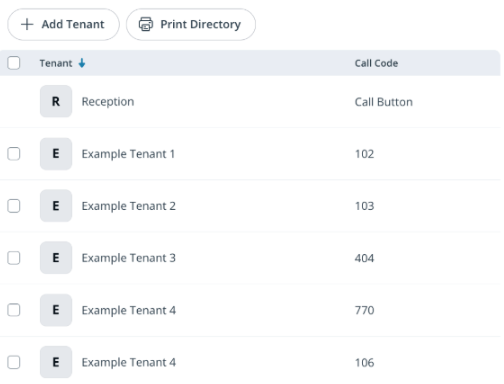
**注:** ディレクトリには、通話ボタンに関連付けられた既定のエントリが常に 1 つ含まれます。ボタンを押すと、その通話フローが起動します。
{% endstep %}
{% step %}
**上部の \[テナントを追加] をクリックします。**
a. テナント名を入力します。\
b. 通話コード(内線番号)を入力します。\
c. (任意)テナントのロゴをアップロードします。これはディレクトリに表示されます。\
d. \[ **続行**.
{% endstep %}
{% step %}
**通話コードに関連付けられた受信機を設定します。**
**注:** 詳細は [インターホンで受信機を追加および設定する](/intercom/ja/she-ding/add-and-configure-receivers-in-intercom.md) を参照してください。
{% endstep %}
{% step %}
**すべてのディレクトリエントリが追加されるまで、これらの手順を繰り返します。**
{% endstep %}
{% endstepper %}
***
## テナントに発信する
キーパッドディレクトリからテナントに電話をかけるには:
{% stepper %}
{% step %}
**テナントの内線コード(例:123)を入力します。**
{% endstep %}
{% step %}
**# を押して通話を開始します。**
{% endstep %}
{% endstepper %}
その内線番号に関連付けられた通話フローに接続されます。
{% hint style="info" %}
この **#** キーは TD63 キーパッドでさまざまな用途に使われます:
* **ディレクトリ通話:** テナントの内線番号を入力し、次に **#** を押して通話を開始します(例: **123#**).
* **入館コード:** 入館コードを入力し、次に **#** を押してドアを解錠します(例: **1234#**)。詳細は [訪問用キーで一時的なインターホンアクセスを許可する](/intercom/ja/she-ding/grant-temporary-access-with-visit-keys.md) を参照してください。
{% endhint %}
***
## ディレクトリを印刷する
{% stepper %}
{% step %}
**Verkada Command で、\[すべての製品] > \[インターホン] に移動します。**
{% endstep %}
{% step %}
**インターホンを選択し、\[受信機] をクリックします。**
{% endstep %}
{% step %}
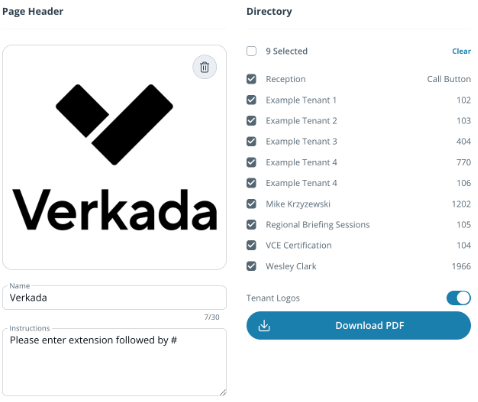
**\[ディレクトリを印刷] を選択します。**
a. (任意) **ロゴをアップロードして** ディレクトリのヘッダーに表示します。\
b. 一意の名前を入力します。\
c. ディレクトリの使用方法を説明する訪問者向けの手順を追加します(例:内線番号をダイヤルして **#** を押して通話します)。訪問者が同じデバイスで入館コードも使用する場合は、コードを入力した後に **#** を押して解錠するよう案内を含めます(例: **1234#**)。\
d. 表示するディレクトリエントリを選択します。\
e. (任意) **テナントのロゴ** を表示するにはオンにします。\
f. \[ **PDF をダウンロード** してディレクトリを生成します。
{% endstep %}
{% endstepper %}
{% hint style="info" %}
**実際の動作を見てみますか?** こちらをご覧ください [動画チュートリアル](https://youtu.be/PN-Ef4sv2NI).
{% endhint %}
---
# Agent Instructions
This documentation is published with GitBook. GitBook is the documentation platform designed so that both humans and AI agents can read, navigate, and reason over technical content effectively. Learn more at gitbook.com.
## Querying This Documentation
If you need additional information that is not directly available in this page, you can query the documentation dynamically by asking a question.
Perform an HTTP GET request on the current page URL with the `ask` query parameter, and the optional `goal` query parameter:
```
GET https://help.verkada.com/intercom/ja/she-ding/wire-a-video-intercom/set-up-td63-keypad-directory.md?ask=&goal=
```
`ask` is the immediate question: it should be specific, self-contained, and written in natural language.
`goal` is optional and describes the broader end goal you are ultimately trying to accomplish on behalf of the user. GitBook uses it to tailor the answer towards what is most useful for that goal.
The response will contain a direct answer to the question and relevant excerpts and sources from the documentation.
Use this mechanism when the answer is not explicitly present in the current page, you need clarification or additional context, or you want to retrieve related documentation sections.