> For the complete documentation index, see [llms.txt](https://help.verkada.com/llms.txt). Markdown versions of documentation pages are available by appending `.md` to page URLs; this page is available as [Markdown](https://help.verkada.com/intercom/ja/she-ding/wire-a-doorbell-chime-to-an-intercom/set-up-a-4-wire-doorbell-chime-for-verkada-intercom.md).
# Verkada Intercom 用に 4 線式ドアベルチャイムを設定する
12V 4 線式ドアベルを Verkada Intercom のチャイムとして設定する方法を学ぶ
Verkadaインターホンには、ドアベルやチャイムを鳴らすために使用できる出力リレーが搭載されています。
{% hint style="danger" %}
インターホンに給電するには、サードパーティ製の電源が必要です。
{% endhint %}
{% hint style="warning" %}
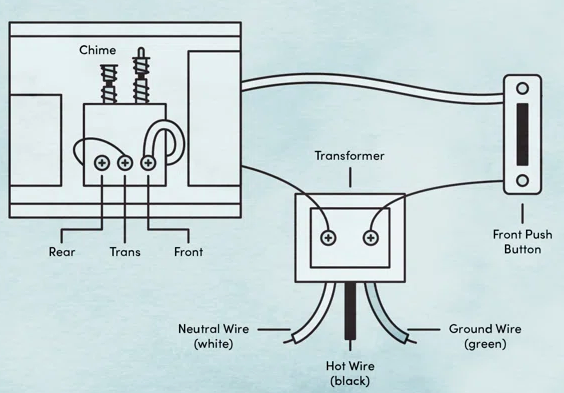
このガイドは4線式チャイムに適用されます。以下の図のような、より一般的なドアベルの構成をお使いの場合は、 [Verkadaインターホンの従来型ドアベル配線](/intercom/ja/she-ding/wire-a-doorbell-chime-to-an-intercom.md) を参照して、詳細な配線ガイドをご覧ください。
 {% endhint %}
***
## チャイム出力を設定する
{% stepper %}
{% step %}
**Verkada Commandで、[すべての製品]>[インターホン]に移動します。**
{% endstep %}
{% step %}
**インターホンを選択し、[Settings]をクリックします。**
{% endstep %}
{% step %}
**I/O > 出力で、チャイムを選択します。**
{% endstep %}
{% endstepper %}
### インターホンを配線する
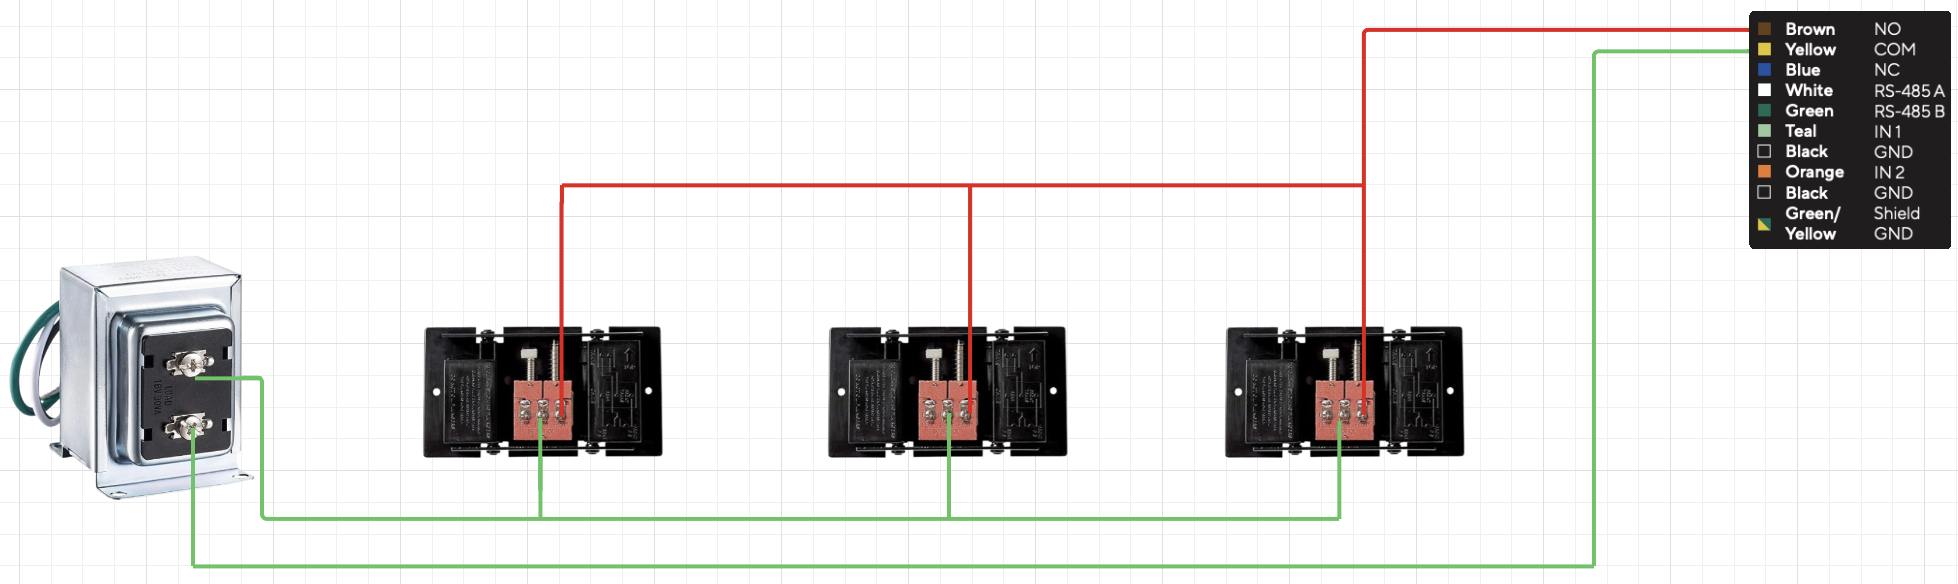
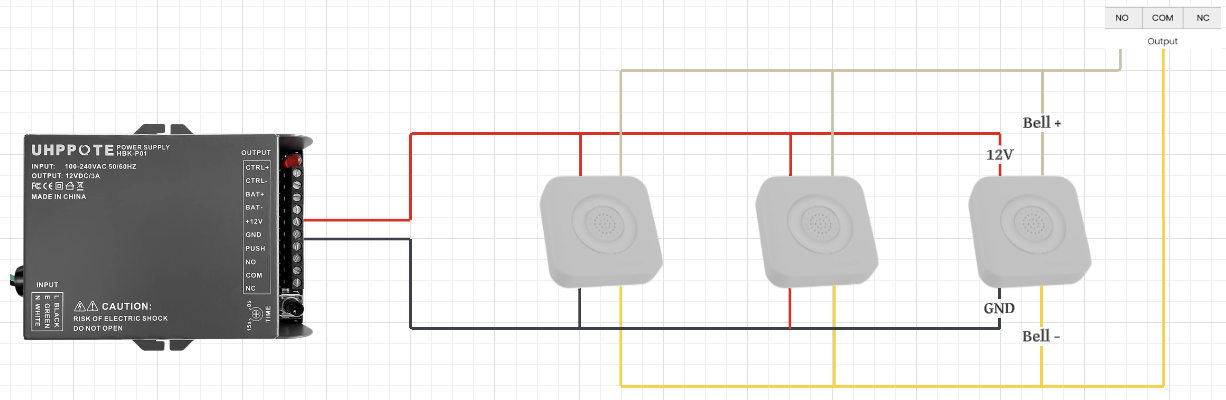
4線式ベルには、電源用の2本の線と、ベルの音を鳴らすための2本の線があります。この手順は、画像に示すように、1台のドアベル(または複数のドアベル)を並列配線する場合に適用されます。
{% stepper %}
{% step %}
**インターホン背面から端子台またはピグテールを取り外します。**
{% endstep %}
{% step %}
**各ドアベルについて、bell+ と bell– を、それぞれインターホンの端子台/ピグテール上の NO 出力と COM 出力に配線します。**
{% endstep %}
{% step %}
**各ドアベルについて、正電圧とグラウンドを、それぞれ電源の正電圧出力とグラウンドに配線します。**
{% endstep %}
{% step %}
**端子台をインターホンに差し戻します。**
{% endstep %}
{% endstepper %}
***
{% hint style="warning" %}
ドアベルが複数ある場合は、並列に配線します。
{% endhint %}
#### TD33 ピッグテール配線
#### TD52/53/63 端子台配線
---
# Agent Instructions
This documentation is published with GitBook. GitBook is the documentation platform designed so that both humans and AI agents can read, navigate, and reason over technical content effectively. Learn more at gitbook.com.
## Querying This Documentation
If you need additional information that is not directly available in this page, you can query the documentation by asking a question.
Perform an HTTP GET request on the following URL with the `ask` and `goal` query parameters:
```
GET https://help.verkada.com/intercom/ja/she-ding/wire-a-doorbell-chime-to-an-intercom/set-up-a-4-wire-doorbell-chime-for-verkada-intercom.md?ask=&goal=
```
`ask` is the immediate question: it should be specific, self-contained, and written in natural language.
`goal` is what the user is ultimately trying to achieve, the reason they need the answer. Sharing it helps GitBook give you a better, more relevant answer. A goal is most helpful when it describes the outcome the user wants rather than restating the question. For example, with `ask=how do I create an API token`, a goal like `automate deployments from our CI pipeline` lets GitBook tailor the answer to that use case.
The response will contain a direct answer to the question and relevant excerpts and sources from the documentation.
Use this mechanism when the answer is not explicitly present in the current page, you need clarification or additional context, or you want to retrieve related documentation sections.
{% endhint %}
***
## チャイム出力を設定する
{% stepper %}
{% step %}
**Verkada Commandで、[すべての製品]>[インターホン]に移動します。**
{% endstep %}
{% step %}
**インターホンを選択し、[Settings]をクリックします。**
{% endstep %}
{% step %}
**I/O > 出力で、チャイムを選択します。**
{% endstep %}
{% endstepper %}
### インターホンを配線する
4線式ベルには、電源用の2本の線と、ベルの音を鳴らすための2本の線があります。この手順は、画像に示すように、1台のドアベル(または複数のドアベル)を並列配線する場合に適用されます。
{% stepper %}
{% step %}
**インターホン背面から端子台またはピグテールを取り外します。**
{% endstep %}
{% step %}
**各ドアベルについて、bell+ と bell– を、それぞれインターホンの端子台/ピグテール上の NO 出力と COM 出力に配線します。**
{% endstep %}
{% step %}
**各ドアベルについて、正電圧とグラウンドを、それぞれ電源の正電圧出力とグラウンドに配線します。**
{% endstep %}
{% step %}
**端子台をインターホンに差し戻します。**
{% endstep %}
{% endstepper %}
***
{% hint style="warning" %}
ドアベルが複数ある場合は、並列に配線します。
{% endhint %}
#### TD33 ピッグテール配線
#### TD52/53/63 端子台配線
---
# Agent Instructions
This documentation is published with GitBook. GitBook is the documentation platform designed so that both humans and AI agents can read, navigate, and reason over technical content effectively. Learn more at gitbook.com.
## Querying This Documentation
If you need additional information that is not directly available in this page, you can query the documentation by asking a question.
Perform an HTTP GET request on the following URL with the `ask` and `goal` query parameters:
```
GET https://help.verkada.com/intercom/ja/she-ding/wire-a-doorbell-chime-to-an-intercom/set-up-a-4-wire-doorbell-chime-for-verkada-intercom.md?ask=&goal=
```
`ask` is the immediate question: it should be specific, self-contained, and written in natural language.
`goal` is what the user is ultimately trying to achieve, the reason they need the answer. Sharing it helps GitBook give you a better, more relevant answer. A goal is most helpful when it describes the outcome the user wants rather than restating the question. For example, with `ask=how do I create an API token`, a goal like `automate deployments from our CI pipeline` lets GitBook tailor the answer to that use case.
The response will contain a direct answer to the question and relevant excerpts and sources from the documentation.
Use this mechanism when the answer is not explicitly present in the current page, you need clarification or additional context, or you want to retrieve related documentation sections.