> For the complete documentation index, see [llms.txt](https://help.verkada.com/llms.txt). Markdown versions of documentation pages are available by appending `.md` to page URLs; this page is available as [Markdown](https://help.verkada.com/intercom/ja/she-ding/integrate-verkada-intercoms-with-sip.md).
# Verkada Intercom を SIP と統合する
SIP 統合で利用可能になる機能を学ぶ
Verkadaインターコムは、事実上あらゆるSession Initiation Protocol(SIP)電話システムと統合できます。 [インターコム相互運用マニュアル](/intercom/ja/she-ding/intercom-deployment-best-practices-guide/intercom-interoperability-manual.md) をご覧いただくと、対応するSIPサーバーの一覧をご確認いただけます。
### メリット
* SIP電話を通話リストの受信者として追加する
* インターコム用のカスタム発信者ID
* 1~9の任意のボタンを押してドアのロックを解除する
* 内線番号をダイヤルしてインターコムに通話する
* SIP通話は、サイトのインターネット障害時でも機能します
{% hint style="danger" %}
セキュリティとコンプライアンスを強化するため、可能な場合は、暗号化されたメディアストリームにはSRTP、暗号化されたシグナリングにはTLSを有効にすることをお勧めします。
{% endhint %}
***
## 設定
### インターコムをSIPシステム内のユーザー/電話としてプロビジョニングする
{% hint style="info" %}
この手順では、SIPプロバイダが提供するユーザー/デバイスのプロビジョニング手順に従うことをお勧めします。
{% endhint %}
従来のSIP電話を追加する場合と同様に、次の一般的な手順に従います。
{% stepper %}
{% step %}
**インターコムをユーザーとして追加します。(通常、ここで内線番号を定義します。)**
{% endstep %}
{% step %}
**インターコムをデバイスとして追加し、その後このデバイスを手順1で作成したユーザーに割り当てます。(通常、デバイスのメディアアクセス制御(MAC)アドレスが必要で、これはデバイス設定またはデバイス背面で確認できます。)**
{% endstep %}
{% endstepper %}
### Verkada Commandでインターコムを設定する
{% stepper %}
{% step %}
**Verkada Commandで、[すべての製品]>[Intercom]に移動します。**
{% endstep %}
{% step %}
**\[設定] > \[通話] > \[アカウントを追加] をクリックします。**
{% endstep %}
{% step %}
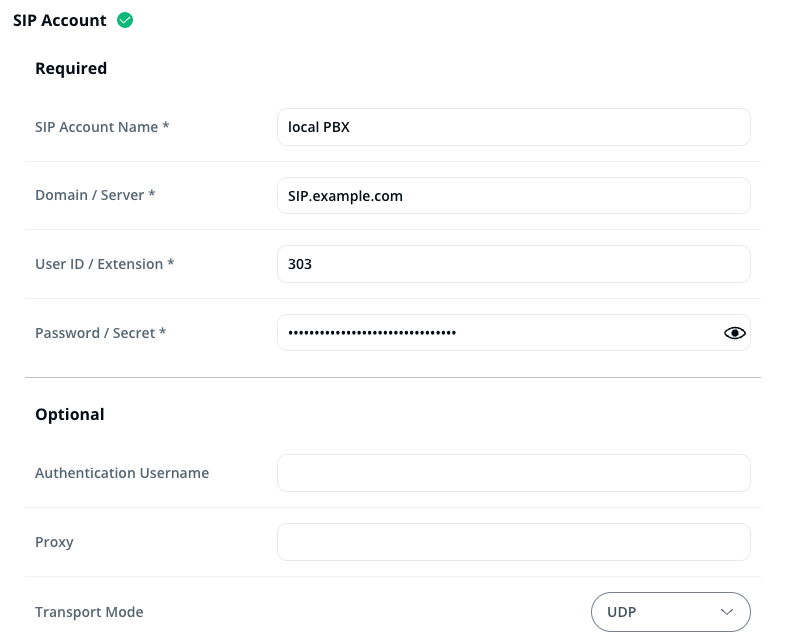
**少なくとも、\[必須] セクションを入力してください。SIPアカウント名はVerkada Commandでイベントにタグ付けするために使用され、SIPサーバーには送信されません。\[ドメイン]、\[ユーザーID]、\[パスワード] は、手順1で設定した内容と一致している必要があります。**
多くのSIPアプリケーションでは、 **\[必須]** セクションだけで十分です。たとえば、ローカルPBXサーバーでは、以下に示す情報のみが必要な場合があります。
ただし、ZoomやRingCentralのようなオフプレミスのソリューションを使用している場合は、アウトバウンドプロキシのアドレスが提供されることがあり、その場合は **プロキシ** デバイス情報
一部のプロバイダ(オンプレミス、オフプレミスの両方)では、認証ユーザー名の設定が必要な場合があります。Zoomではこれを **認証ID**と呼び、Ciscoでは認証ユーザー名が [Cisco Unified Communication Manager](/intercom/ja/she-ding/integrate-verkada-intercoms-with-sip/sip-integration-cisco-unified-cm.md)で作成したエンドユーザーIDと一致することを想定しており、freePBXでは必要ありません。
全体として、プロバイダによって **オプション** フィールドに期待される値は異なります。正しいオプションの設定で問題が発生した場合は、 [Verkadaサポート](/command/ja/herupugadesuka/contact-verkada-support.md) にご相談ください。
{% endstep %}
{% step %}
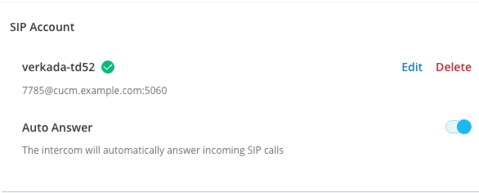
**インターコムのプロビジョニングが正常に完了すると、\[デバイス設定] > \[通話] > \[SIPアカウント] の下に緑のチェックマークが表示されます。**
{% endstep %}
{% endstepper %}
### SIP電話を受信者として追加する
{% stepper %}
{% step %}
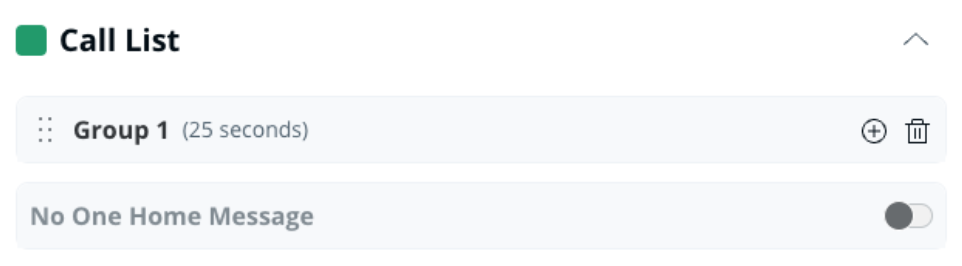
**インターコムの\[受信者]タブに移動し、通話リストを確認します。**
{% endstep %}
{% step %}
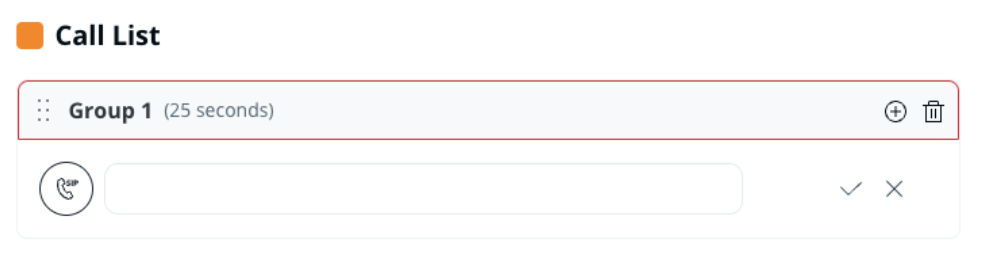
**通話リストのグループで、プラス(+)アイコンをクリックし、\[SIP電話] を選択します。**
{% endstep %}
{% step %}
**通話リストに追加したい受信者の内線番号を入力します。あるいは、SIPデバイスからインターコムに通話するには、内線番号をそのままダイヤルします。**
{% endstep %}
{% endstepper %}
***
{% hint style="info" %}
**実際に動作しているところを見たいですか?** こちらをチェックしてください [動画チュートリアル](https://www.youtube.com/watch?v=pgUM7Jwglng).
{% endhint %}
---
# Agent Instructions
This documentation is published with GitBook. GitBook is the documentation platform designed so that both humans and AI agents can read, navigate, and reason over technical content effectively. Learn more at gitbook.com.
## Querying This Documentation
If you need additional information that is not directly available in this page, you can query the documentation by asking a question.
Perform an HTTP GET request on the following URL with the `ask` and `goal` query parameters:
```
GET https://help.verkada.com/intercom/ja/she-ding/integrate-verkada-intercoms-with-sip.md?ask=&goal=
```
`ask` is the immediate question: it should be specific, self-contained, and written in natural language.
`goal` is what the user is ultimately trying to achieve, the reason they need the answer. Sharing it helps GitBook give you a better, more relevant answer. A goal is most helpful when it describes the outcome the user wants rather than restating the question. For example, with `ask=how do I create an API token`, a goal like `automate deployments from our CI pipeline` lets GitBook tailor the answer to that use case.
The response will contain a direct answer to the question and relevant excerpts and sources from the documentation.
Use this mechanism when the answer is not explicitly present in the current page, you need clarification or additional context, or you want to retrieve related documentation sections.