> For the complete documentation index, see [llms.txt](https://help.verkada.com/llms.txt). Markdown versions of documentation pages are available by appending `.md` to page URLs; this page is available as [Markdown](https://help.verkada.com/intercom/ja/she-ding/configure-a-video-intercom-as-a-1-door-ac.md).

# ビデオインターホンを1ドア AC として設定する

### 始める前に

* 以下に従ってください [インストールガイド](https://www.verkada.com/docs/?product=intercom\&contentType=setupGuide) を使用してハードウェアをセットアップしてください。
* 次のすべての要件に従ってください [Verkada Intercom を使い始める](/intercom/ja/hajimeni/get-started-with-verkada-intercom.md).

{% hint style="warning" %}
インターホンを1ドアコントローラとして設定する場合、別途ドアライセンスは必要ありません。これはインターホンライセンスに含まれています。
{% endhint %}

## ハードウェアのセットアップ

<details>

<summary>TD33</summary>

### Verkada リーダー

第2世代の Verkada Intercom（TD33、TD53、TD63）にはすべて内蔵リーダーが含まれています。TD63 では、来訪者はキーパッドでエントリーコードを入力し、その後に **#** ロック解除するには（たとえば、 **1234#**）。参照 [訪問キーで一時的なインターホンアクセスを付与する](/intercom/ja/she-ding/grant-temporary-access-with-visit-keys.md) 詳細については。

### 出力配線

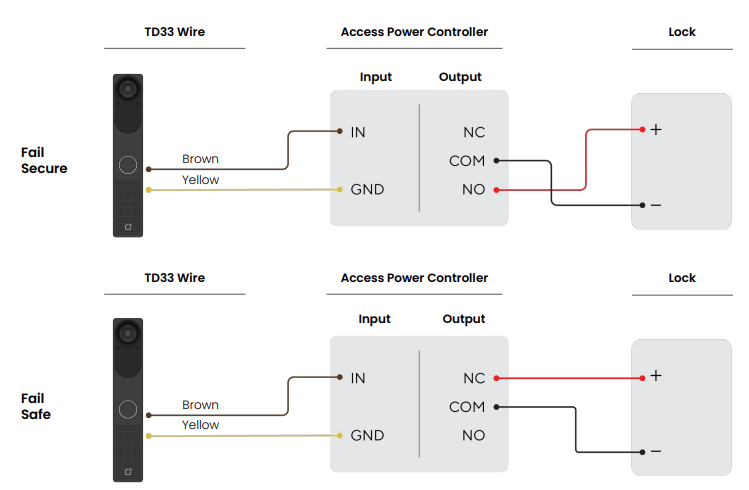
TD33 には、アクセスコントローラとして設定できるドライ接点 C リレー出力があります。これには、インターホンを補助電源コントローラとロックに配線します。

<div align="left" data-with-frame="true"><img src="/files/803c71409ecfebca729730816872cfba23e32457" alt="" width="563"></div>

</details>

<details>

<summary>TD53/63</summary>

### Verkada リーダー

第2世代の Verkada Intercom（TD33、TD53、TD63）にはすべて内蔵リーダーが含まれています。TD63 では、来訪者はキーパッドでエントリーコードを入力し、その後に **#** ロック解除するには（たとえば、 **1234#**）。参照 [訪問キーで一時的なインターホンアクセスを付与する](/intercom/ja/she-ding/grant-temporary-access-with-visit-keys.md) 詳細については。

### 出力配線

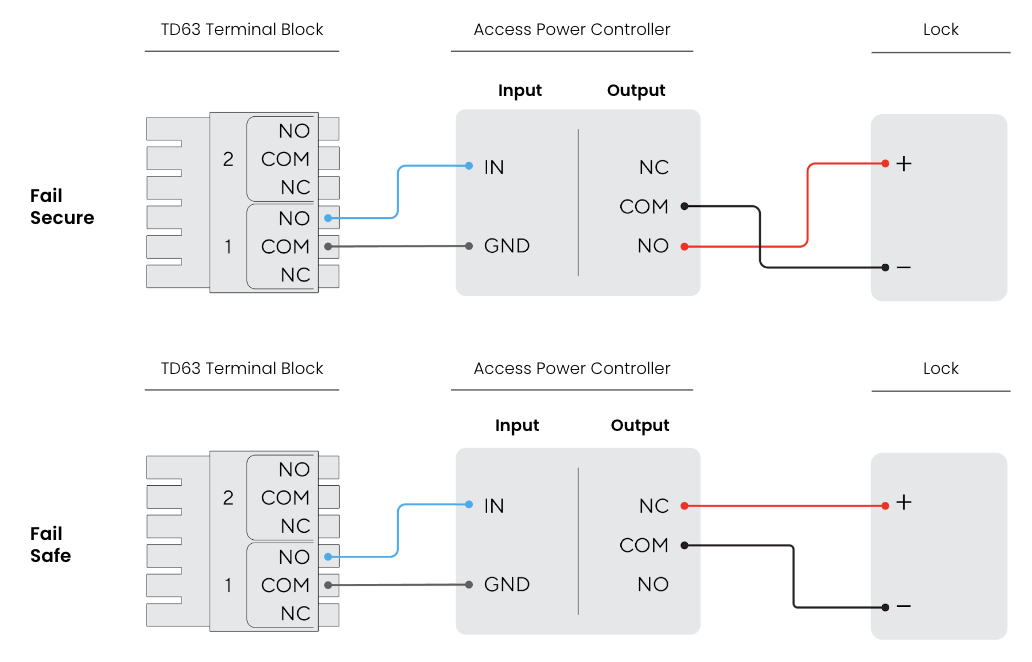
TD53 と TD63 には、アクセスコントローラとして設定できるドライ接点 C リレー出力があります。これには、インターホンを補助電源コントローラとロックに配線します。

<div align="left" data-with-frame="true"><img src="/files/a1216cfe91f65003256cba48ccaba2e680a548d7" alt="" width="563"></div>

</details>

<details>

<summary>TS12</summary>

#### Verkada リーダー <a href="#verkada-reader-2" id="verkada-reader-2"></a>

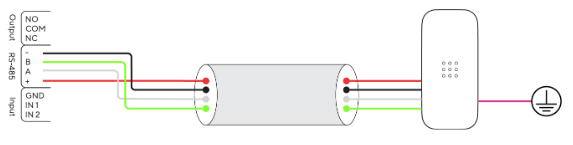
TS12 インターホンは、デバイス背面の端子台にある V+ および GND 端子を介して、12V・250mA で Verkada リーダーに電力を供給できる定格です。以下の図を使用して、Verkada リーダーを端子台に配線してください。ドレン線はリーダー側の接地に接続することを推奨します。ラッチオフ型の電流制限があるため、12V 電源を他の周辺機器の電源供給に使用しないでください。

#### 入力 <a href="#inputs" id="inputs"></a>

TS12 には、コールトリガー、DPI、または REX として機能できる汎用ドライ入力が 2 つあります。これらは、Verkada Command のインターホン設定ページの I/O セクションで構成できます。

**入力接続**

各入力について、1 本の線を IN ピンに、もう 1 本を GND ピンに接続します。これらのポートには、ドライリレー出力を備えた任意のデバイスを接続できます。関連するすべてのイベントは Command に記録されます。

#### 出力 <a href="#output" id="output"></a>

TS12 には、以下に示すように、出力端子にアクセス電源コントローラを接続することでアクセスコントローラ（AC）として設定できる、ドライ接点 C リレー出力が 1 つあります。

</details>

<details>

<summary>TD52</summary>

### Verkada リーダー

この [Verkada TD52 ビデオインターホン](https://www.verkada.com/intercom/td52/) は、Verkada リーダーに 12V・250mA で電力を供給できる定格で、（**+**）および（**–**）。

{% hint style="info" %}
ドレン線はリーダー側の接地に接続することを推奨します。
{% endhint %}

{% hint style="warning" %}
ラッチオフ型の電流制限があるため、12V 電源を他の周辺機器の電源供給に使用しないでください。
{% endhint %}

<div align="left" data-with-frame="true"><img src="/files/95f5451838d2443855c6dccd2499184aca94fe3b" alt="" width="563"></div>

### 入力

TD52 には汎用ドライ入力が 2 つあります。各入力のデフォルト状態（通常閉 \[NC] または通常開 \[NO]）は Verkada Command で構成できます。

#### 接続

各入力について、1 本の線を IN ピンに、もう 1 本を GND ピンに接続します。これらのポートには、ドライリレー出力を備えた任意のデバイスを接続できます。たとえば、ドア位置インジケーター（DPI）、退出要求（REX）センサー、インターホン、またはアクセスコントロール出力です。関連するすべてのイベントは Command に記録されます。次の方法の詳細を [入力デバイスを配線する](/intercom/ja/she-ding/wire-a-video-intercom.md).

### 出力

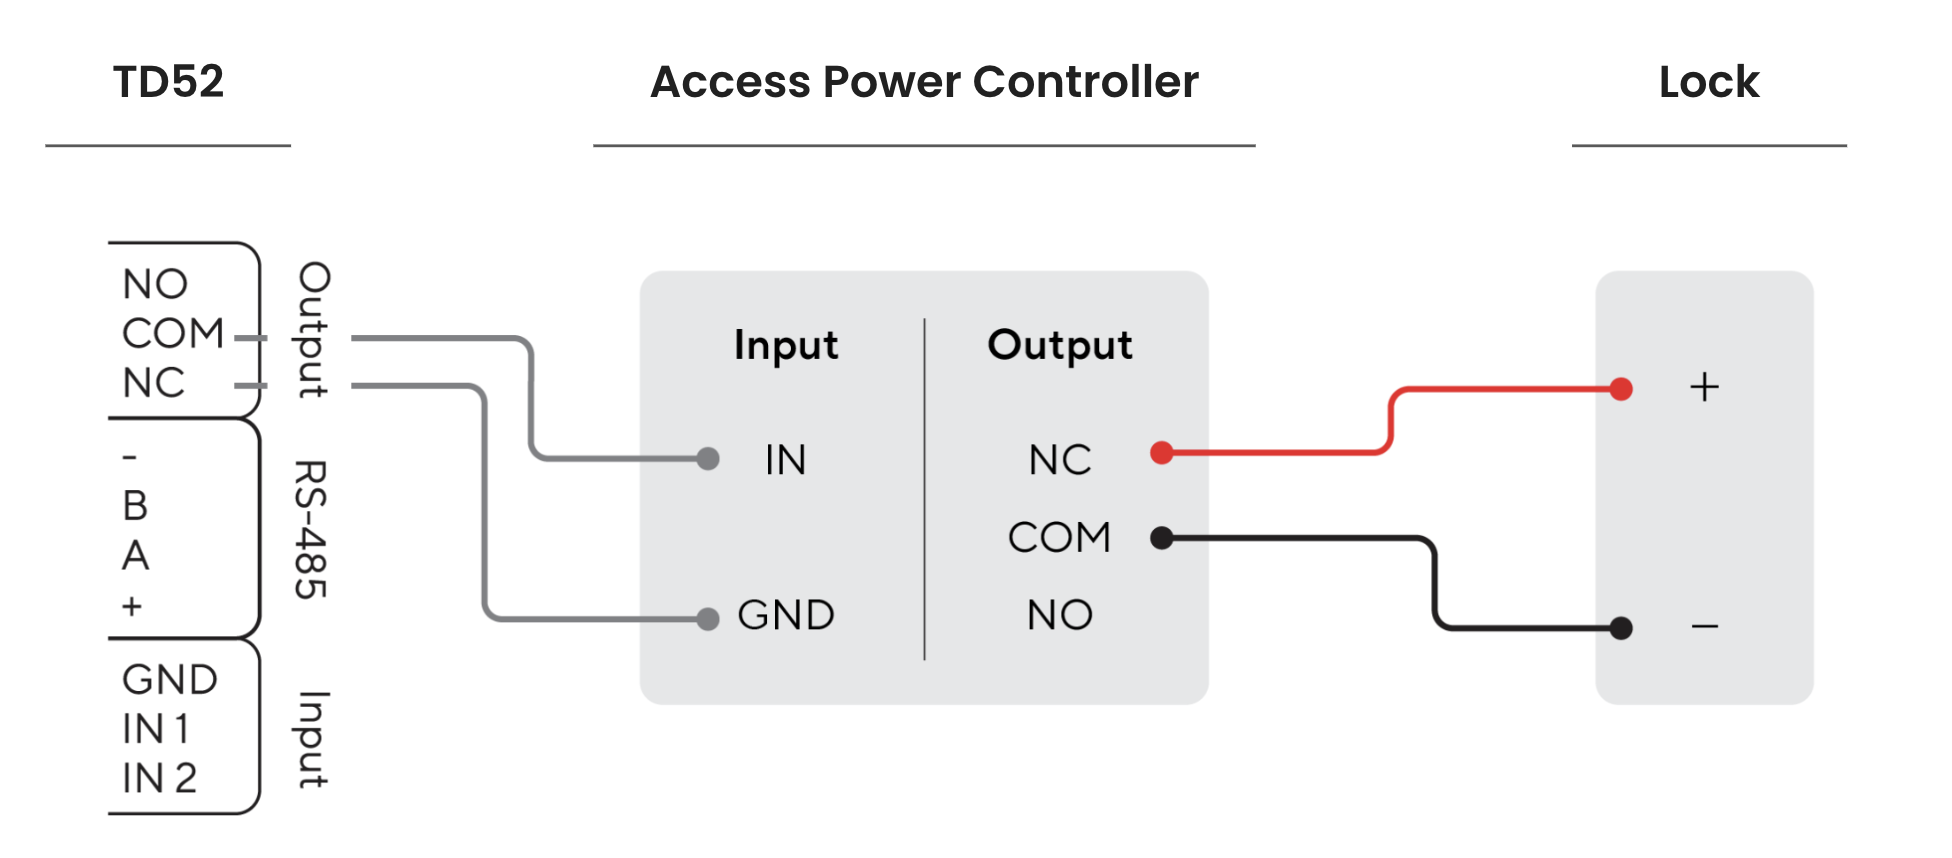
TD52 には、以下に示すように、出力端子にアクセス電源コントローラを接続することでアクセスコントローラ（AC）として設定できる、ドライ接点 C リレー出力が 1 つあります。

#### 接続

出力リレーは汎用出力としても使用できます。

* *フェイル Safe ロックの場合*、デフォルトでロックされるようにするには、+ を NC に接続します。
* *フェイルセキュア ロックの場合*、デフォルトでロックされるようにするには、+ を NO に接続します。

<div align="left" data-with-frame="true"><img src="/files/35c9d39dda392f1cad2e6c41d20842b025d2ed4d" alt="" width="563"></div>

次の方法の詳細を [出力デバイスを配線する](/intercom/ja/she-ding/wire-a-video-intercom.md).

</details>

***

## Command の設定

{% stepper %}
{% step %}
**Verkada Command で、［すべての製品］>［デバイス］に移動します。**
{% endstep %}

{% step %}
**設定するインターホンを選択します。**
{% endstep %}

{% step %}
**［設定］>［ドア］で［ドアを追加］をクリックします。**
{% endstep %}

{% step %}
**［インターホンへ直接］の［選択］をクリックします。**
{% endstep %}

{% step %}
**建物と階を選択し、［適用］をクリックします。**
{% endstep %}
{% endstepper %}

{% hint style="info" %}
参照 [ユーザーにドアへのアクセスを割り当てる](/access-control/ja/yzto/add-a-user-to-the-verkada-access-system/assign-a-user-access-to-a-door.md) ことで、ユーザーにドアへのアクセス権を付与します。
{% endhint %}


---

# Agent Instructions
This documentation is published with GitBook. GitBook is the documentation platform designed so that both humans and AI agents can read, navigate, and reason over technical content effectively. Learn more at gitbook.com.

## Querying This Documentation
If you need additional information that is not directly available in this page, you can query the documentation dynamically by asking a question.

Perform an HTTP GET request on the current page URL with the `ask` query parameter, and the optional `goal` query parameter:

```
GET https://help.verkada.com/intercom/ja/she-ding/configure-a-video-intercom-as-a-1-door-ac.md?ask=<question>&goal=<endgoal>
```

`ask` is the immediate question: it should be specific, self-contained, and written in natural language.
`goal` is optional and describes the broader end goal you are ultimately trying to accomplish on behalf of the user. GitBook uses it to tailor the answer towards what is most useful for that goal.

The response will contain a direct answer to the question and relevant excerpts and sources from the documentation.

Use this mechanism when the answer is not explicitly present in the current page, you need clarification or additional context, or you want to retrieve related documentation sections.