> For the complete documentation index, see [llms.txt](https://help.verkada.com/llms.txt). Markdown versions of documentation pages are available by appending `.md` to page URLs; this page is available as [Markdown](https://help.verkada.com/intercom/configuration/wire-a-doorbell-chime-to-an-intercom/set-up-a-4-wire-doorbell-chime-for-verkada-intercom.md).
# Set Up a 4-Wire Doorbell Chime for Verkada Intercom
Learn how to set up 12V 4-wire doorbells as Verkada Intercom chimes
Verkada intercoms include an output relay that you can use to trigger a doorbell or chime.
{% hint style="danger" %}
You need a third-party power supply to power an intercom.
{% endhint %}
{% hint style="warning" %}
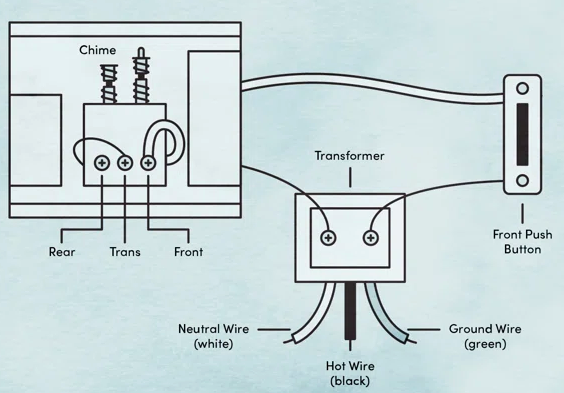
This guide applies to 4 wire chimes. If you have a more traditional doorbell setup like the diagram below, see [Traditional Doorbell Wiring for Verkada Intercoms](/intercom/configuration/wire-a-doorbell-chime-to-an-intercom.md) for a detailed wiring guide.
 {% endhint %}
***
## Configure a chime output
{% stepper %}
{% step %}
**In Verkada Command, go to All Products > Intercom.**
{% endstep %}
{% step %}
**Select your intercom and click Settings.**
{% endstep %}
{% step %}
**Under I/O > Output, select Chime.**
{% endstep %}
{% endstepper %}
### Wire your intercom
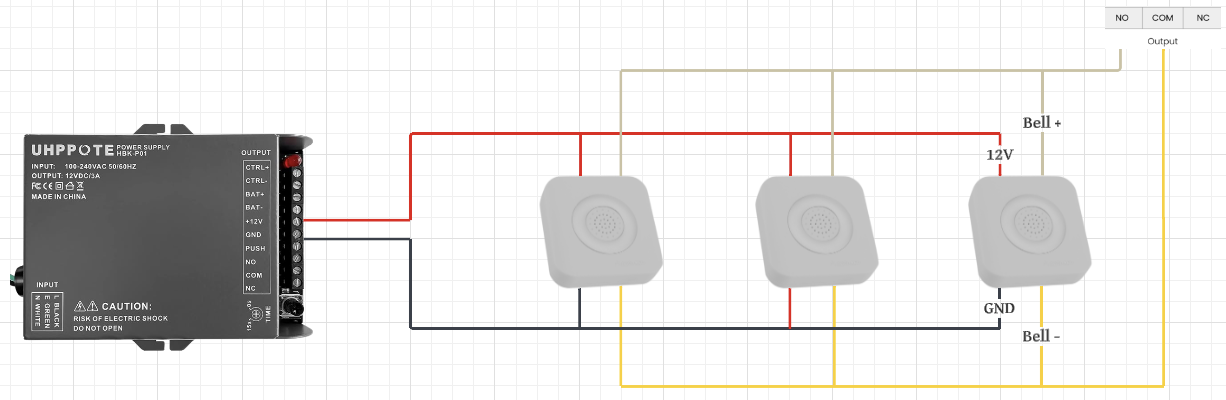
4-wire bells have 2 wires dedicated to power and 2 wires dedicated to triggering the bell sound. This procedure applies to a single doorbell (or multiple doorbells) wired in parallel, as shown in the image.
{% stepper %}
{% step %}
**Remove the terminal block or pigtail from the rear of your intercom.**
{% endstep %}
{% step %}
**For each doorbell, wire bell+ and bell– to the NO and COM outputs on the intercom terminal block/pigtail, respectively.**
{% endstep %}
{% step %}
**For each doorbell, wire positive voltage and ground to the positive voltage output and ground on your power supply, respectively.**
{% endstep %}
{% step %}
**Reinsert the terminal block into the intercom.**
{% endstep %}
{% endstepper %}
***
{% hint style="warning" %}
If you have multiple doorbells, wire them in parallel.
{% endhint %}
#### TD33 Pigtail Wiring
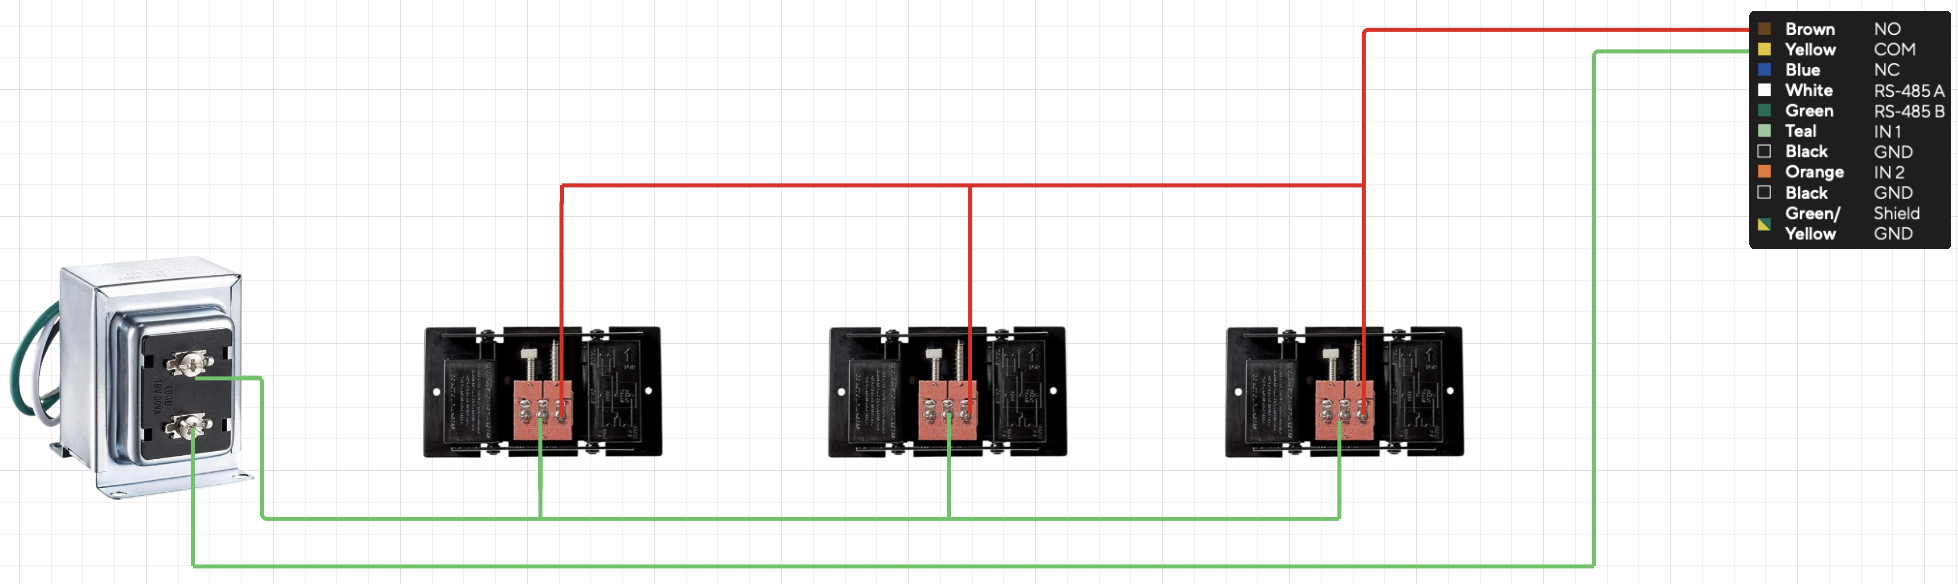
#### TD52/53/63 Terminal Block Wiring
---
# Agent Instructions
This documentation is published with GitBook. GitBook is the documentation platform designed so that both humans and AI agents can read, navigate, and reason over technical content effectively. Learn more at gitbook.com.
## Querying This Documentation
If you need additional information that is not directly available in this page, you can query the documentation by asking a question.
Perform an HTTP GET request on the following URL with the `ask` and `goal` query parameters:
```
GET https://help.verkada.com/intercom/configuration/wire-a-doorbell-chime-to-an-intercom/set-up-a-4-wire-doorbell-chime-for-verkada-intercom.md?ask=&goal=
```
`ask` is the immediate question: it should be specific, self-contained, and written in natural language.
`goal` is what the user is ultimately trying to achieve, the reason they need the answer. Sharing it helps GitBook give you a better, more relevant answer. A goal is most helpful when it describes the outcome the user wants rather than restating the question. For example, with `ask=how do I create an API token`, a goal like `automate deployments from our CI pipeline` lets GitBook tailor the answer to that use case.
The response will contain a direct answer to the question and relevant excerpts and sources from the documentation.
Use this mechanism when the answer is not explicitly present in the current page, you need clarification or additional context, or you want to retrieve related documentation sections.
{% endhint %}
***
## Configure a chime output
{% stepper %}
{% step %}
**In Verkada Command, go to All Products > Intercom.**
{% endstep %}
{% step %}
**Select your intercom and click Settings.**
{% endstep %}
{% step %}
**Under I/O > Output, select Chime.**
{% endstep %}
{% endstepper %}
### Wire your intercom
4-wire bells have 2 wires dedicated to power and 2 wires dedicated to triggering the bell sound. This procedure applies to a single doorbell (or multiple doorbells) wired in parallel, as shown in the image.
{% stepper %}
{% step %}
**Remove the terminal block or pigtail from the rear of your intercom.**
{% endstep %}
{% step %}
**For each doorbell, wire bell+ and bell– to the NO and COM outputs on the intercom terminal block/pigtail, respectively.**
{% endstep %}
{% step %}
**For each doorbell, wire positive voltage and ground to the positive voltage output and ground on your power supply, respectively.**
{% endstep %}
{% step %}
**Reinsert the terminal block into the intercom.**
{% endstep %}
{% endstepper %}
***
{% hint style="warning" %}
If you have multiple doorbells, wire them in parallel.
{% endhint %}
#### TD33 Pigtail Wiring
#### TD52/53/63 Terminal Block Wiring
---
# Agent Instructions
This documentation is published with GitBook. GitBook is the documentation platform designed so that both humans and AI agents can read, navigate, and reason over technical content effectively. Learn more at gitbook.com.
## Querying This Documentation
If you need additional information that is not directly available in this page, you can query the documentation by asking a question.
Perform an HTTP GET request on the following URL with the `ask` and `goal` query parameters:
```
GET https://help.verkada.com/intercom/configuration/wire-a-doorbell-chime-to-an-intercom/set-up-a-4-wire-doorbell-chime-for-verkada-intercom.md?ask=&goal=
```
`ask` is the immediate question: it should be specific, self-contained, and written in natural language.
`goal` is what the user is ultimately trying to achieve, the reason they need the answer. Sharing it helps GitBook give you a better, more relevant answer. A goal is most helpful when it describes the outcome the user wants rather than restating the question. For example, with `ask=how do I create an API token`, a goal like `automate deployments from our CI pipeline` lets GitBook tailor the answer to that use case.
The response will contain a direct answer to the question and relevant excerpts and sources from the documentation.
Use this mechanism when the answer is not explicitly present in the current page, you need clarification or additional context, or you want to retrieve related documentation sections.