> For the complete documentation index, see [llms.txt](https://help.verkada.com/llms.txt). Markdown versions of documentation pages are available by appending `.md` to page URLs; this page is available as [Markdown](https://help.verkada.com/guest/ja/purint/connect-a-printer-to-verkada-guest-using-an-ip-connection.md).
# IP 接続を使用してプリンターを Verkada Guest に接続
Verkada Guest 用に iPad を IP 接続でプリンターに接続
### 始める前に
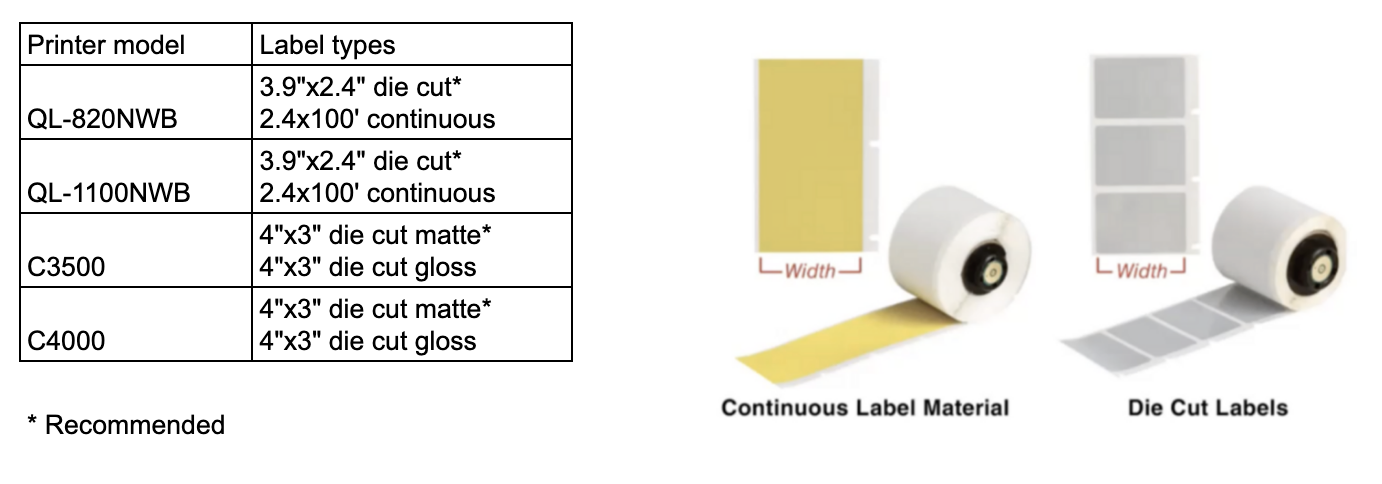
* 以下を確認してください [プリンター](#h_ae37d6fffa), [ラベルの種類とサイズ](#h_3e83b36866) それが [Verkada Guest](/guest/ja/hajimeni/get-started-with-verkada-guest.md) 対応しています。
* タブレットが [Guestアプリ用に設定されている](/guest/ja/hajimeni/get-started-with-verkada-guest.md).
#### モデル別の対応プリンター
| | |
| ----------------------------------------------------------------------------- | --------------------------------------------------------- |
| **モノクロ印刷用** | **カラー印刷用** |
| Brother QL820-NWB(簡単なセットアップ)
Brother QL1110-NWB
| Epson C4000(推奨)
Epson C3500
|
#### 対応ラベルの種類とサイズ
***
## Verkada Guestにプリンターを追加する
{% hint style="danger" %}
プリンターのPINコードを読み取り・更新するために必要な最小権限は **Workplace サイト管理者**.
{% endhint %}
### CommandでプリンターのPINコードを取得する
{% stepper %}
{% step %}
**Verkada Commandでは、All Products > Workplace >**  **Guest。**
{% endstep %}
{% step %}
**左側のナビゲーションで、Guest Settings を選択します。**
{% endstep %}
{% step %}
**上部で、Sites > 対象のサイトを選択します。**
{% endstep %}
{% step %}
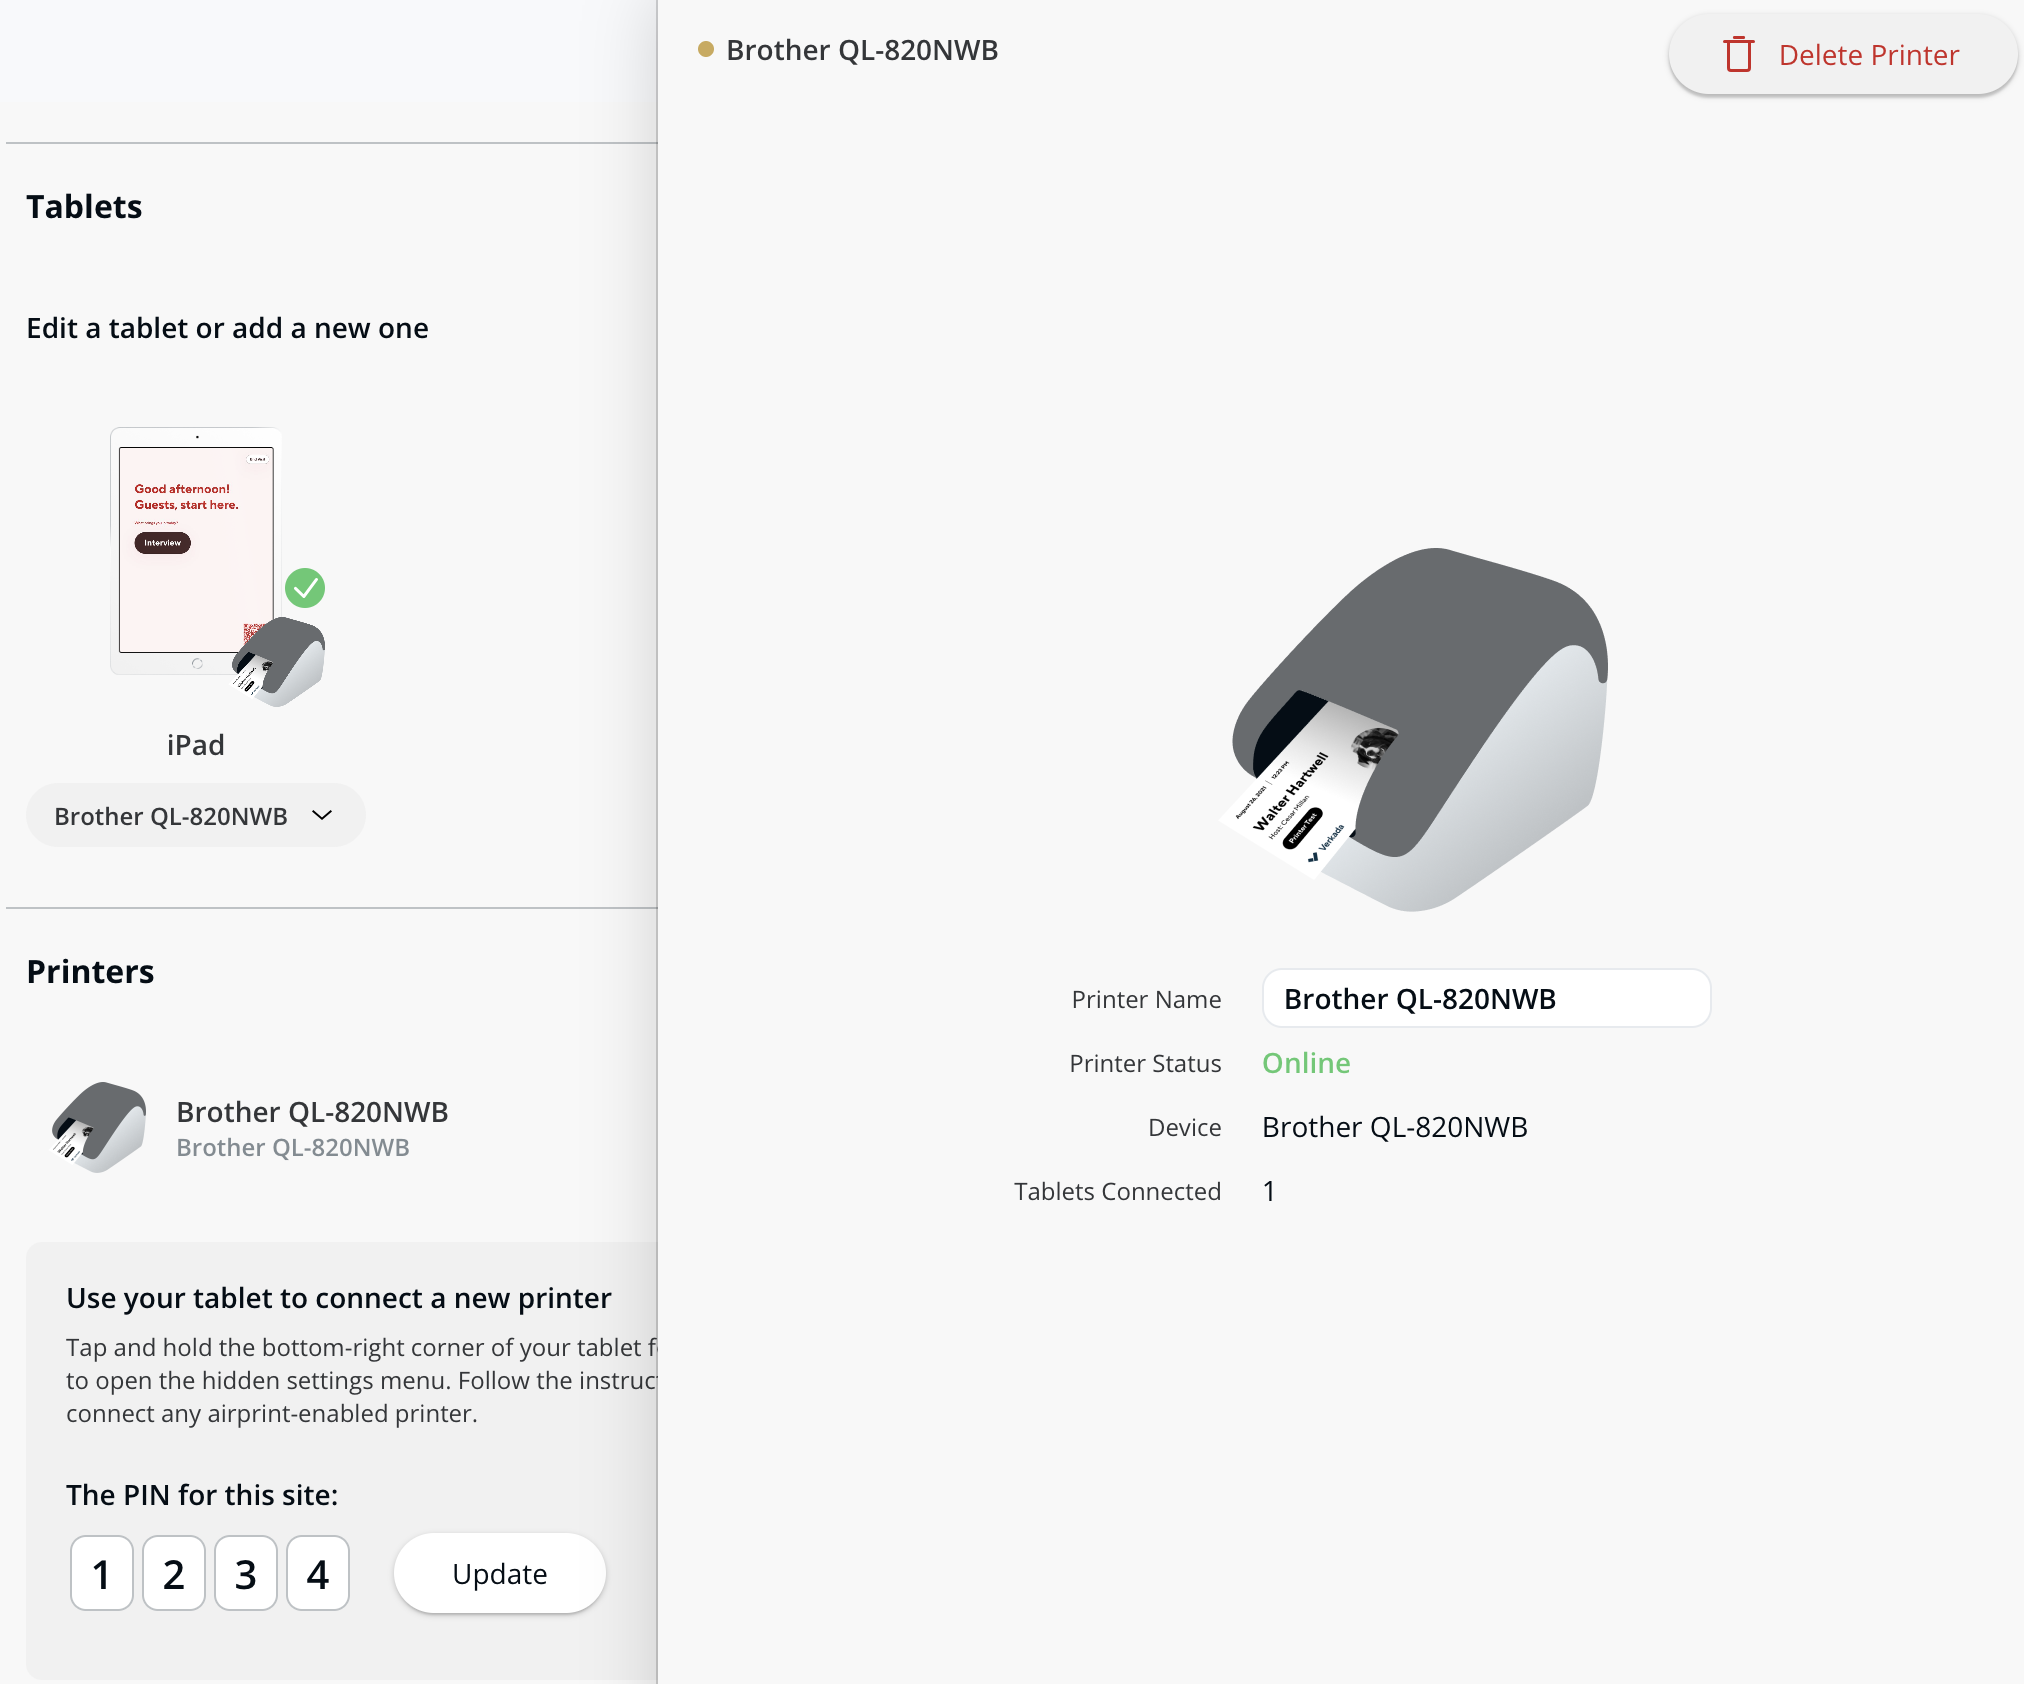
**[Printers]を選択して、選択したサイトのランダムPINコードを表示します。独自のコードを作成するには、4桁のコードを入力して[Update]をクリックします。**
{% endstep %}
{% endstepper %}
### IPアドレスでプリンターを手動で追加する
{% stepper %}
{% step %}
**プリンターがネットワークに接続されていることを確認してください。プリンターをネットワークに接続するには、以下の記事を参照してください。**
* [Brother製プリンターを接続する](/guest/ja/purint/brother-printer-setup-guide.md)
* [Epson製プリンターを接続する](/guest/ja/purint/epson-printer-setup-guide.md)
{% endstep %}
{% step %}
**Guestアプリを開き、右下隅を約3秒間タップしたままにするとPINパッドが表示されます。**
{% endstep %}
{% step %}
**CommandのPINを入力してプリンター設定ページに進みます。読み込みに数秒かかる場合があります。**
{% endstep %}
{% step %}
**[Connect Manually]をタップします。**
{% endstep %}
{% step %}
**次の画面で、プリンターのIPアドレスを入力して手動で接続します。**
{% endstep %}
{% step %}
**プリンターはCommandのサイト > タブレットに表示されるはずです。**
{% endstep %}
{% endstepper %}
***
## プリンターのトラブルシューティング
### Guestアプリにプリンターを追加できない
Guestに追加したいプリンターが見つからない場合は、以下をおすすめします。
{% stepper %}
{% step %}
**〜を使用していることを確認してください** [**対応プリンター**](#h_ae37d6fffa)**.**
{% endstep %}
{% step %}
**プリンターを有線ネットワークに接続して、LANに接続されていることを確認してください。**
{% endstep %}
{% step %}
**プリンターを再起動します。**
{% endstep %}
{% step %}
**プリンターがタブレットと同じLAN上にあるにもかかわらずまだプリンターが表示されない場合は、** [**Verkadaサポート**](/command/ja/herupugadesuka/contact-verkada-support.md)**.**
{% endstep %}
{% endstepper %}
### バッジを印刷できない
バッジを印刷できない場合、プリンターが正常に動作していないか、または **バッジを印刷** ボタンがグレー表示になっている可能性があります。
{% stepper %}
{% step %}
**Verkada Commandでは、All Products > Workplace >** **Guest。**
{% endstep %}
{% step %}
**左側のナビゲーションで、Guest Settings を選択します。**
{% endstep %}
{% step %}
**上部で、Sites > 対象のサイトを選択します。**
{% endstep %}
{% step %}
**\[Printers] でプリンターを選択してステータスを確認します。オンライン以外は問題です。**
{% endstep %}
{% step %}
**プリンターが電源に接続されていることを確認してください。**
{% endstep %}
{% step %}
**iPadがプリンターと同じネットワークに接続されていることを確認してください。可能であれば、Ethernetケーブルでプリンターをネットワークに接続してください。**
{% endstep %}
{% step %}
**プリンターが接続できない場合は、連絡してください** [**Verkadaサポート**](/command/ja/herupugadesuka/contact-verkada-support.md)**.**
{% endstep %}
{% endstepper %}
---
# Agent Instructions
This documentation is published with GitBook. GitBook is the documentation platform designed so that both humans and AI agents can read, navigate, and reason over technical content effectively. Learn more at gitbook.com.
## Querying This Documentation
If you need additional information that is not directly available in this page, you can query the documentation by asking a question.
Perform an HTTP GET request on the following URL with the `ask` and `goal` query parameters:
```
GET https://help.verkada.com/guest/ja/purint/connect-a-printer-to-verkada-guest-using-an-ip-connection.md?ask=&goal=
```
`ask` is the immediate question: it should be specific, self-contained, and written in natural language.
`goal` is what the user is ultimately trying to achieve, the reason they need the answer. Sharing it helps GitBook give you a better, more relevant answer. A goal is most helpful when it describes the outcome the user wants rather than restating the question. For example, with `ask=how do I create an API token`, a goal like `automate deployments from our CI pipeline` lets GitBook tailor the answer to that use case.
The response will contain a direct answer to the question and relevant excerpts and sources from the documentation.
Use this mechanism when the answer is not explicitly present in the current page, you need clarification or additional context, or you want to retrieve related documentation sections.
**Guest。**
{% endstep %}
{% step %}
**左側のナビゲーションで、Guest Settings を選択します。**
{% endstep %}
{% step %}
**上部で、Sites > 対象のサイトを選択します。**
{% endstep %}
{% step %}
**[Printers]を選択して、選択したサイトのランダムPINコードを表示します。独自のコードを作成するには、4桁のコードを入力して[Update]をクリックします。**
{% endstep %}
{% endstepper %}
### IPアドレスでプリンターを手動で追加する
{% stepper %}
{% step %}
**プリンターがネットワークに接続されていることを確認してください。プリンターをネットワークに接続するには、以下の記事を参照してください。**
* [Brother製プリンターを接続する](/guest/ja/purint/brother-printer-setup-guide.md)
* [Epson製プリンターを接続する](/guest/ja/purint/epson-printer-setup-guide.md)
{% endstep %}
{% step %}
**Guestアプリを開き、右下隅を約3秒間タップしたままにするとPINパッドが表示されます。**
{% endstep %}
{% step %}
**CommandのPINを入力してプリンター設定ページに進みます。読み込みに数秒かかる場合があります。**
{% endstep %}
{% step %}
**[Connect Manually]をタップします。**
{% endstep %}
{% step %}
**次の画面で、プリンターのIPアドレスを入力して手動で接続します。**
{% endstep %}
{% step %}
**プリンターはCommandのサイト > タブレットに表示されるはずです。**
{% endstep %}
{% endstepper %}
***
## プリンターのトラブルシューティング
### Guestアプリにプリンターを追加できない
Guestに追加したいプリンターが見つからない場合は、以下をおすすめします。
{% stepper %}
{% step %}
**〜を使用していることを確認してください** [**対応プリンター**](#h_ae37d6fffa)**.**
{% endstep %}
{% step %}
**プリンターを有線ネットワークに接続して、LANに接続されていることを確認してください。**
{% endstep %}
{% step %}
**プリンターを再起動します。**
{% endstep %}
{% step %}
**プリンターがタブレットと同じLAN上にあるにもかかわらずまだプリンターが表示されない場合は、** [**Verkadaサポート**](/command/ja/herupugadesuka/contact-verkada-support.md)**.**
{% endstep %}
{% endstepper %}
### バッジを印刷できない
バッジを印刷できない場合、プリンターが正常に動作していないか、または **バッジを印刷** ボタンがグレー表示になっている可能性があります。
{% stepper %}
{% step %}
**Verkada Commandでは、All Products > Workplace >** **Guest。**
{% endstep %}
{% step %}
**左側のナビゲーションで、Guest Settings を選択します。**
{% endstep %}
{% step %}
**上部で、Sites > 対象のサイトを選択します。**
{% endstep %}
{% step %}
**\[Printers] でプリンターを選択してステータスを確認します。オンライン以外は問題です。**
{% endstep %}
{% step %}
**プリンターが電源に接続されていることを確認してください。**
{% endstep %}
{% step %}
**iPadがプリンターと同じネットワークに接続されていることを確認してください。可能であれば、Ethernetケーブルでプリンターをネットワークに接続してください。**
{% endstep %}
{% step %}
**プリンターが接続できない場合は、連絡してください** [**Verkadaサポート**](/command/ja/herupugadesuka/contact-verkada-support.md)**.**
{% endstep %}
{% endstepper %}
---
# Agent Instructions
This documentation is published with GitBook. GitBook is the documentation platform designed so that both humans and AI agents can read, navigate, and reason over technical content effectively. Learn more at gitbook.com.
## Querying This Documentation
If you need additional information that is not directly available in this page, you can query the documentation by asking a question.
Perform an HTTP GET request on the following URL with the `ask` and `goal` query parameters:
```
GET https://help.verkada.com/guest/ja/purint/connect-a-printer-to-verkada-guest-using-an-ip-connection.md?ask=&goal=
```
`ask` is the immediate question: it should be specific, self-contained, and written in natural language.
`goal` is what the user is ultimately trying to achieve, the reason they need the answer. Sharing it helps GitBook give you a better, more relevant answer. A goal is most helpful when it describes the outcome the user wants rather than restating the question. For example, with `ask=how do I create an API token`, a goal like `automate deployments from our CI pipeline` lets GitBook tailor the answer to that use case.
The response will contain a direct answer to the question and relevant excerpts and sources from the documentation.
Use this mechanism when the answer is not explicitly present in the current page, you need clarification or additional context, or you want to retrieve related documentation sections.