> For the complete documentation index, see [llms.txt](https://help.verkada.com/llms.txt). Markdown versions of documentation pages are available by appending `.md` to page URLs; this page is available as [Markdown](https://help.verkada.com/guest/ja/purint/brother-printer-setup-guide.md).
# Brother プリンターのセットアップガイド
Verkada Guest と Mailroom 用に Brother プリンターを設定
Brother QL-820NWBc は、Verkada Guest と Mailroom でサポートされているモノクロラベルプリンターです。これはサーマルプリンターであり、サーマルラベルロールが必要です。ラベルを自動的に印刷するには、プリンターをいくつかの異なる方法で iPad に接続できます。
{% hint style="info" %}
Brother QL820-NWB プリンターは、Verkada の 10 年保証の対象です。
{% endhint %}
***
## Brother QL-820NWBc を開封する
Verkada から直接注文した Brother プリンターには、メーカーのパッケージに入った新しい Brother QL-820NWBc が含まれます。このパッケージには、白地に黒/赤のサンプルロールも含まれますが、ACCX-LBL-PRT-1 の白黒ラベルロールが推奨されます。
{% stepper %}
{% step %}
**プリンターを箱から取り出します。**
{% endstep %}
{% step %}
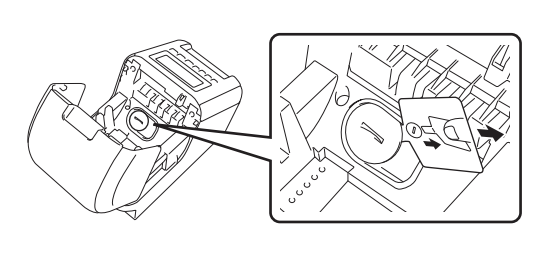
**コイン型電池を準備します。この電池は、内蔵時計の設定を保持するために使用されます。プリンターの電源がオフの状態で:**
a. ロール収納カバーを開きます。\
b. コイン型電池の絶縁シールを取り外します。
{% endstep %}
{% step %}
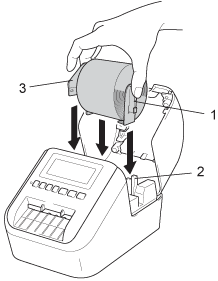
**ラベルロールを挿入します。**
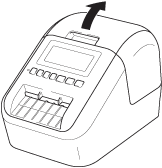
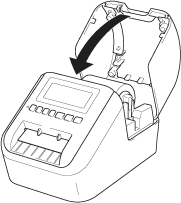
a. ロール収納カバーを開きます。
b. ロールをロールスプールガイドに差し込みます。
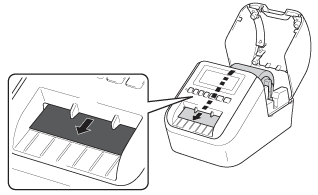
c. ロールの端をプリンターに通します。
d. ロール収納カバーを閉じます。
{% endstep %}
{% step %}
**電源アダプターを組み立てます。**
a. アダプターの DC コネクタをプリンターに差し込みます。\
b. AC ケーブルコネクタをアダプターに差し込みます。\
c. AC ケーブルを接地されたコンセントに差し込みます。
{% endstep %}
{% step %}
**プリンターの電源を入れます。緑色のステータスランプが点灯していれば、プリンターに正しく電源が供給されていることを示します。**
{% endstep %}
{% endstepper %}
{% hint style="info" %}
QL-820NWBc は平らな場所に置くことを推奨します。
{% endhint %}
## プリンターのネットワーク接続を設定する
QL-820NWBc プリンターは無線ネットワークに接続できます。Brother QL-820NWBc は 2.4 GHz 無線帯域への接続のみをサポートしています。プリンターを接続するには:
{% stepper %}
{% step %}
**矢印を使用して WLAN (5/7) > WLAN (オン/オフ) に移動し、オンを選択して OK を押します。**
{% endstep %}
{% step %}
**WLAN (5/7) で、矢印を使用して Infra Manual Setting に移動します。プリンターが近くの SSID を検索します。**
{% endstep %}
{% step %}
**矢印を使用して目的の SSID を選択し、OK を押します。**
{% endstep %}
{% step %}
**必要に応じてパスワードを入力します。Menu ボタンを使用して、大文字、小文字、数字、特殊文字を切り替えます。完了したら OK を押します。**
{% endstep %}
{% step %}
**プリンターの IP アドレスは、WLAN (5/7) > WLAN Status > Infrastructure Mode に移動して確認できます。**
{% endstep %}
{% endstepper %}
または、イーサネット接続を使用してプリンターをネットワークに接続することもできます。
{% stepper %}
{% step %}
**プリンターを有線ネットワークに接続できることを確認します。**
{% endstep %}
{% step %}
**イーサネットケーブルを使用してプリンターを有線ネットワークに接続します。**
{% endstep %}
{% step %}
**プリンターの IP アドレスは、情報 (3/7) > 印刷設定 > すべて に移動して確認できます。**
{% endstep %}
{% endstepper %}
***
{% hint style="info" %}
**実際の動きを見ますか?** こちらをチェック [ビデオチュートリアル](https://www.youtube.com/watch?v=LZvmhKkFdww).
{% endhint %}
---
# Agent Instructions
This documentation is published with GitBook. GitBook is the documentation platform designed so that both humans and AI agents can read, navigate, and reason over technical content effectively. Learn more at gitbook.com.
## Querying This Documentation
If you need additional information that is not directly available in this page, you can query the documentation by asking a question.
Perform an HTTP GET request on the following URL with the `ask` and `goal` query parameters:
```
GET https://help.verkada.com/guest/ja/purint/brother-printer-setup-guide.md?ask=&goal=
```
`ask` is the immediate question: it should be specific, self-contained, and written in natural language.
`goal` is what the user is ultimately trying to achieve, the reason they need the answer. Sharing it helps GitBook give you a better, more relevant answer. A goal is most helpful when it describes the outcome the user wants rather than restating the question. For example, with `ask=how do I create an API token`, a goal like `automate deployments from our CI pipeline` lets GitBook tailor the answer to that use case.
The response will contain a direct answer to the question and relevant excerpts and sources from the documentation.
Use this mechanism when the answer is not explicitly present in the current page, you need clarification or additional context, or you want to retrieve related documentation sections.