# Verkada Guest にカメラとドアを追加
[Verkada Guest](https://docs.verkada.com/docs/verkada-guest-overview.pdf) 組織が最適な訪問者体験を提供し、施設内に誰がいるかをより良く把握できるようにし、既存のGuest設定にカメラやドアを追加することを可能にします。
カメラはGuestダッシュボードのユーザーがイベントを表示できるようにします。ドアは管理者とマネージャーがドアスケジュールを表示・編集できるようにし、サイト閲覧者はドアを使用してドアイベントを表示できます。詳細については [Commandユーザーの役割](https://app.gitbook.com/s/NRq5qDDjsYNxwNzF1bcB/users-and-permissions/roles-and-permissions-for-command).
***
### カメラまたはドアを追加するサイトを選択してください
{% stepper %}
{% step %}
**Verkada Commandで、All Products > Workplace >**  **Guest。**
{% endstep %}
{% step %}
**左側のナビゲーションで、Guest Settingsをクリックします。**
{% endstep %}
{% step %}
**組織の下で、\[Sites] を選択します。**
{% endstep %}
{% step %}
**タイルの一覧から、カメラ(またはドア)を追加したいサイトを選択します。**
{% endstep %}
{% endstepper %}
## カメラを追加
カメラは次の条件に該当する場合、Guestサイトとペアリングできます:
{% stepper %}
{% step %}
**Guestサイトと同じサイトにある場合、または**
{% endstep %}
{% step %}
**Guestサイトのサブサイトにある場合**
{% endstep %}
{% endstepper %}
{% hint style="warning" %}
ユーザーは少なくとも **Live-Only Viewer** のサイト権限を持っている必要があり、そのサイトのカメラをGuestに追加できます。
{% endhint %}
{% stepper %}
{% step %}
**Verkada Commandで、All Products > Workplace >** **Guest。**
{% endstep %}
{% step %}
**左側のナビゲーションで、Guest Settingsをクリックします。**
{% endstep %}
{% step %}
**\[Sites] の下で、\[Cameras] を選択します。**
{% endstep %}
{% step %}
**選択したカメラの数の横にある \[Manage cameras] をクリックします。**
{% endstep %}
{% step %}
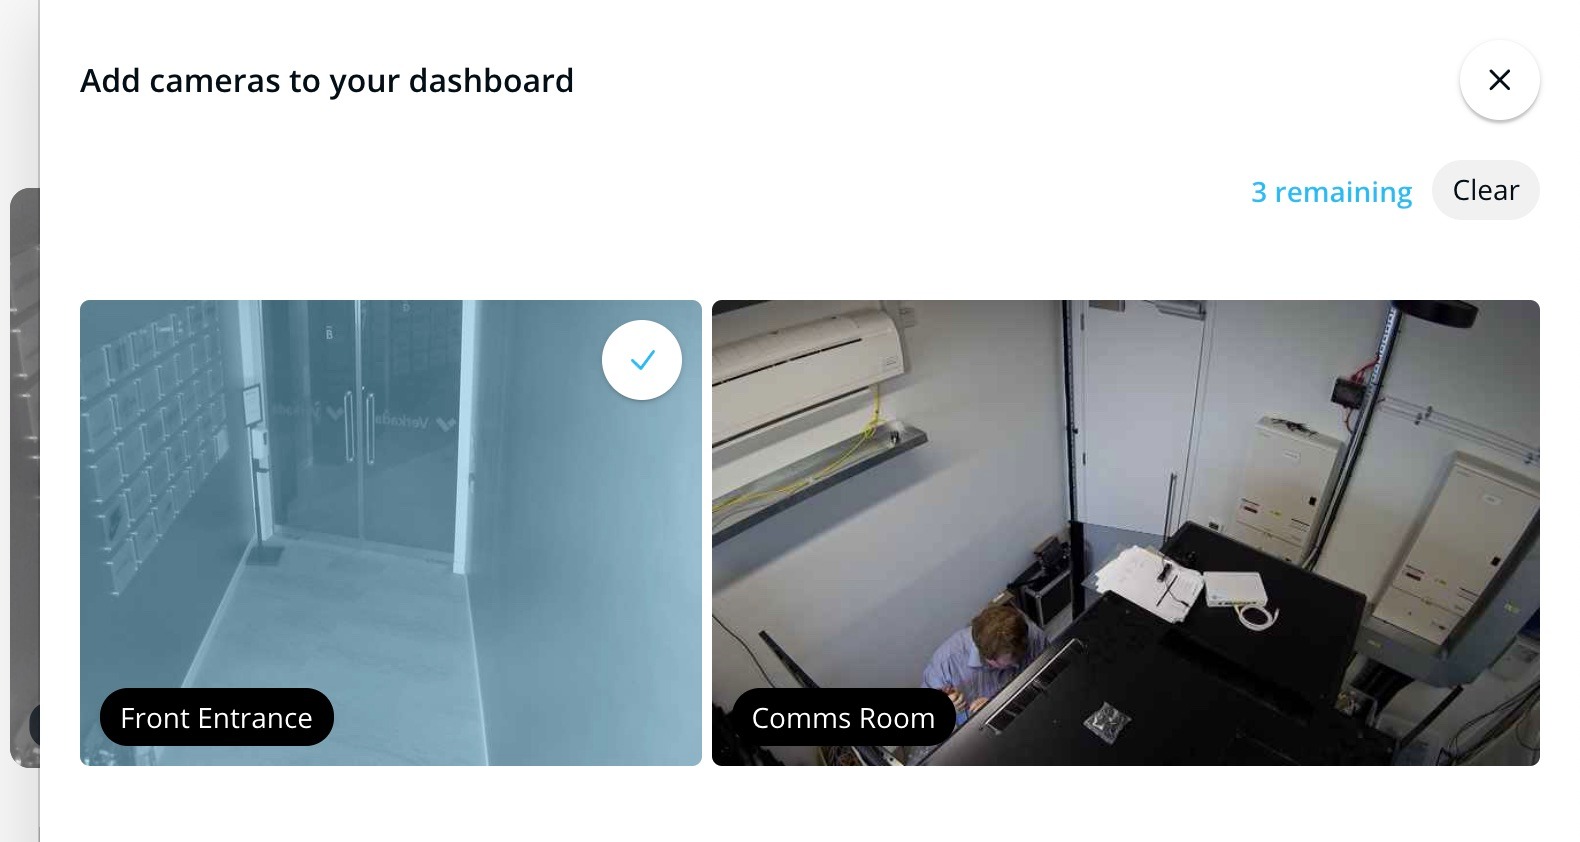
**\[Add cameras to your dashboard] ページでは、追加可能なカメラの数が表示されます。**
{% endstep %}
{% step %}
**Guestサイトには最大で4台までのカメラを選択できます。**
{% endstep %}
{% step %}
**任意。すべてのカメラを削除してやり直すには、右上の \[Clear] をクリックします。**
{% endstep %}
{% endstepper %}
## ドアを追加
{% hint style="warning" %}
ユーザーは **Access Site Admin** の権限をそのサイトで持っている必要があり、そのサイトのドアをGuestに追加できます。
{% endhint %}
ドアは同じサイト内にある限り、Guestサイトに接続できます。
{% stepper %}
{% step %}
**Verkada Commandで、All Products > Workplace >** **Guest。**
{% endstep %}
{% step %}
**左側のナビゲーションで、Guest Settingsをクリックします。**
{% endstep %}
{% step %}
**\[Sites] の下で、下にスクロールして \[Doors] を探します。**
{% endstep %}
{% step %}
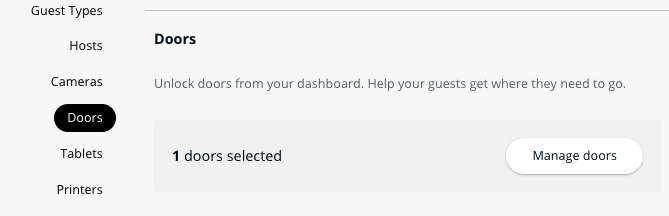
**選択したドアの数の横にある \[Manage doors] をクリックします。**
{% endstep %}
{% step %}
**\[Enable Doors for Guest Management] ページでは、追加可能なドアの数が表示されます。**
{% endstep %}
{% step %}
**Guestサイトには最大で4つまでのドアを選択できます。**
{% endstep %}
{% endstepper %}
### ドアアクセスの設定
Guestユーザーには [ドアアクセスを割り当てる必要があります](https://app.gitbook.com/s/aaHs5RfKqv9Z49mi02cC/users-and-credentials/add-a-user-to-the-verkada-access-system/assign-a-user-access-to-a-door)。Guestホームページからドアを開くには、 **リモート解除** を有効にする必要があります:
{% stepper %}
{% step %}
**アクセスユーザーの場合**
{% endstep %}
{% step %}
**ドアの場合**
{% endstep %}
{% step %}
**アクセスサイトの場合**
{% endstep %}
{% endstepper %}
***
## FAQ
**Guest。**
{% endstep %}
{% step %}
**左側のナビゲーションで、Guest Settingsをクリックします。**
{% endstep %}
{% step %}
**組織の下で、\[Sites] を選択します。**
{% endstep %}
{% step %}
**タイルの一覧から、カメラ(またはドア)を追加したいサイトを選択します。**
{% endstep %}
{% endstepper %}
## カメラを追加
カメラは次の条件に該当する場合、Guestサイトとペアリングできます:
{% stepper %}
{% step %}
**Guestサイトと同じサイトにある場合、または**
{% endstep %}
{% step %}
**Guestサイトのサブサイトにある場合**
{% endstep %}
{% endstepper %}
{% hint style="warning" %}
ユーザーは少なくとも **Live-Only Viewer** のサイト権限を持っている必要があり、そのサイトのカメラをGuestに追加できます。
{% endhint %}
{% stepper %}
{% step %}
**Verkada Commandで、All Products > Workplace >** **Guest。**
{% endstep %}
{% step %}
**左側のナビゲーションで、Guest Settingsをクリックします。**
{% endstep %}
{% step %}
**\[Sites] の下で、\[Cameras] を選択します。**
{% endstep %}
{% step %}
**選択したカメラの数の横にある \[Manage cameras] をクリックします。**
{% endstep %}
{% step %}
**\[Add cameras to your dashboard] ページでは、追加可能なカメラの数が表示されます。**
{% endstep %}
{% step %}
**Guestサイトには最大で4台までのカメラを選択できます。**
{% endstep %}
{% step %}
**任意。すべてのカメラを削除してやり直すには、右上の \[Clear] をクリックします。**
{% endstep %}
{% endstepper %}
## ドアを追加
{% hint style="warning" %}
ユーザーは **Access Site Admin** の権限をそのサイトで持っている必要があり、そのサイトのドアをGuestに追加できます。
{% endhint %}
ドアは同じサイト内にある限り、Guestサイトに接続できます。
{% stepper %}
{% step %}
**Verkada Commandで、All Products > Workplace >** **Guest。**
{% endstep %}
{% step %}
**左側のナビゲーションで、Guest Settingsをクリックします。**
{% endstep %}
{% step %}
**\[Sites] の下で、下にスクロールして \[Doors] を探します。**
{% endstep %}
{% step %}
**選択したドアの数の横にある \[Manage doors] をクリックします。**
{% endstep %}
{% step %}
**\[Enable Doors for Guest Management] ページでは、追加可能なドアの数が表示されます。**
{% endstep %}
{% step %}
**Guestサイトには最大で4つまでのドアを選択できます。**
{% endstep %}
{% endstepper %}
### ドアアクセスの設定
Guestユーザーには [ドアアクセスを割り当てる必要があります](https://app.gitbook.com/s/aaHs5RfKqv9Z49mi02cC/users-and-credentials/add-a-user-to-the-verkada-access-system/assign-a-user-access-to-a-door)。Guestホームページからドアを開くには、 **リモート解除** を有効にする必要があります:
{% stepper %}
{% step %}
**アクセスユーザーの場合**
{% endstep %}
{% step %}
**ドアの場合**
{% endstep %}
{% step %}
**アクセスサイトの場合**
{% endstep %}
{% endstepper %}
***
## FAQ
受付担当者をフロントデスクのカメラだけに制限するにはどうすればよいですか?
1. カメラはGuestサイトと同じサイトにあるか、Guestサイトの下にネストされたサブサイトにある場合にGuestに接続できます。カメラが多数あるサイトでGuestを使用したい組織は、受付担当者のアクセスを次の方法で制限できます:
2. 関連するカメラをサブサイトに配置します。受付担当者には適切なサブサイトに対するカメラ権限のみを付与します。
訪問者にドアアクセスを与えることはできますか?
招待された訪問者は登録リンクからドアアクセスを取得できます。招待客のドアアクセスを構成するには、 [Guestタイプを編集します](https://help.verkada.com/guest/ja/configuration/configure-guest-types) そして有効にします **Guest Door Access**.