For the complete documentation index, see llms.txt. This page is also available as Markdown.

Okta

Configure SSO and user provisioning with Okta for your Government Solutions organization

Verkada Command has the ability to integrate with Okta in two ways:

  • Security Assertion Markup Language (SAML)

  • System for Cross-Domain Identity Management (SCIM)

SAML handles authentication, allowing Okta to manage access to Command, just as it manages access to other Software-as-a-Service (SaaS) applications already integrated with your Microsoft Entra ID tenant. This means you can integrate Command into your existing identity framework and authorize users in line with your current policies.

SCIM allows you to leverage your existing users and groups in Microsoft Entra ID and synchronize them with Command. This allows you to retain the current central IdP and configure permissions in Command using your existing users and groups.


Before you begin

For a successful integration, make sure you have the following:

  • Admin access to your Okta tenant

  • Generate a client-ID


Create a custom SAML application

1

Go to Applications, and select Create App Integration.

2

Create a new app integration, select SAML 2.0, and click Next.

3

On the "Create a SAML integration" page, under General Settings, enter an application name, optionally add an application logo, and then click Next.

4

In the configure SAML page, fill in the Single Sign-On URL and Audience URI (SP Entity ID) with this link:

https://saml.prod-govus-pine.verkadagov.com/saml/sso/<client-ID>

Check the Use this for Recipient URL and Destination URL box.

5

The application username is the Okta Username.

6

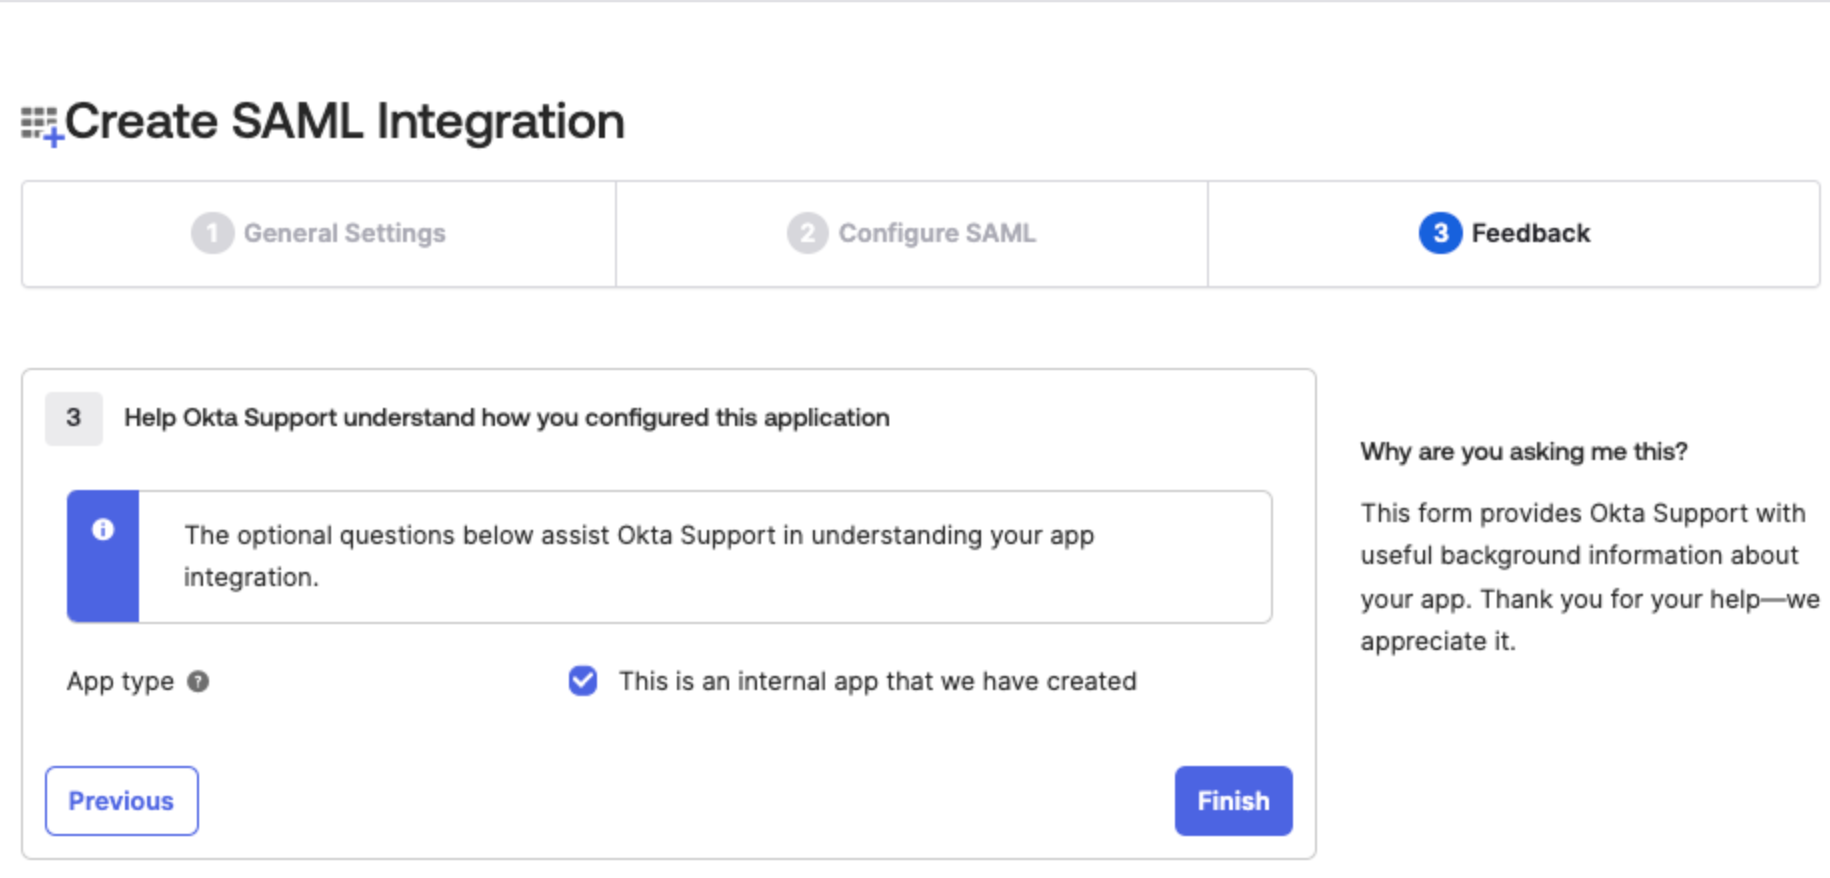
Click Next. On the feedback page, check the box labeled "This is an internal app that we have created". Click Finish.

7

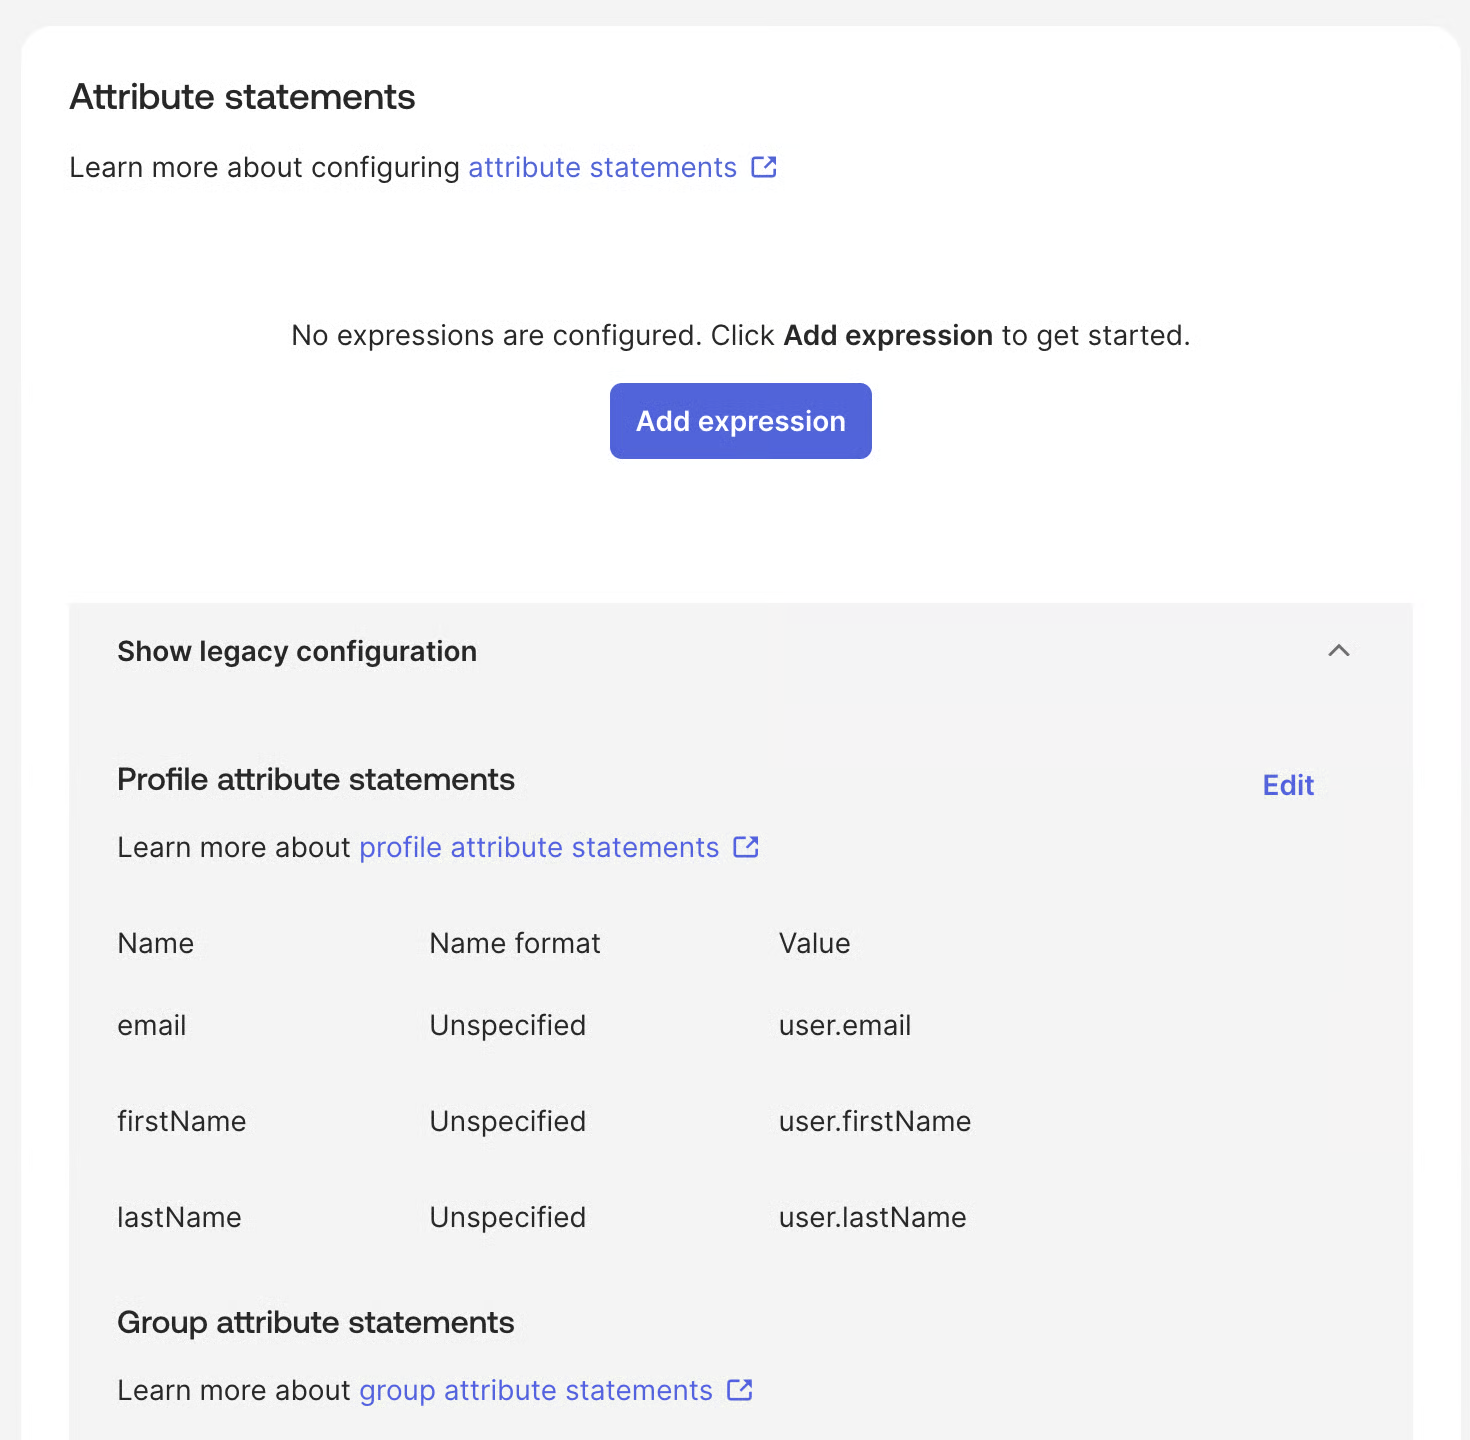
In the attributes statements section, set up attributes mapping as follows:

  • email > user.email

  • firstName > user.firstName

  • lastName > user.lastName


Configuration

1

In Okta, select the Assignments tab for the app. Click Assign and select People or Groups to enable SSO for these users.

2

Select the Sign On tab for the app.

3

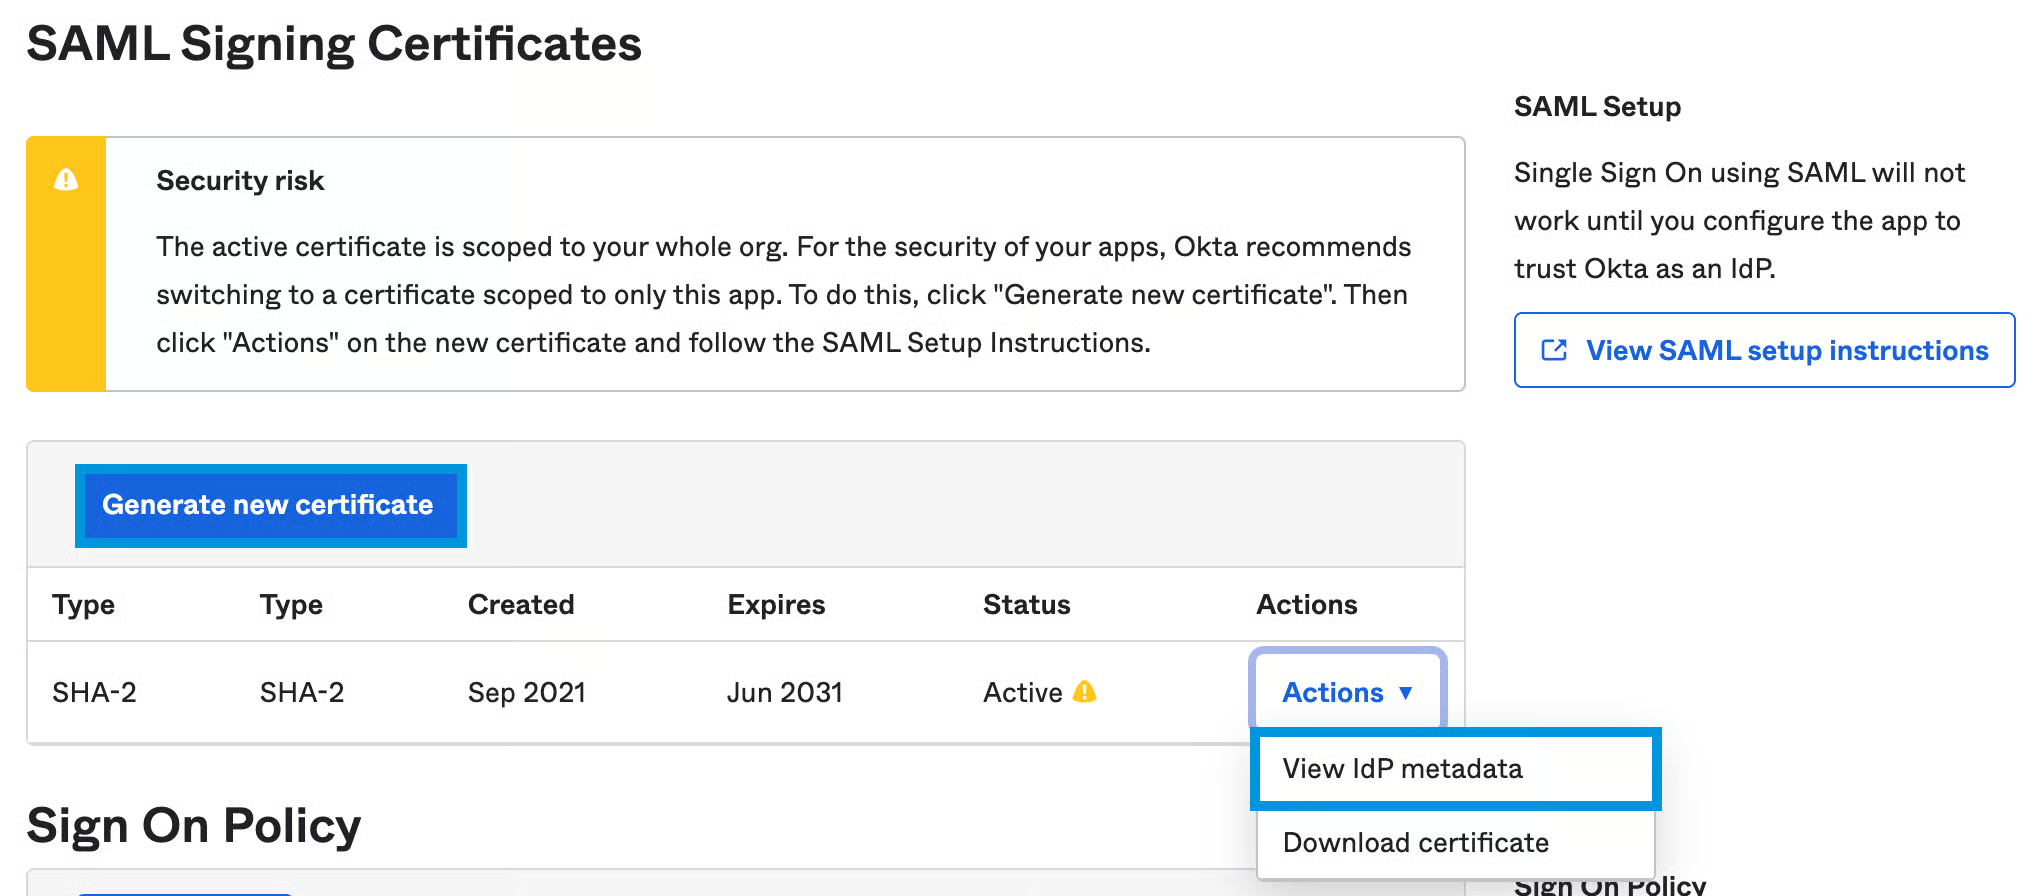
Scroll down to SAML Signing Certificates and click Generate new certificate if a new certificate does not exist.

4

To the right of the certificate, select the Actions dropdown and click View IdP metadata.

5

Right-click the metadata, select "Save As," and download as an XML file.

6

After downloading the XML file, continue to Verkada Command to complete the configuration.

7

In the Verify Metadata section, click Run Login Test.

Okta SCIM Integration


Before you begin

1

You need an API token to connect to the Verkada SCIM endpoint. This token is unique per the Verkada organization. Learn how to acquire a SCIM API token.

2

For a successful integration, choose the best path for your region:

  • For US orgs, follow the steps in Create a Verkada Okta app.


Follow the steps on the SAML Create an Okta App section Tab above

Due to the OTKA application creation process their SAML is required when setting up SCIM. This is a limitation of OKTA. You can place invalid urls for SSO during the setup process but this option will appear on command users login in pages. It is recommended setup up SSO/SAML as well.

Configure the Verkada Okta app

US region
  1. Log in to Okta.

  2. On the left, select the Provisioning tab.

  3. At the top, select the General tab:

    1. At the top right, click Edit for your app’s App Settings.

    2. Check the Enable SCIM provisioning box.

    3. Click Save.

  4. On SCIM Connection:

    1. At the top of your newly created app, select the Provisioning tab.

    2. Click Edit for the SCIM Connection settings.

    3. For Unique identifier field for users, enter userName.

    4. Check the Push New Users, Push Profile Updates, and Push Groups boxes.

    5. Click the Authentication Mode dropdown and select HTTP Header.

  5. Under the Provisioning tab > Integration:

    1. Click Configure API Integration.

    2. Check the Enable API integration box.

    3. In the API Token field, copy and paste your Command-generated API token.

    4. Click Save.

  6. Under the Provisioning tab > Settings:

    1. Select To App and click Edit.

    2. Check the Enable box for Create Users, Update User Attributes, and Deactivate Users.

    3. Click Save.

  7. Under the Provisioning tab > To App section > Verkada Attribute Mappings, click Go to Profile Editor.

  8. Ensure that the attributes match, as shown in the example below. You can add more attributes than shown. See Add attributes to SCIM-managed users.


Add-on attributes to SCIM-managed users

Add attributes to SCIM-managed users (optional)

Verkada and Okta support these attributes: userName (default), givenName (default), familyName (default), title, employeeNumber, primaryPhone, department, organization.

You can also sync a unique identifier to Command by mapping it to the externalId field. This enables advanced use cases such as disambiguating users across systems or syncing access credentials to a unique user reference. This value is stored in the database and can be queried via API, but it does not appear in the Command UI.

To provision phone numbers outside the US in Command, include the country code in the user's phone number in the Okta profile.

For example:

  • US: 123-456-7890 → +1 123-456-7890

  • UK: 07123 456789 → +44 7123 456789

Using the international format ensures the number is correctly imported into Command.

  1. Log in to Okta.

  2. Create the Attribute in the SCIM App Profile.

    1. In Okta, go to Directory > Profile Editor.

    2. Select your Verkada SCIM-managed application User.

    3. Click Add Attribute and add the attribute details as listed in the table below.

    4. Click Save.

  3. Map the Attribute

    1. Still in Profile Editor, click Mappings.

    2. Choose Okta User to [Your SCIM App].

    3. Click the dropdown and find the source field you want to map (e.g., user.nickName, employeeNumber, or another custom field) and map it to the appuser attribute.

    4. Click the arrow between fields and select Apply mapping on user create and update.

    5. Click Save Mappings.

  4. Confirm Attribute is Populated

    1. Navigate to Directory > People.

    2. Open a user profile and ensure the source field you're mapping from (e.g., Nickname) has a value.

    3. From the SCIM App > Provisioning tab, use Force Sync to push updates if needed.

Add access credentials to SCIM-managed users (optional)
  1. Log in to Okta.

  2. On the left navigation, select Directory > Profile Editor.

    1. Select User (default) as the user type.

    2. Click Add Attribute and add the custom attributes from the table below.

  3. On the left navigation, select Applications and open your Verkada SCIM-managed application.

  4. On the Provisioning tab, select To App > Go to Profile Editor.

  5. Click Add Attribute to create the attributes listed above using the exact same Data Type, Display Name, Variable Name, Description, and ENUM values.

    1. Set the External namespace value for all attributes to:

    1. Set Attribute type to Personal.

    2. Click Save to add the attribute.

  6. Click Mappings to map the attributes from the Okta User application to your SCIM application.

    1. Select Okta User to YourSCIMApp at the top and map the custom attributes created for the Okta Default User to the ones created on your SCIM application.

    2. Click Save Mappings and Apply updates now to apply the changes.

  7. The attributes should now be available to use on all your Okta application's users' profiles. Once synced, you can view the credentials on Command under Access > Access Users > User Profile > Credentials.

Attribute table

Refer to this list of credentials for the list of acceptable card formats. Data type for all attributes will be string.

Display Name

Variable Name /External Name

External Namespace

Description

ENUM

Card Format

cardFormat

urn:ietf:params:scim:schemas:extension:verkada:access:2.0:User

Card format for access credential

Leave unchecked

Card Number

cardNumber

urn:ietf:params:scim:schemas:extension:verkada:access:2.0:User

Card number for access credential

Leave unchecked

Card Number Hex

cardNumberHex

urn:ietf:params:scim:schemas:extension:verkada:access:2.0:User

Hexadecimal representation of the card number

Leave unchecked

Credential Status

credentialStatus

urn:ietf:params:scim:schemas:extension:verkada:access:2.0:User

Status of the card credential

Checkbox: active → active, deactivated → deactivated, deleted → deleted

Facility Code

facilityCode

urn:ietf:params:scim:schemas:extension:verkada:access:2.0:User

Facility code associated with the card

Leave unchecked

External ID

externalId

urn:ietf:params:scim:schemas:extension:verkada:core:2.0:User

Customer-defined unique ID, not exposed in UI

Leave unchecked

Department ID

costCenter

urn:ietf:params:scim:schemas:extension:verkada:core:2.0:User

Identifier used to map user's department in Command

Leave unchecked

Title

title

urn:ietf:params:scim:schemas:core:2.0:User

User's title or role

Leave unchecked

Employee Number

employeeNumber

urn:ietf:params:scim:schemas:core:2.0:User

Employee ID

Leave unchecked

Phone Number

Variable Name: phoneNumber

External Name: phoneNumbers.^[type==work].value

urn:ietf:params:scim:schemas:core:2.0:User

Work phone number

Leave unchecked

Department

department

urn:ietf:params:scim:schemas:core:2.0:User

User's department

Leave unchecked

Organization

organization

urn:ietf:params:scim:schemas:core:2.0:User

Company or organization

Leave unchecked


Provision users and groups

Users within Okta
  1. Log in to Okta.

  2. On the left, click Applications and click the Verkada app.

  3. Click the Assignments tab.

  4. Click the Assign dropdown and select Assign to People.

  5. Click Assign for the people you want to provision to the app.

  6. You'll see the information for that user. At the bottom, click Save and Go Back.

  7. When you are redirected to the Assign page, click Done.

Groups within Okta
  1. Log in to Okta.

  2. On the left, click Applications and click the Verkada app.

  3. Click the Assign dropdown and select Assign to Groups.

  4. Click Assign for the groups you want to provision to the app.

  5. You'll see the information for that group. At the bottom, click Save and Go Back.

  6. When you are redirected to the Assign page, click Done.

  7. At the top, select the Push Groups tab.

  8. Click the Push Groups dropdown to find groups (by name or by rule).

  9. Find the group you want to push and click Save. If successful, the Push Status shows Active.

  10. Command then tags users and groups as SCIM Managed if they are imported via SCIM.


Delete SCIM-managed users from Command

When a SCIM-managed user is deactivated in your identity provider, you can remove the user from Command in two ways:

  • Delete the user – The account moves to the Deleted Users page but keeps historical records, roles, and permissions.

  • Permanently remove the user – All roles, credentials, access logs, and associated data are erased. If the user is re-provisioned via SCIM, Command creates a new user record.


Known issues

  • Updating usernames (emails) does not automatically take effect in Command. If you need to change a username, unassign the user from the SAML app, then re-add the user to the app for the change to take effect.

  • If a new user cannot log in via SSO, it could be because the email domain is not being added to the SSO configuration in the Verkada backend. If the user's email is outside of the email domains provided when SSO was set up, this causes the user to be unable to use SSO. If this is the cause of the problem, you need to edit the SSO configuration and add this domain to remedy the issue.

  • If you run into this error while provisioning users, "Error while trying to push profile update for user: Bad Request. Errors reported by remote server: Invalid request", see this Okta article for troubleshooting steps.

  • If you experience any other problems with setting up SSO, contact Verkada Support.


Prefer to see it in action? Check out the video tutorial.


Troubleshooting

  • Username changes do not automatically sync with Command. If you update a user’s email, unassign the user from the SAML app and then re-add them for the change to take effect.

  • New users cannot sign in via SSO. This may occur if the user’s email domain is not included in the SSO configuration. If the domain was not added when SSO was set up, update the configuration to include the missing domain.

  • Ensure you are using the Government Solutions endpoint:

    • https://saml.prod-govus-pine.verkadagov.com/saml/sso/<client-ID>

    • Using commercial Verkada endpoints will not work for a Government Solutions Configuration.

  • If you experience any other problems with setting up SSO, contact Verkada Support.

Last updated

Was this helpful?