# JumpCloud

Verkada는 Identity Provider(IdP)로 JumpCloud를 사용하여 Security Assertion Markup Language(SAML) 인증을 지원합니다.

| 기능         | 지원됨 |
| ---------- | :-: |
| OIDC SSO   |  —  |
| SAML SSO   |  예  |
| SCIM 프로비저닝 |  —  |
| ECE 지원     |  —  |

### 시작하기 전에

Security Assertion Markup Language(SAML)를 통합하려면 먼저 다음을 수행해야 합니다 [클라이언트 ID 생성](/command/ko/security/identity-providers.md#generate-client-id).

***

## 구성

### SSO 설정

{% stepper %}
{% step %}
**Verkada Command에서 모든 제품 > 관리자 > 개인정보 및 보안 > 인증 및 사용자 관리로 이동합니다.**
{% endstep %}

{% step %}
**단일 로그인(SSO)을 설정하려면 새로 추가를 클릭합니다.**
{% endstep %}
{% endstepper %}

### Verkada 앱 만들기

{% stepper %}
{% step %}
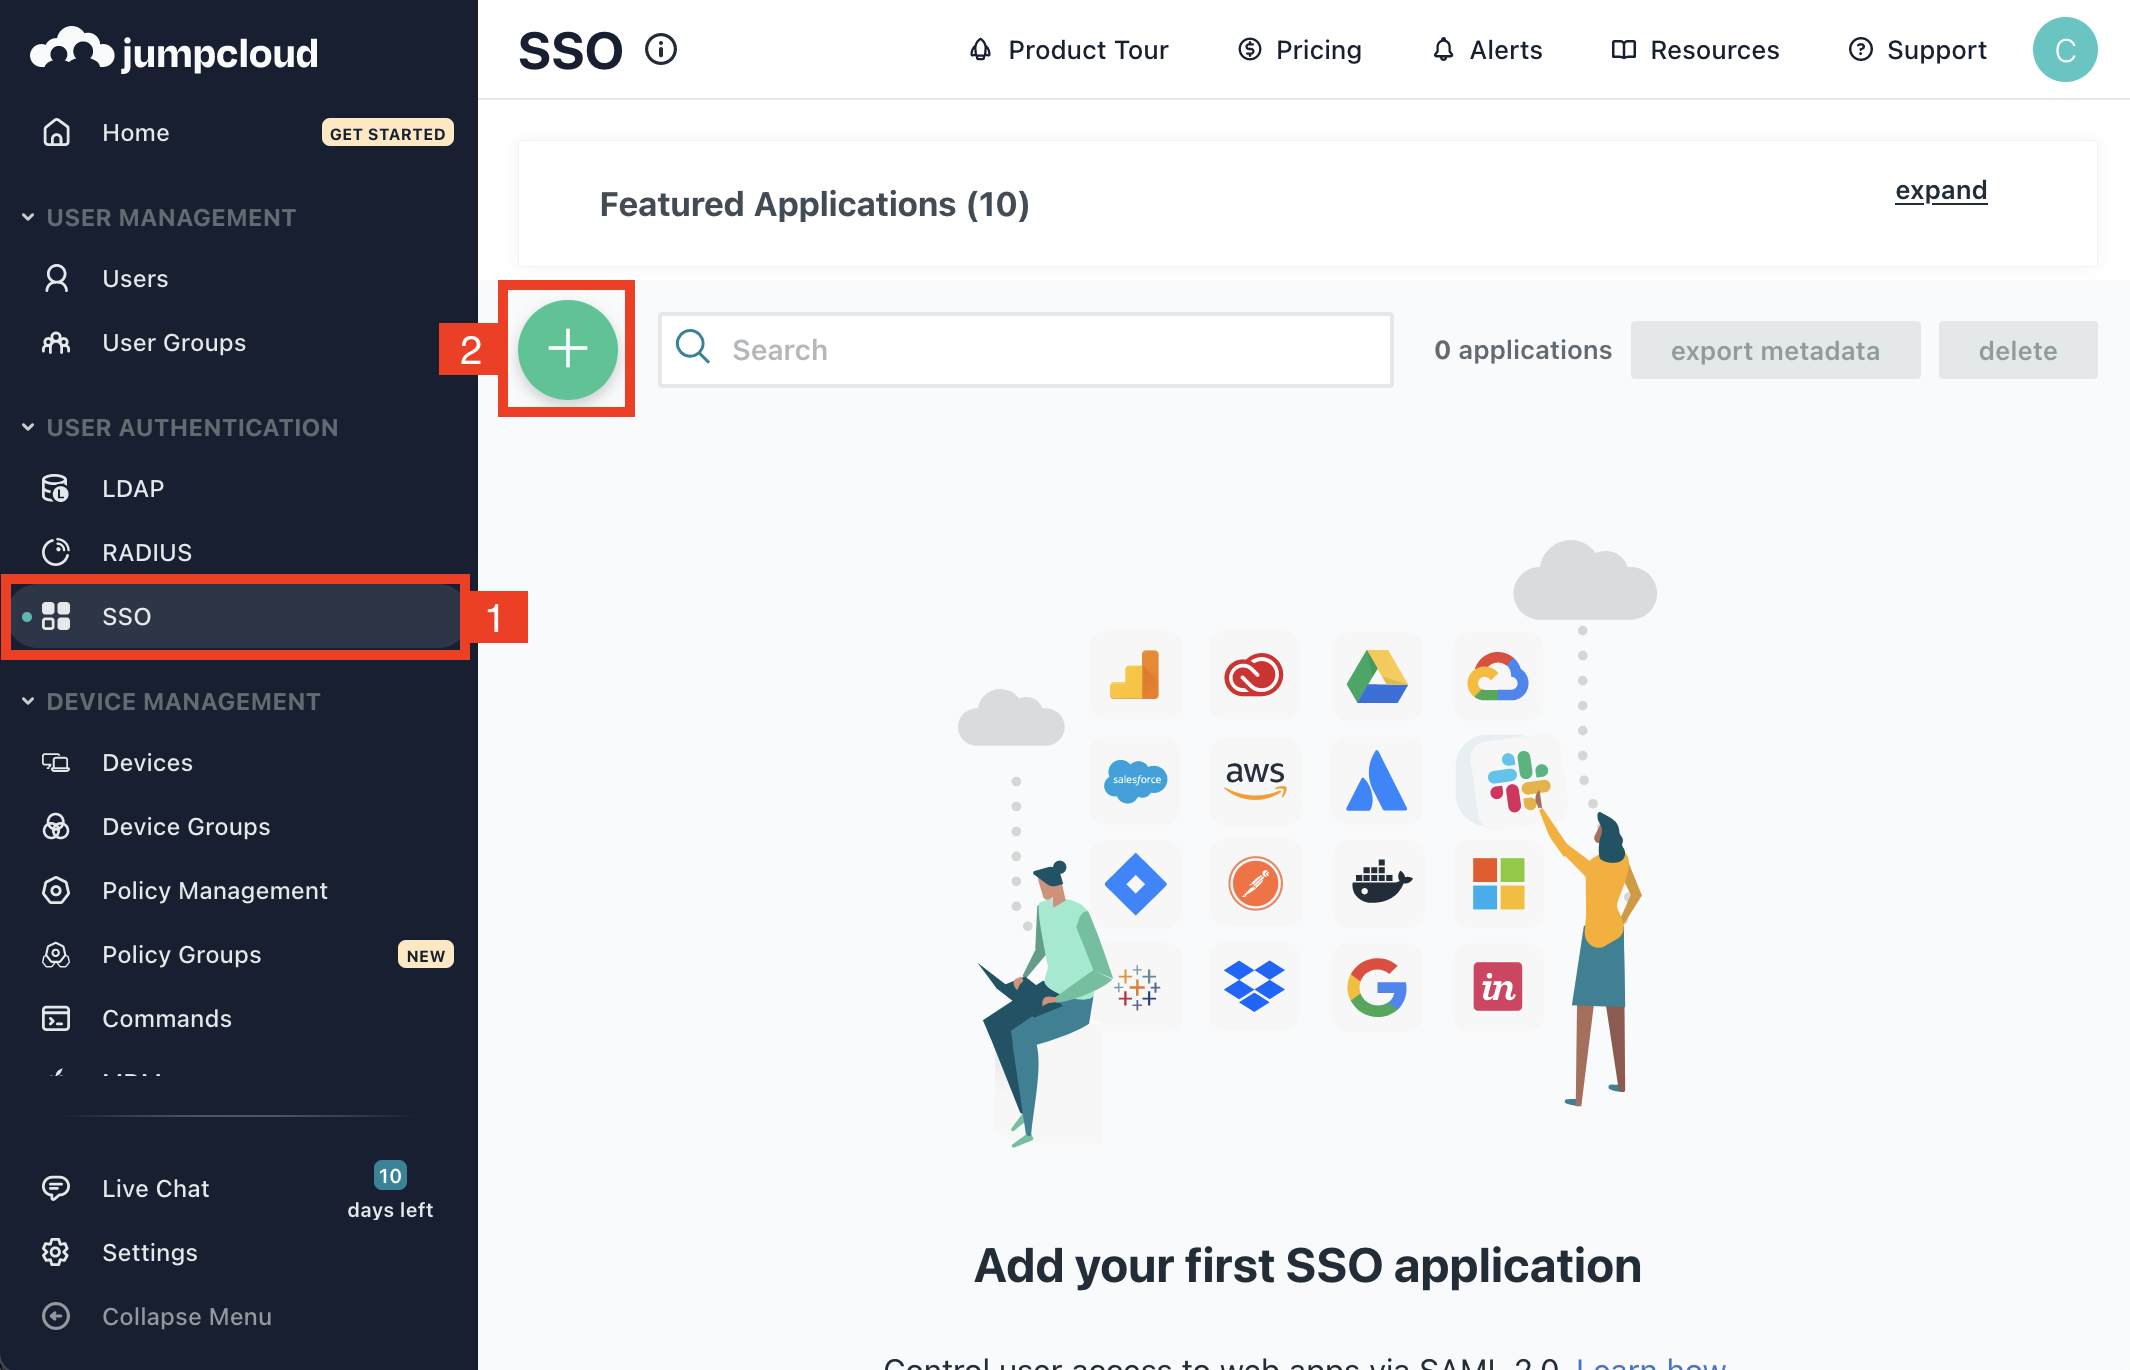
**JumpCloud 대시보드로 이동하여 SSO를 클릭해 SSO 애플리케이션을 확인합니다.**
{% endstep %}

{% step %}
**플러스(+) 아이콘을 클릭하여 새 애플리케이션을 만듭니다.**

<div align="left" data-with-frame="true"><img src="/files/736c7ba4236aaf8c5681783f0834422b5de39269" alt="" width="563"></div>
{% endstep %}

{% step %}
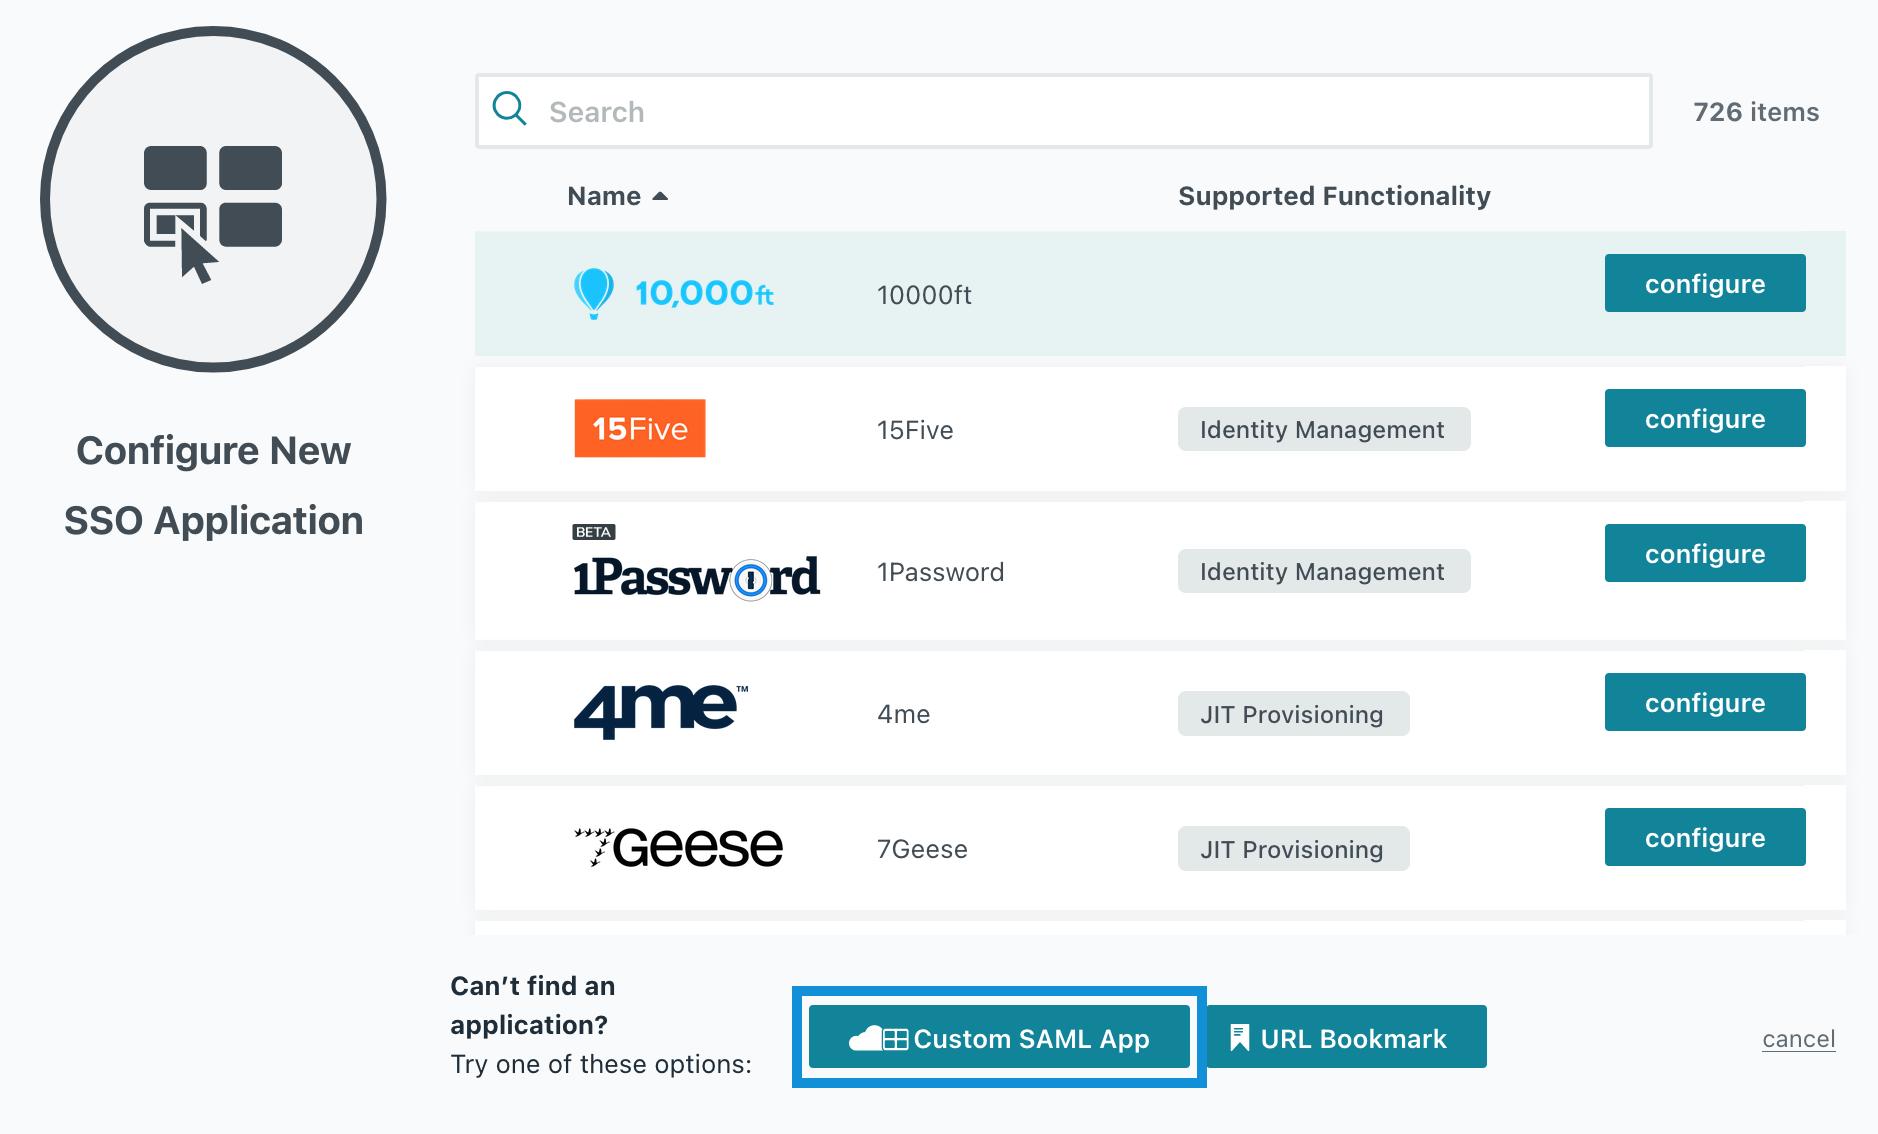
**Custom SAML App을 클릭합니다.**

<div align="left" data-with-frame="true"><img src="/files/984c21736a074ee1a5dff5aee86cf4b40e499c92" alt="" width="563"></div>
{% endstep %}

{% step %}
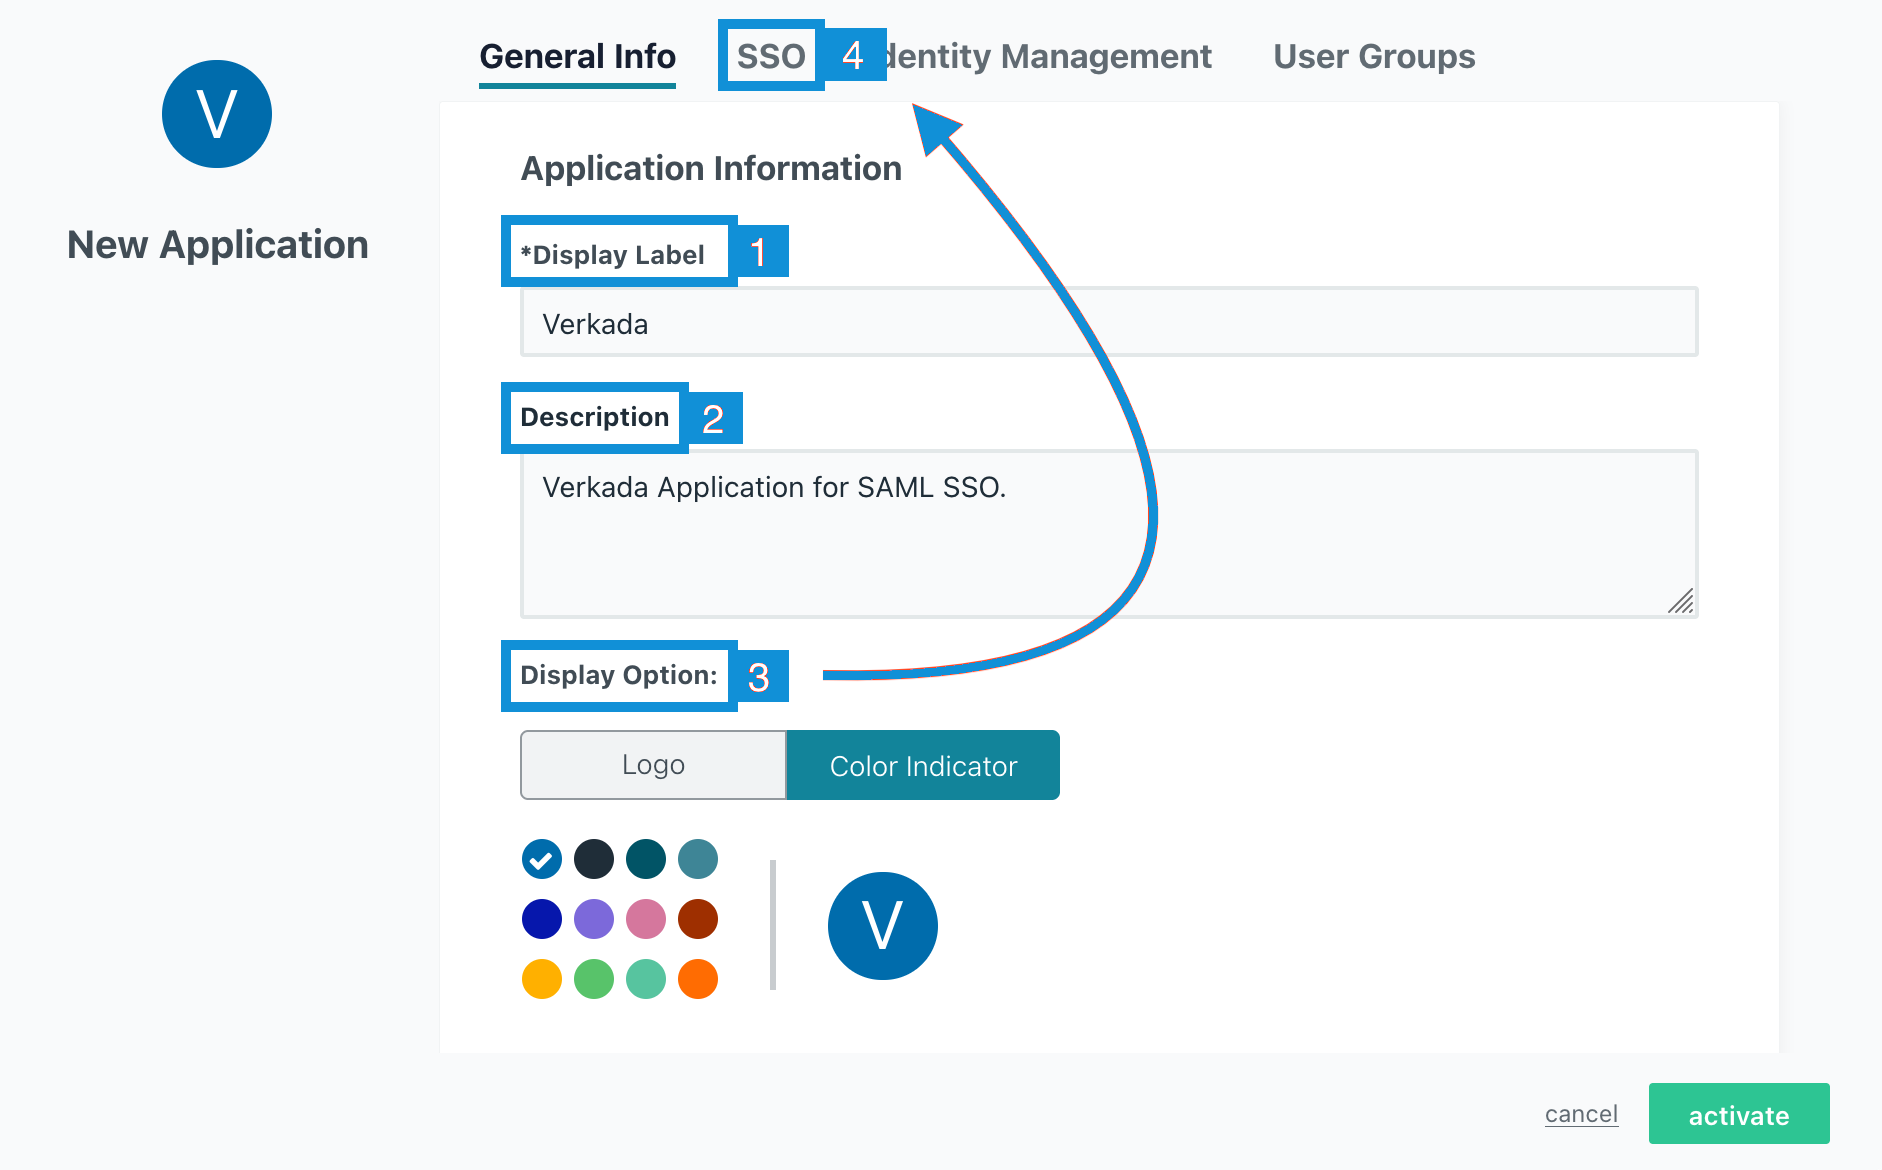
**애플리케이션 이름을 지정하고, 설명을 추가한 다음, 필요에 따라 아이콘을 변경합니다. Verkada와 관련된 이름을 사용하세요.**
{% endstep %}

{% step %}
**완료되면 상단 메뉴에서 SSO를 선택하고 활성화를 클릭합니다.**

<div align="left" data-with-frame="true"><img src="/files/702059fc0d473118e7a5e432707ed723c7966531" alt="" width="563"></div>
{% endstep %}

{% step %}
**다음과 같이 IdP Entity ID, SP Entity ID 및 ACS URL을 구성합니다:**

* 다음 항목의 **IdP Entity ID**:\
  미국 조직의 경우: [https://vauth.command.verkada.com/saml/sso](https://vauth.command.verkada.com/sam/sso)\
  EU 조직의 경우: <https://saml.prod2.verkada.com/saml/sso>

  AUS 조직의 경우: <https://saml.prod-ap-syd.verkada.com/saml/sso>
* 다음 항목의 **SP Entity ID**:\
  미국 조직의 경우: [https://vauth.command.verkada.com/saml/sso](https://vauth.command.verkada.com/sam/sso)\
  EU 조직의 경우: <https://saml.prod2.verkada.com/saml/sso>

  AUS 조직의 경우: <https://saml.prod-ap-syd.verkada.com/saml/sso>
* 다음 항목의 **로그인 URL**:\
  미국 조직의 경우: <https://vauth.command.verkada.com/saml/login>\
  EU 조직의 경우: [https://saml.prod2.verkada.com/saml/login](https://saml.prod2.verkada.com/saml/login/)

  AUS 조직의 경우: <https://saml.prod-ap-syd.verkada.com/saml/login>
* 또는 Command에서 필드를 복사할 수 있습니다.

{% hint style="warning" %}
어느 지역에 위치해 있는지 확인하려면 다음을 수행하세요 [Verkada용 조직이 생성된 위치를 참조하세요](/command/ko/getting-started/get-started-with-verkada-command.md).
{% endhint %}
{% endstep %}

{% step %}
**활성화를 클릭합니다.**
{% endstep %}

{% step %}
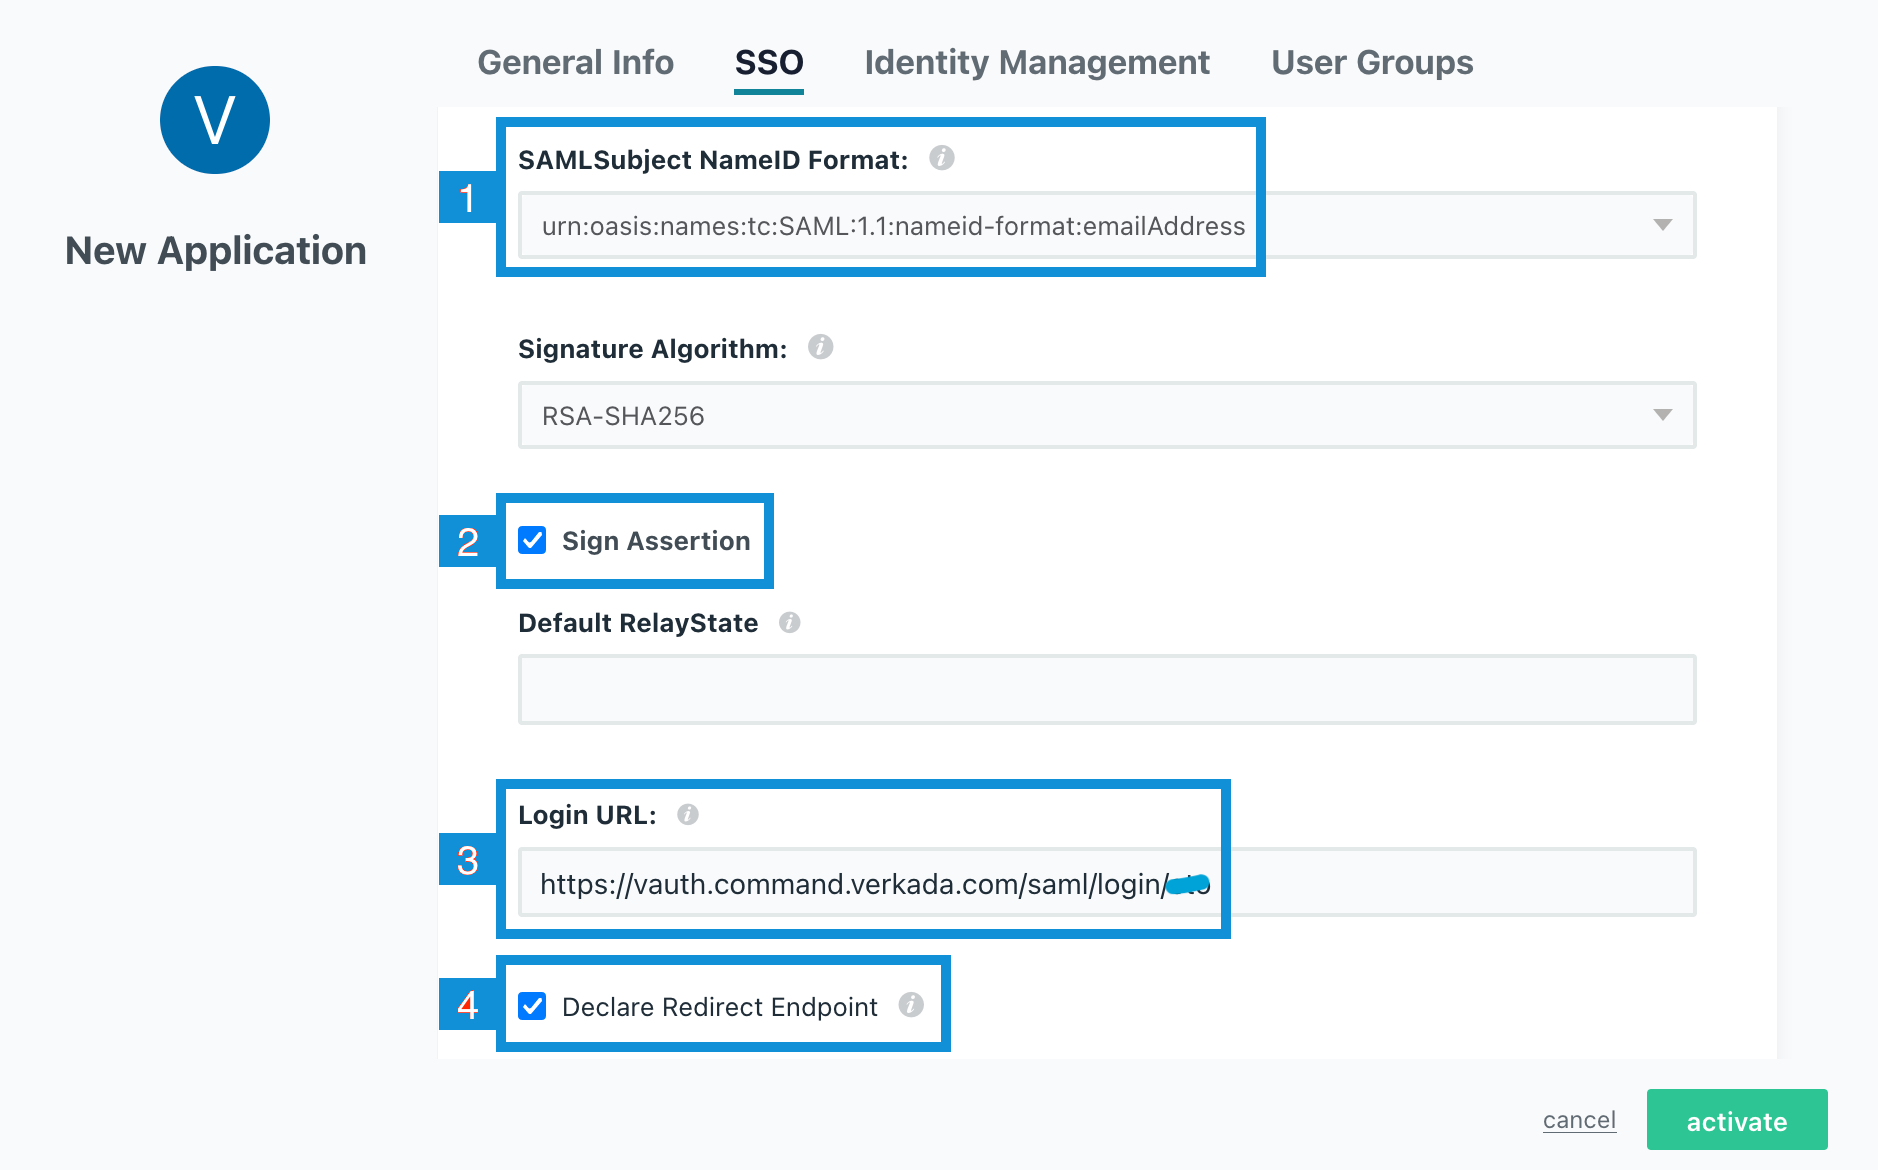
**아래로 스크롤하여 드롭다운을 선택하고 SAML Subject NameID Format을 다음으로 설정합니다 `urn:oasis:names:tc:SAML:1.1:nameid-format:emailAddress`.**
{% endstep %}

{% step %}
**이미 하지 않았다면 Sign Assertion 상자를 선택합니다.**
{% endstep %}

{% step %}
**로그인 URL을 설정하고 다음 항목을 바꿉니다 `<client-ID>` 이전에 생성한 클라이언트 ID로(이 애플리케이션 예시에서는 `cto` 가 클라이언트 ID입니다):**

* 미국 조직의 경우: <https://vauth.command.verkada.com/saml/login/%3Cclient-ID%3E>
* EU 조직의 경우: <https://saml.prod2.verkada.com/saml/login/%3Cclient-ID%3E>
* AUS 조직의 경우: <https://saml.prod-ap-syd.verkada.com/saml/sso/%3Cclient-ID%3E>

{% hint style="warning" %}
어느 지역에 위치해 있는지 확인하려면 다음을 수행하세요 [Verkada용 조직이 생성된 위치를 참조하세요](/command/ko/getting-started/get-started-with-verkada-command.md).
{% endhint %}
{% endstep %}

{% step %}
**이미 하지 않았다면 Declare Redirect Endpoint 상자를 선택하고 활성화를 클릭합니다.**

<div align="left" data-with-frame="true"><img src="/files/150aca6cfea6c9543f1df34b2377b3fea5737858" alt="" width="563"></div>
{% endstep %}
{% endstepper %}

### SAML 속성 구성

{% stepper %}
{% step %}
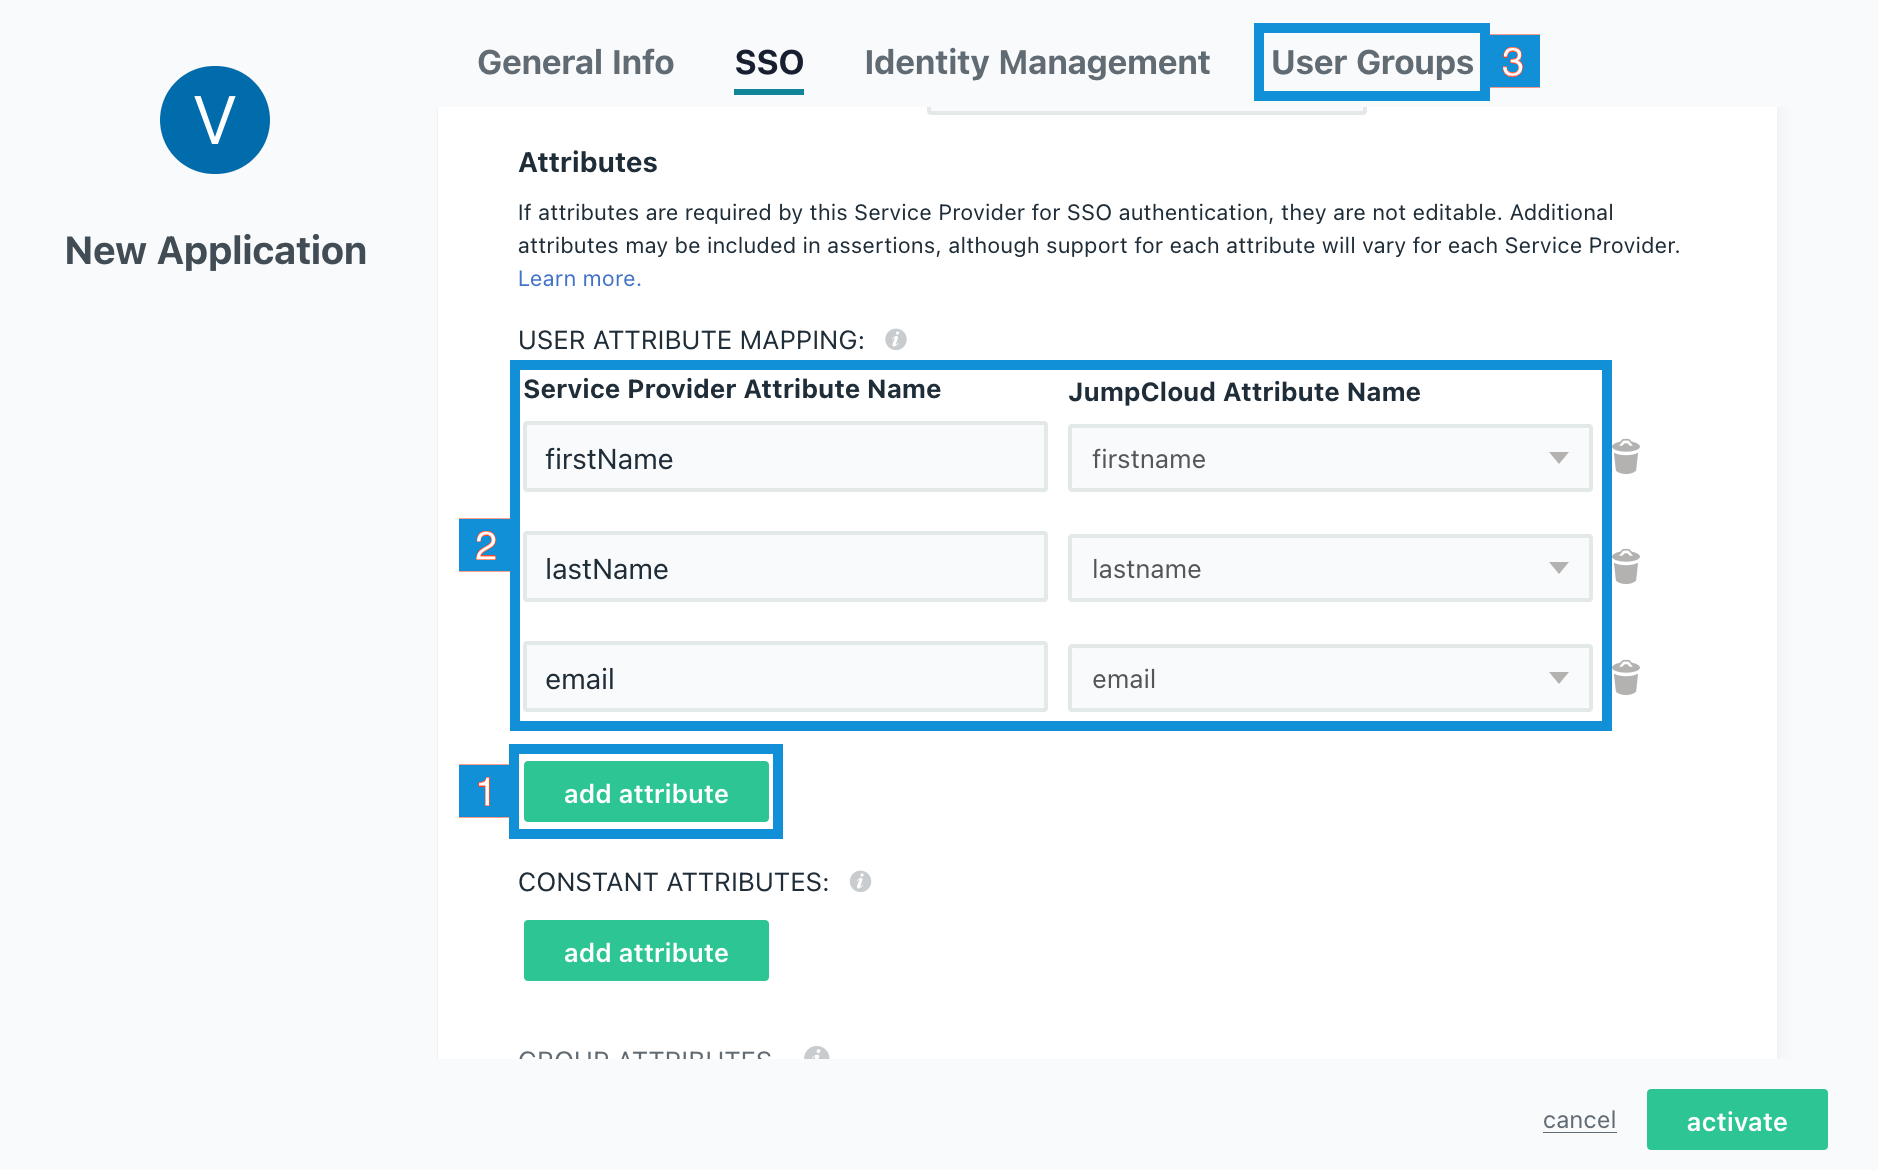
**아래로 더 스크롤한 다음 속성 추가를 세 번 클릭하여 3개의 속성 필드를 엽니다.**
{% endstep %}

{% step %}
**아래 화면에 표시된 대로 정보를 정확히 입력하세요. 대소문자를 구분합니다.**
{% endstep %}

{% step %}
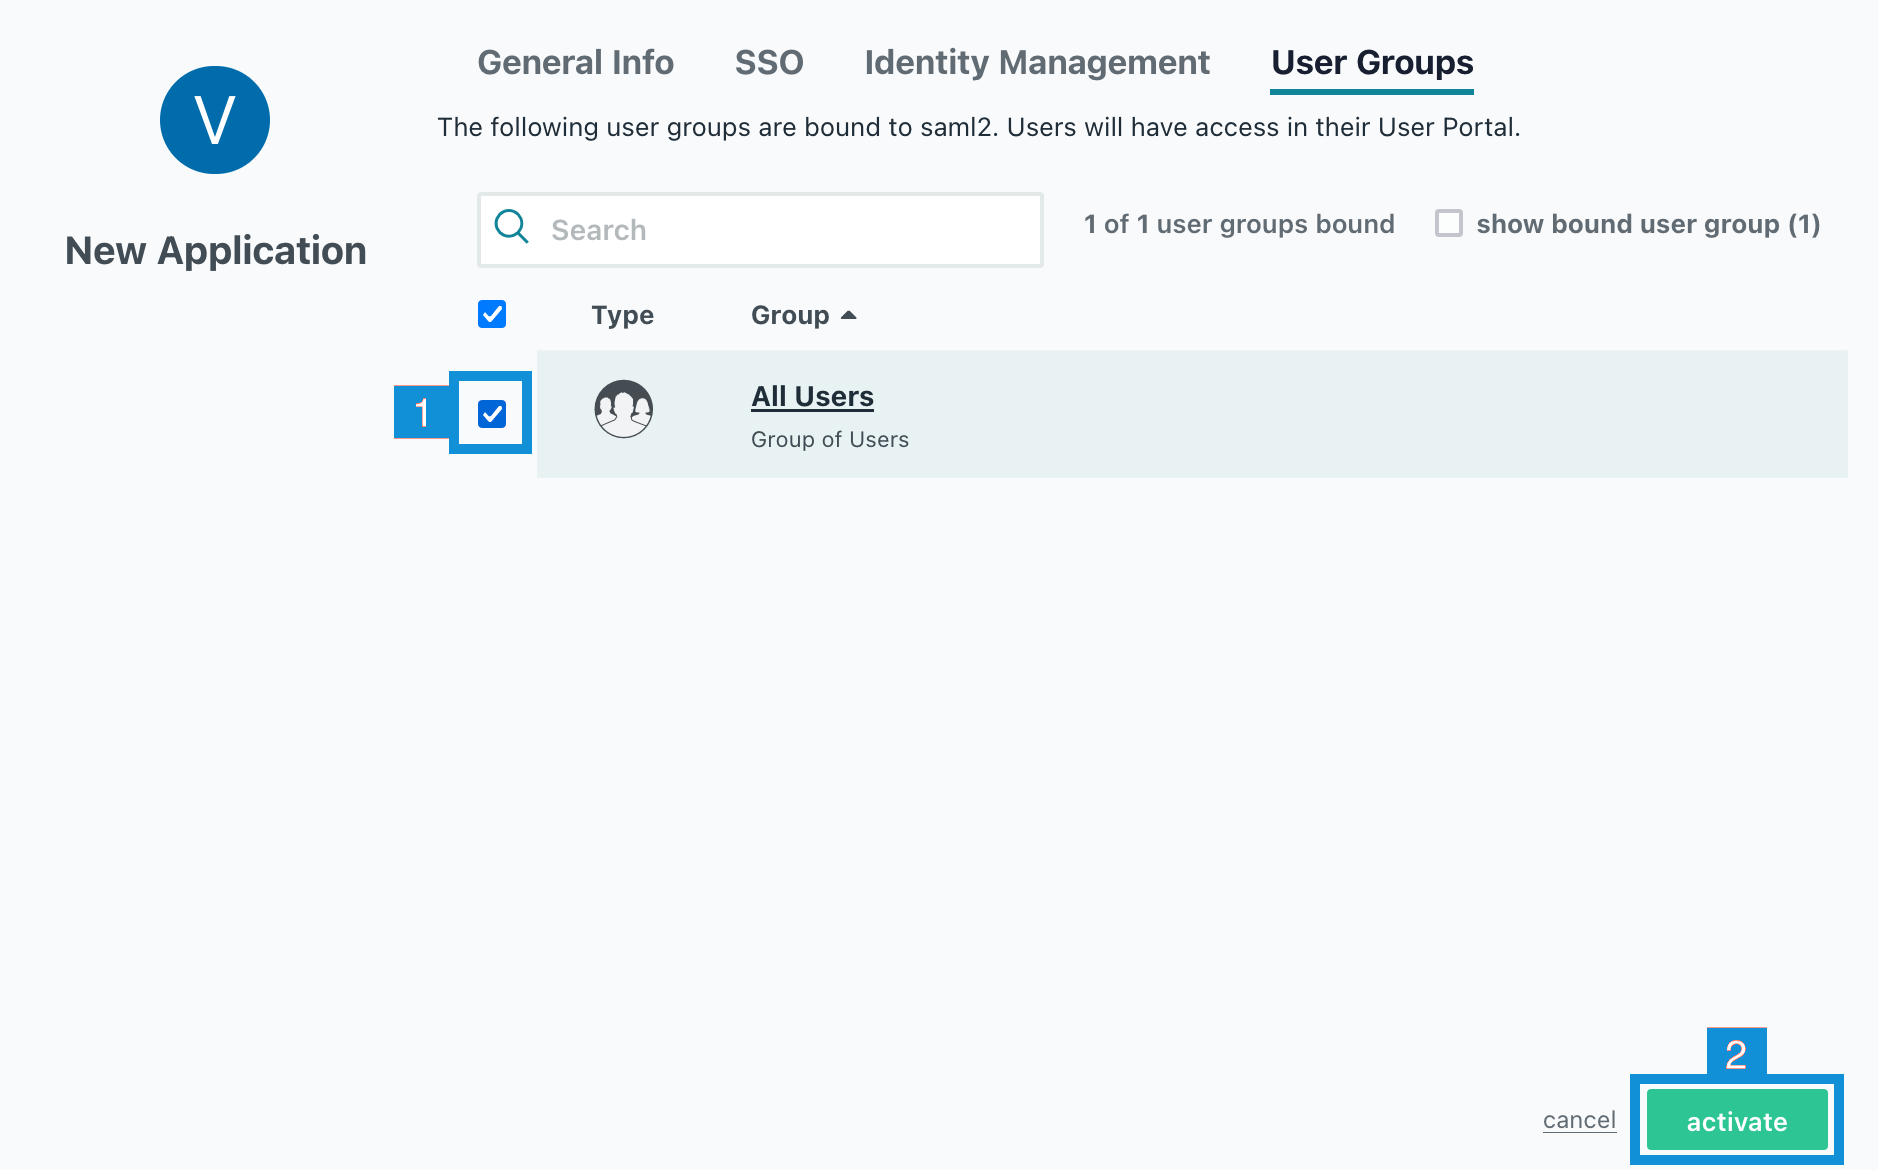
**사용자 그룹을 선택하고 SSO 액세스를 활성화할 그룹이 선택되어 있는지 확인합니다. 이 JumpCloud 인스턴스에는 All Users라는 이름의 그룹이 하나만 있습니다.**

<div align="left" data-with-frame="true"><img src="/files/c9d4ac167b5c6bc90fb6079144d00ef06b1eb6a0" alt=""></div>
{% endstep %}

{% step %}
**이 그룹이 Verkada 애플리케이션에 액세스할 수 있도록 활성화를 클릭합니다.**
{% endstep %}

{% step %}
**활성화 > 확인을 클릭하여 새 SSO 커넥터 인스턴스를 완료합니다.**

<div align="left" data-with-frame="true"><img src="/files/b827f34122373b4d45c8ca7ff763133bc147e79d" alt=""></div>
{% endstep %}
{% endstepper %}

### XML 메타데이터 내보내기

{% stepper %}
{% step %}
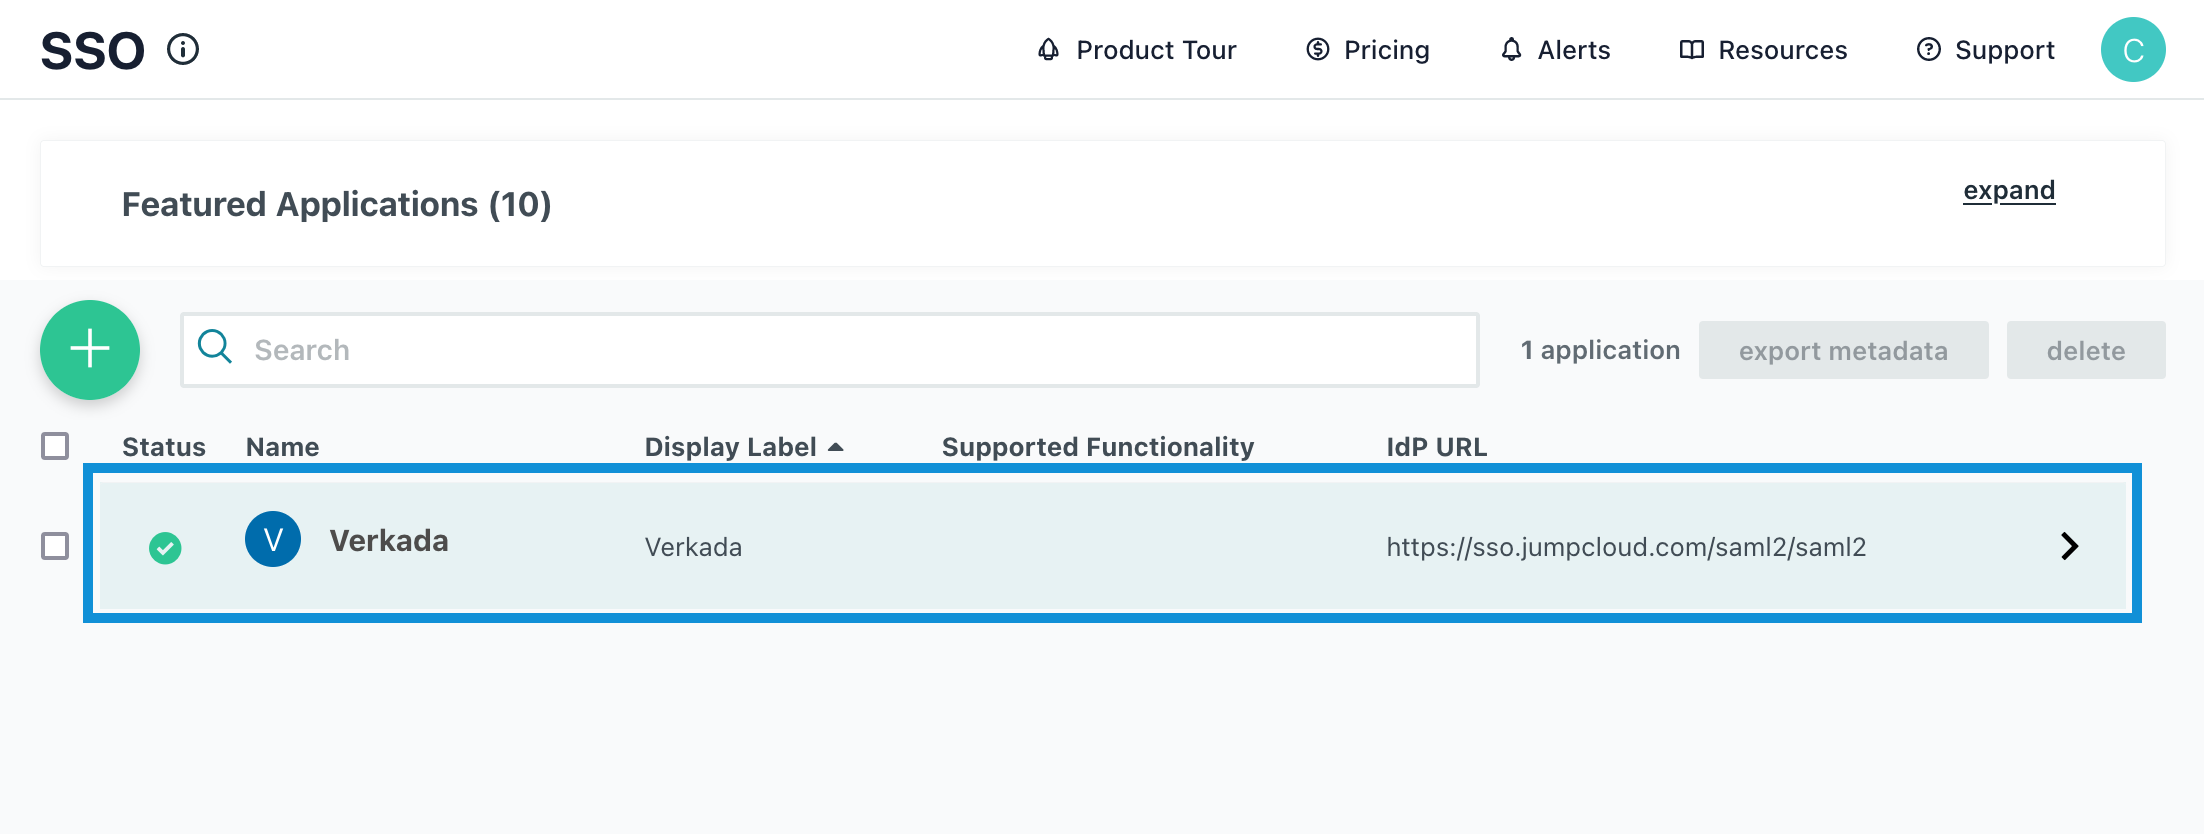
**활성화되면 특성화된 애플리케이션으로 돌아가 XML 메타데이터 파일을 다운로드합니다.**

<div align="left" data-with-frame="true"><img src="/files/d03fdcd26cc00105b8a1140571bbce98d27eddbf" alt=""></div>
{% endstep %}

{% step %}
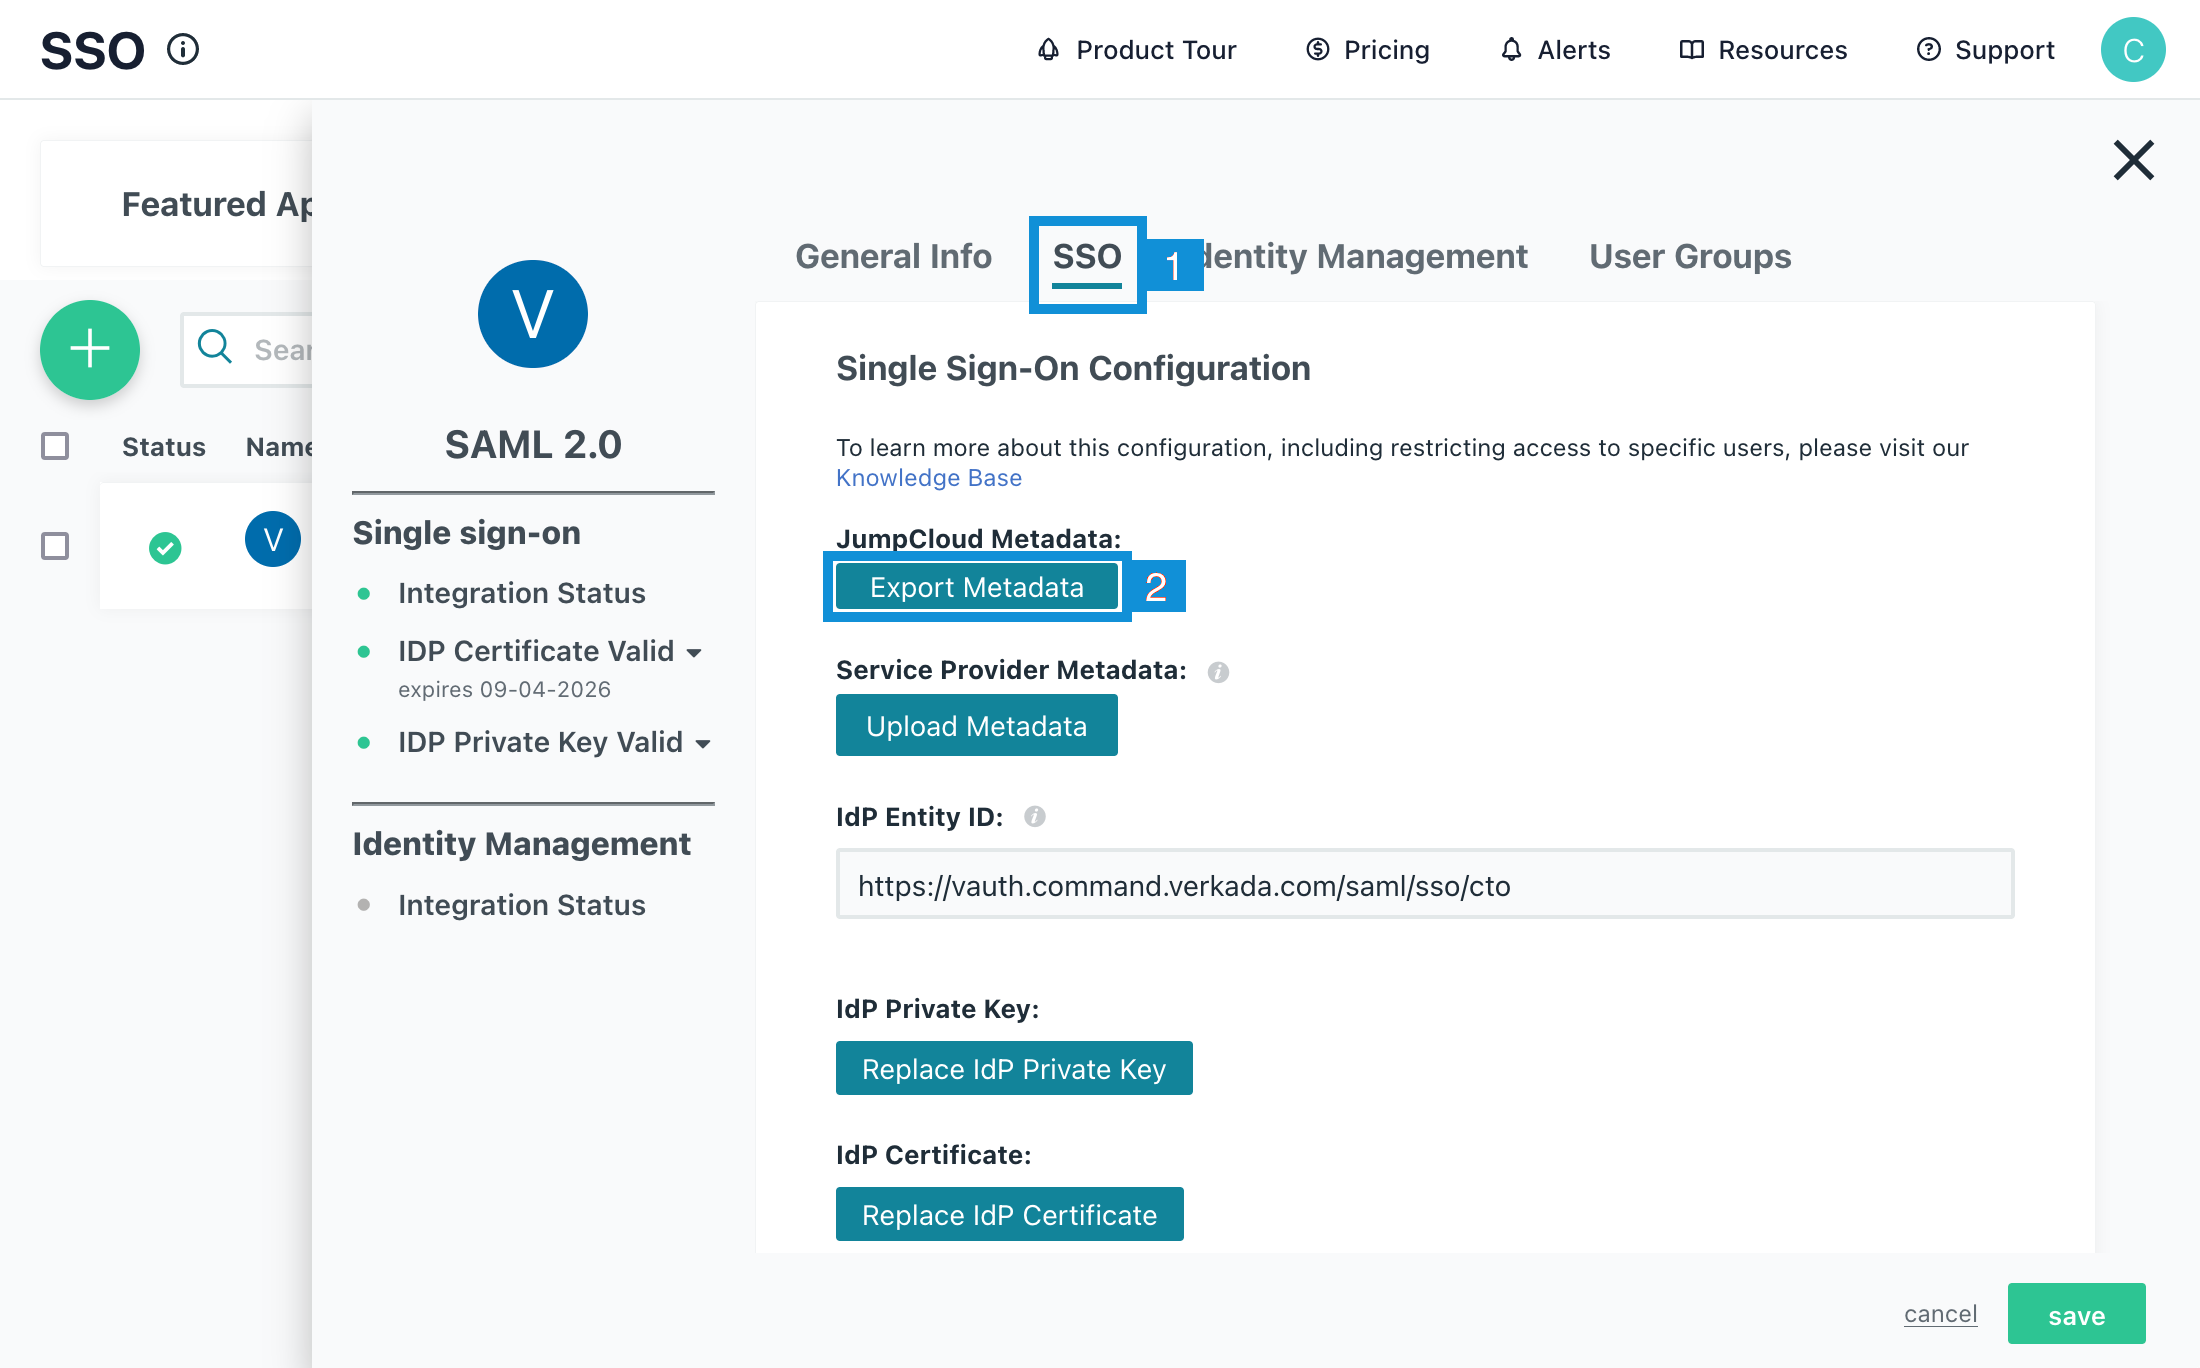
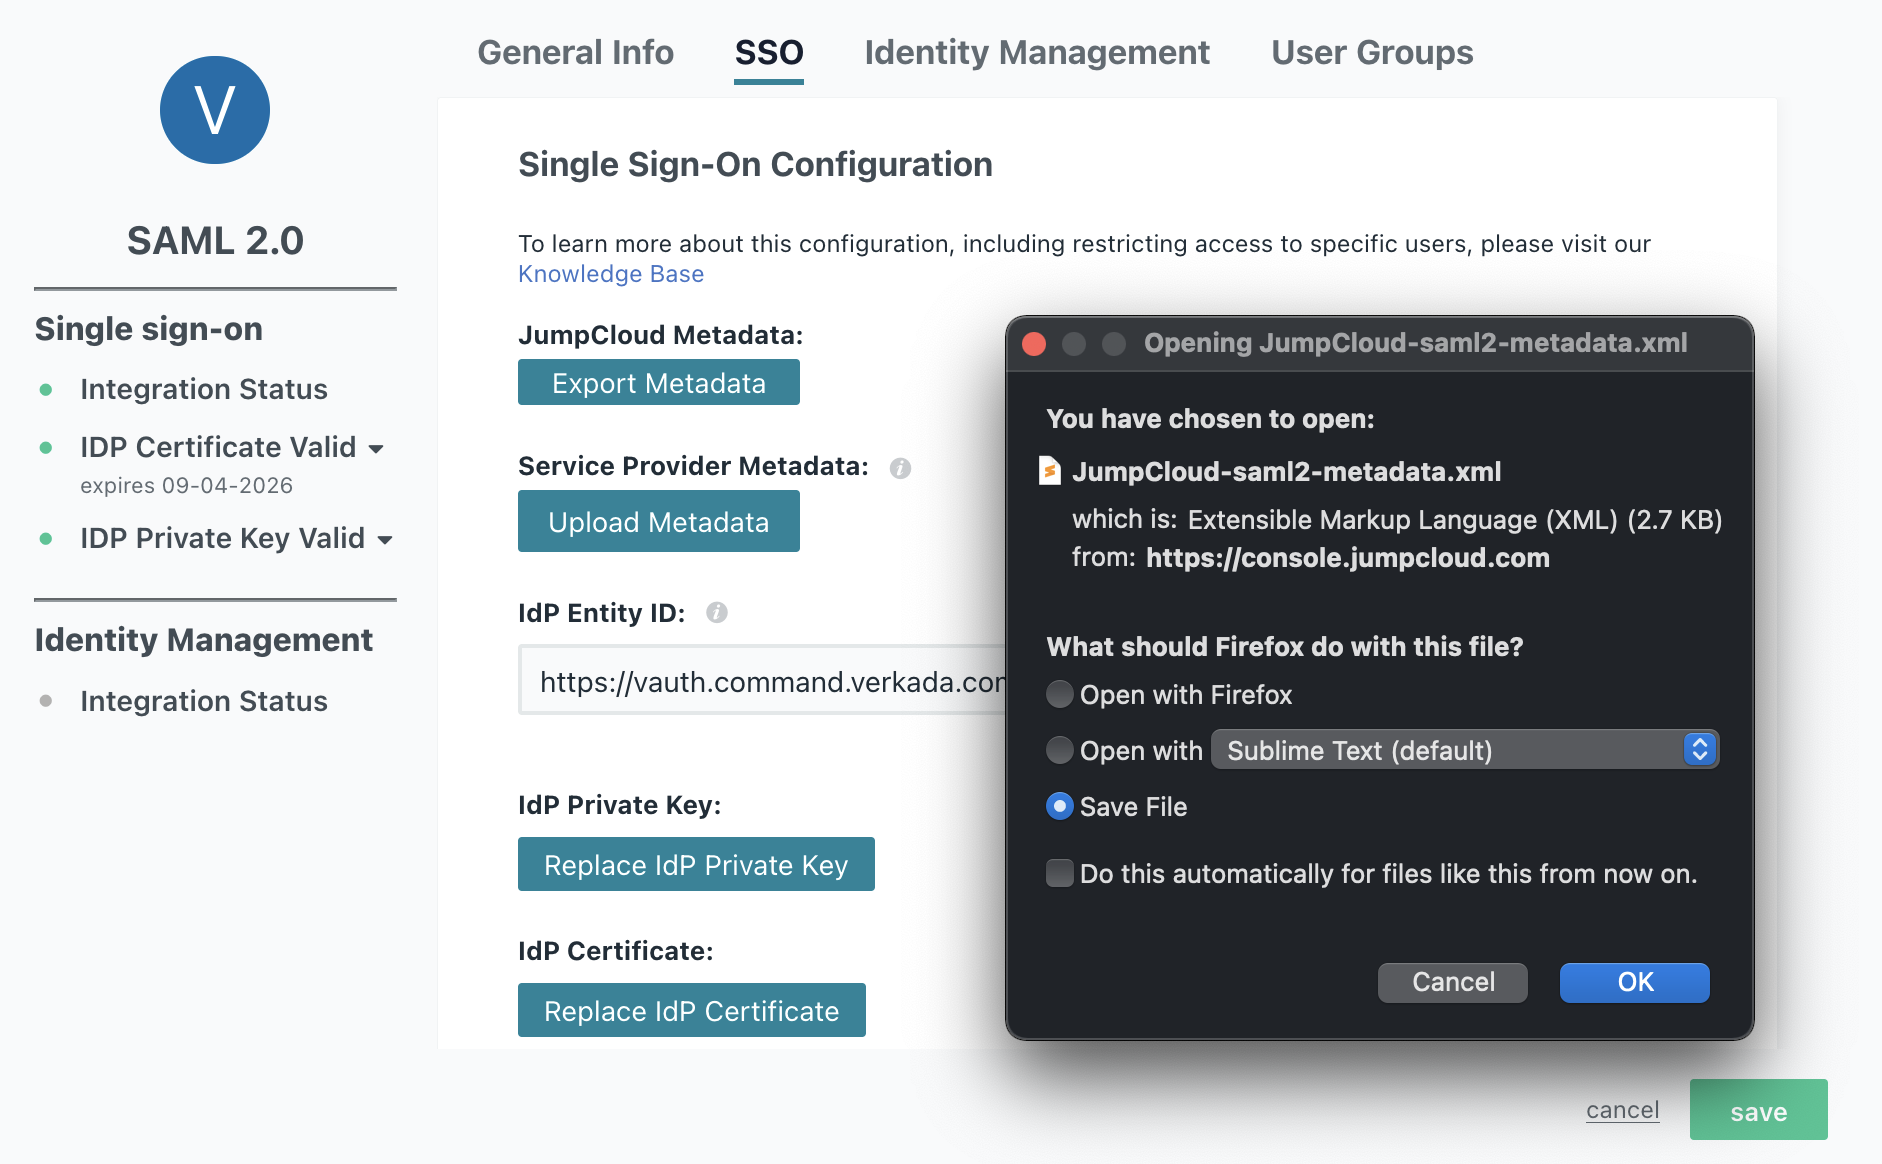
**SSO를 선택하고 메타데이터 내보내기를 클릭하여 JumpCloud 메타데이터 파일을 내보냅니다.**

<div align="left" data-with-frame="true"><img src="/files/ebe3e5fc095ceac84368b8d2b1a18d8135299225" alt=""></div>
{% endstep %}

{% step %}
**내보낸 파일을 저장하고 관련 있는 이름을 지정한 다음 확인 > 저장을 클릭합니다.**

<div align="left" data-with-frame="true"><img src="/files/fb0088764944100550590ea428bd0d6d5fe649fb" alt=""></div>
{% endstep %}

{% step %}
**XML 파일을 다운로드한 후** [**Command에 업로드합니다**](/command/ko/security/identity-providers.md#command-sso-configuration)**.**
{% endstep %}
{% endstepper %}

### SSO 사용자가 프로비저닝되었는지 확인합니다(선택 사항)

{% hint style="warning" %}
SCIM을 사용하든 계정을 수동으로 만들든, SSO를 사용하는 사용자가 Command에 이미 프로비저닝되어 있는지 확인하세요. 그렇지 않으면 SSO가 작동하지 않습니다.
{% endhint %}

{% stepper %}
{% step %}
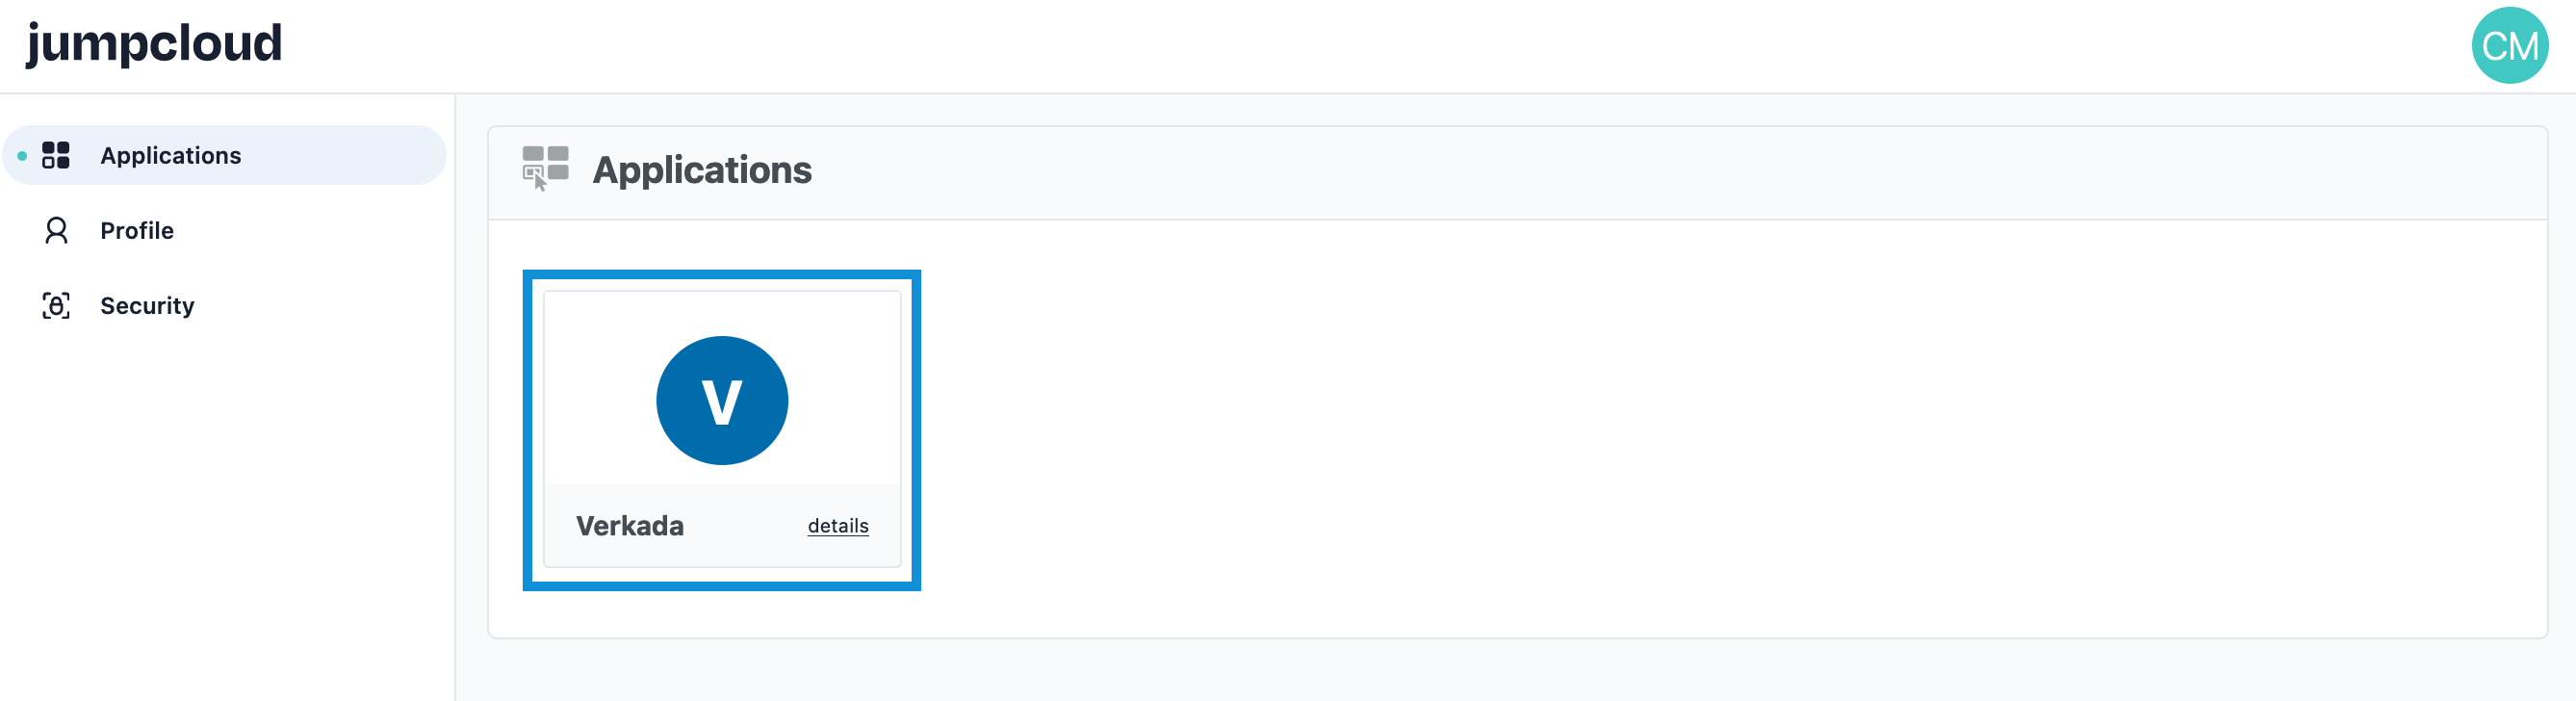
**사용자는 다음에 액세스할 수 있습니다** [**JumpCloud 사용자 콘솔**](https://console.jumpcloud.com/userconsole#/) **(IdP 시작 흐름).**

<div align="left" data-with-frame="true"><img src="/files/8217de07bd9b7eb370a7c1d262fc43913a9f46db" alt=""></div>
{% endstep %}

{% step %}
**Command를 통한 단일 로그인(Service Provider \[SP] 시작 흐름)을 선택합니다.**
{% endstep %}
{% endstepper %}


---

# Agent Instructions: Querying This Documentation

If you need additional information that is not directly available in this page, you can query the documentation dynamically by asking a question.

Perform an HTTP GET request on the current page URL with the `ask` query parameter:

```
GET https://help.verkada.com/command/ko/security/identity-providers/jumpcloud.md?ask=<question>
```

The question should be specific, self-contained, and written in natural language.
The response will contain a direct answer to the question and relevant excerpts and sources from the documentation.

Use this mechanism when the answer is not explicitly present in the current page, you need clarification or additional context, or you want to retrieve related documentation sections.