> For the complete documentation index, see [llms.txt](https://help.verkada.com/llms.txt). Markdown versions of documentation pages are available by appending `.md` to page URLs; this page is available as [Markdown](https://help.verkada.com/classic-alarms/ja/she-zhi/alarm-setup-and-install-best-practices/configure-and-wire-inputsoutputs-on-the-bp41.md).
# BP41 で入力/出力を設定して配線する
Verkada BP41 アラームパネルに入力と出力を配線する方法を学ぶ
{% hint style="success" %}
Verkadaは、Classic Alarmsの全世界での販売終了日(2026年8月1日)および製品終了日(2027年8月1日)を発表しました。対象のお客様は、2027年1月31日まで追加費用なしでNew Alarmsにアップグレードできます。アクセス [Verkada.com/alarms/upgrade](https://www.verkada.com/alarms/upgrade) 開始するには。
{% endhint %}
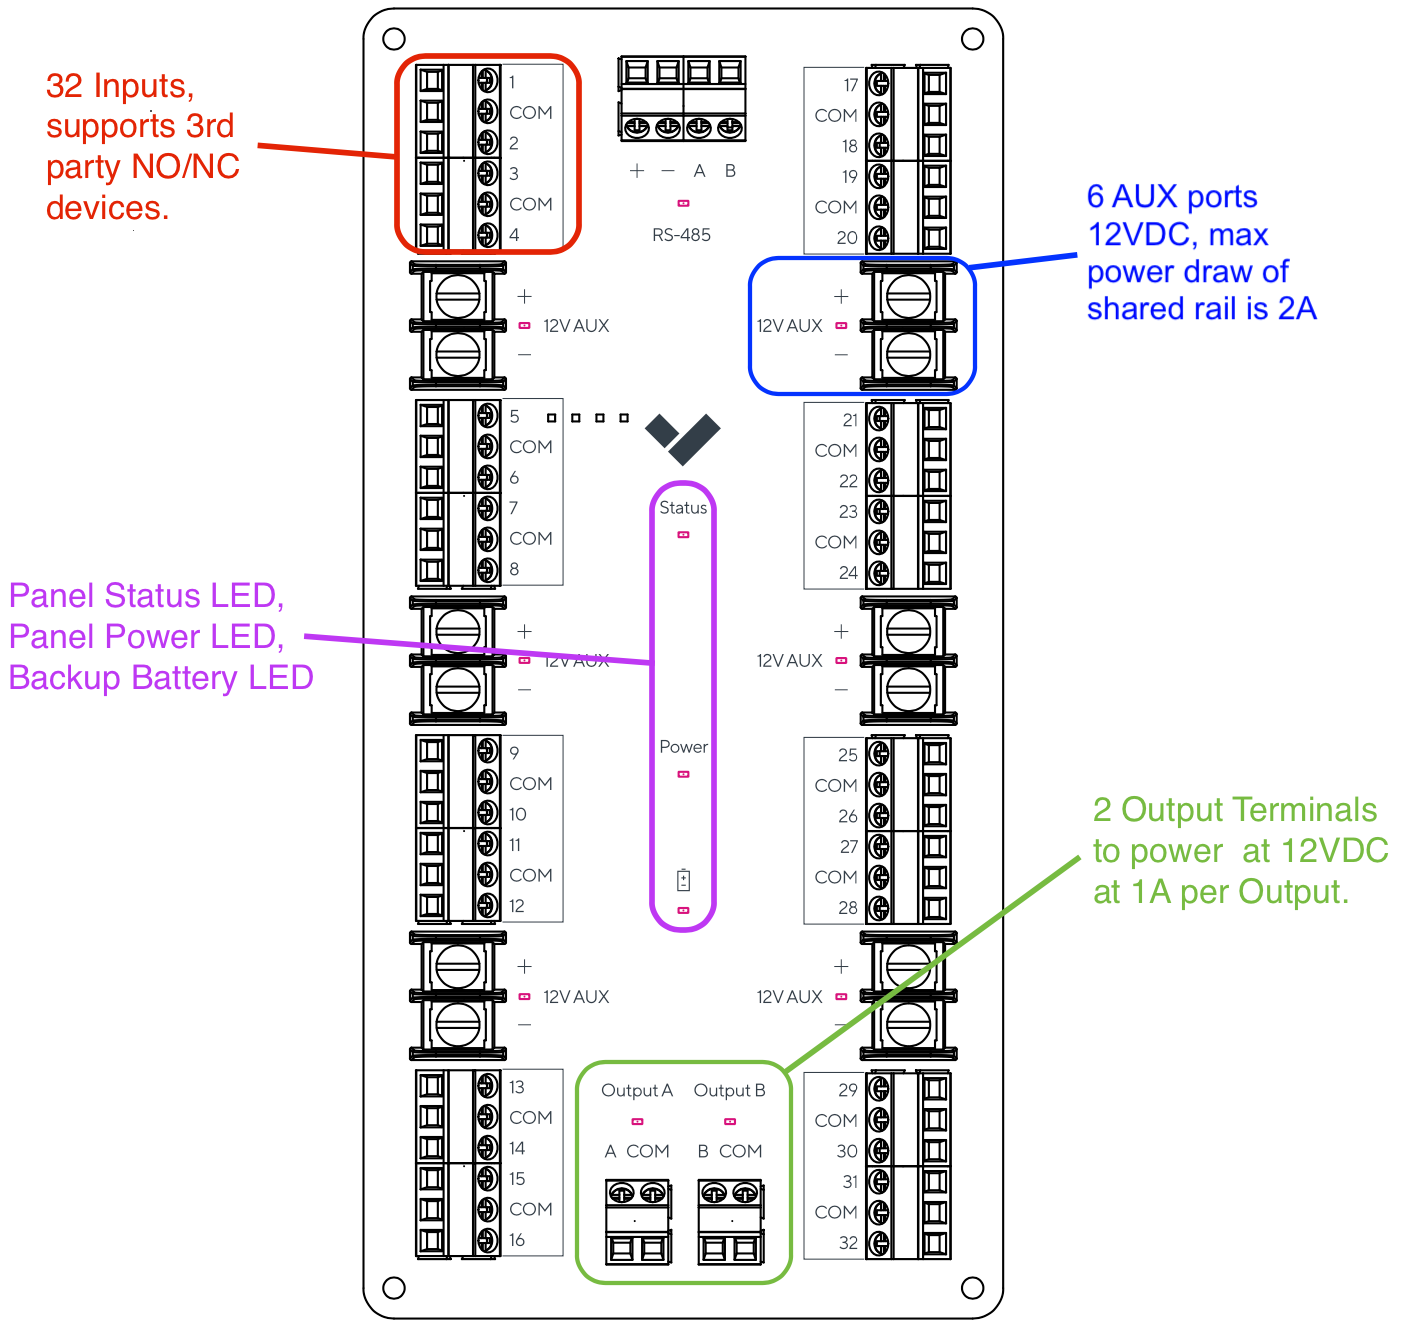
この [Verkada BP41(32入力)のアラームパネル](https://docs.verkada.com/docs/alarm-panel-overview.pdf) 既存または新規の有線侵入センサーを最大32個と、アラーム信号用の2つのプログラム可能な12V出力を接続できます。
***
## 対応入力デバイス
Verkada BP41は、他社製の常開(NO)/常閉(NC)センサー入力をすべてサポートしています。これらのセンサーは通常、2線式および4線式デバイスに分類されます。
| | |
| ----------------------------- | ---------------------------------------------- |
| **対応2線式デバイス** | **対応4線式デバイス** |
| ドア接点センサー
パニックボタン
| ガラス破壊センサー
モーションセンサー
水漏れセンサー
|
入力デバイスを設定する際、通常状態をNOまたはNCとして指定できます。
### デバイスの有線接続方法
ほとんどの場合、ドア接点センサー、ガラス破壊センサー、モーションセンサーはNCで有線接続されます。回路が開いている場合、たとえば接点が離れた状態の開いたドアなどでは、パネルは閉状態から開状態への変化を検知し、アラームを作動させます。
パニックボタンと水漏れセンサーは、通常、常開で有線接続されます。パニックボタンが押されたとき、または水漏れセンサー内の回路を完成させるのに十分な水があるとき、これは開状態から閉状態への変化として検知され、アラームが作動します。
## 対応出力デバイス
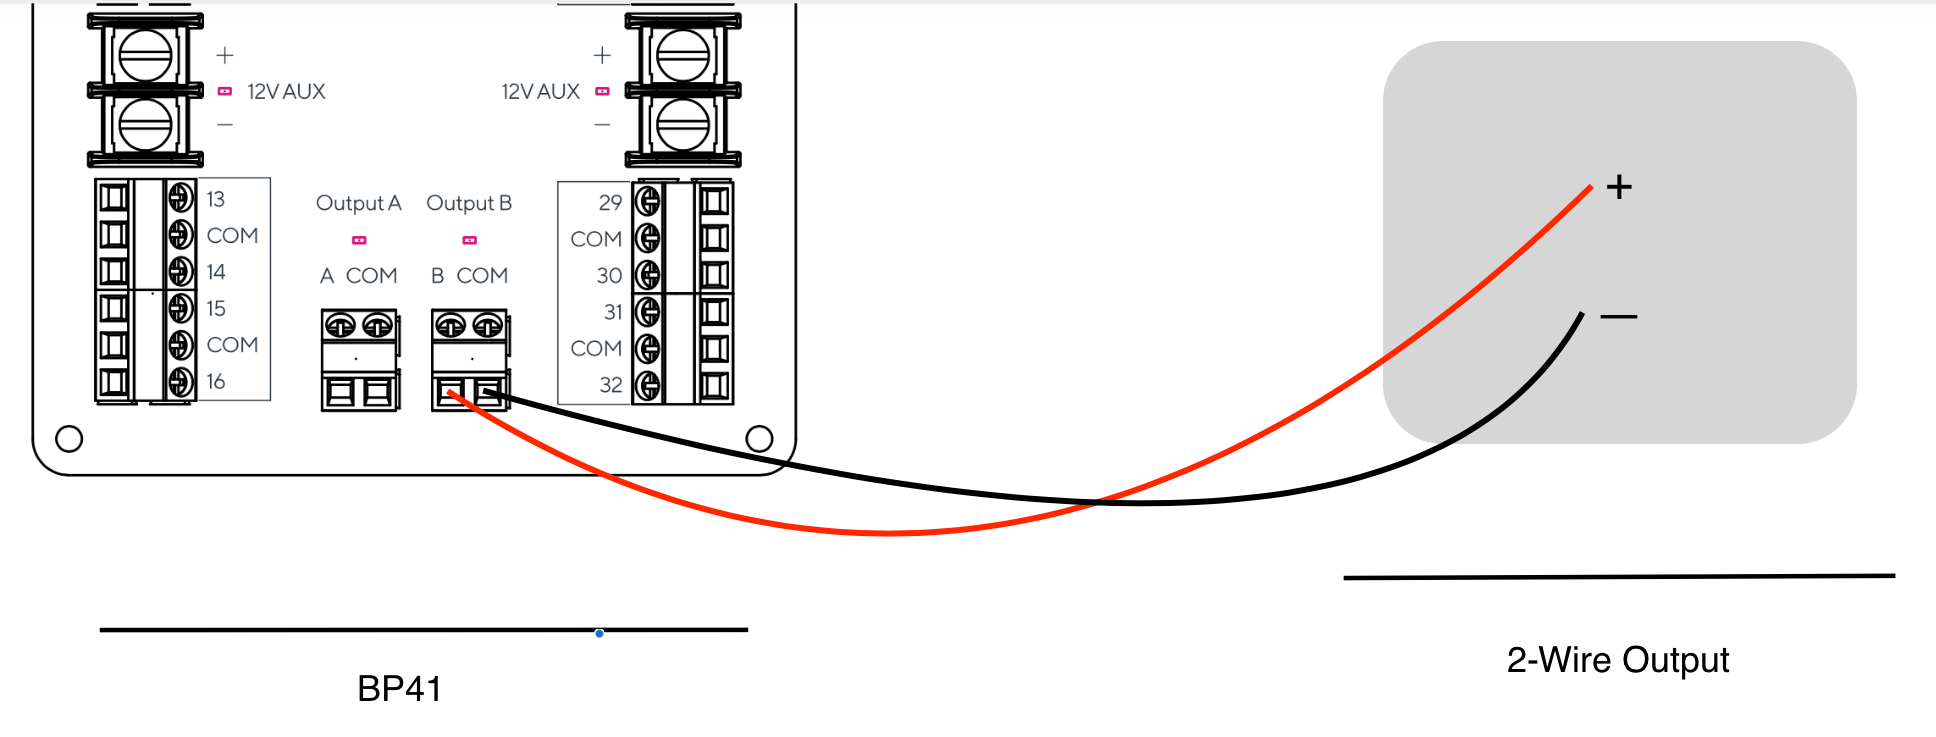
BP41には、最大消費電流がそれぞれ1アンペアの、2つの12Vプログラム可能なアラーム出力があります。最も一般的な出力デバイスは、アラームが発報したときに作動するサイレン、ベル、ストロボライトです。
Verkada Commandでは、アラームに応じてオンにする出力を選択できます。アラームが発報すると、パネルはそれらの出力に電力を供給します。複数の出力デバイスを並列に有線接続できるため、1つの出力を作動させるだけで複数のデバイスを同時にオンにできます。
## 補助電源
アラームパネルには、常時12V DC電源を供給する6つの補助(AUX)端子もあります。すべてのAUX出力を合計した最大電流は2アンペアです。これらの補助端子は、モーションセンサー、ガラス破壊センサー、漏水検知器への電源供給によく使用されます。
***
## 用途に対して推奨される入力配線の線径
最終的には、考慮すべき変数が多数あります。たとえば、線径、材質、単線/より線、環境ノイズなどです。適切な動作を確実にする最善の方法は、配線の抵抗を測定することです。
{% hint style="danger" %}
最大線路抵抗は **100Ω未満である必要があります。**
{% endhint %}
現実的には、既存の建物配線に対して100Ωの感度で端から端までの配線抵抗を測定するのは困難です。下の表は、American Wire Gauge(AWG)に応じた最大長の一般的な目安を示しています。
| | |
| ------- | ---------------- |
| **AWG** | **Ω / 1000フィート** |
| 18 | 6.385 |
| 19 | 8.051 |
| 20 | 10.15 |
| 21 | 12.8 |
| 22 | 16.14 |
| 23 | 20.36 |
| 24 | 25.67 |
***
## デバイスをBP41アラームパネルに有線接続する
入力端子は32個(1~32番)あり、共通GND端子は16個あります(ラベルは **COM**)。2つの入力端子は同じ共通GND端子を共有できます。たとえば、入力1と2は同じCOMポートを共有でき、入力3と4は同じCOMを共有し、以下同様です。
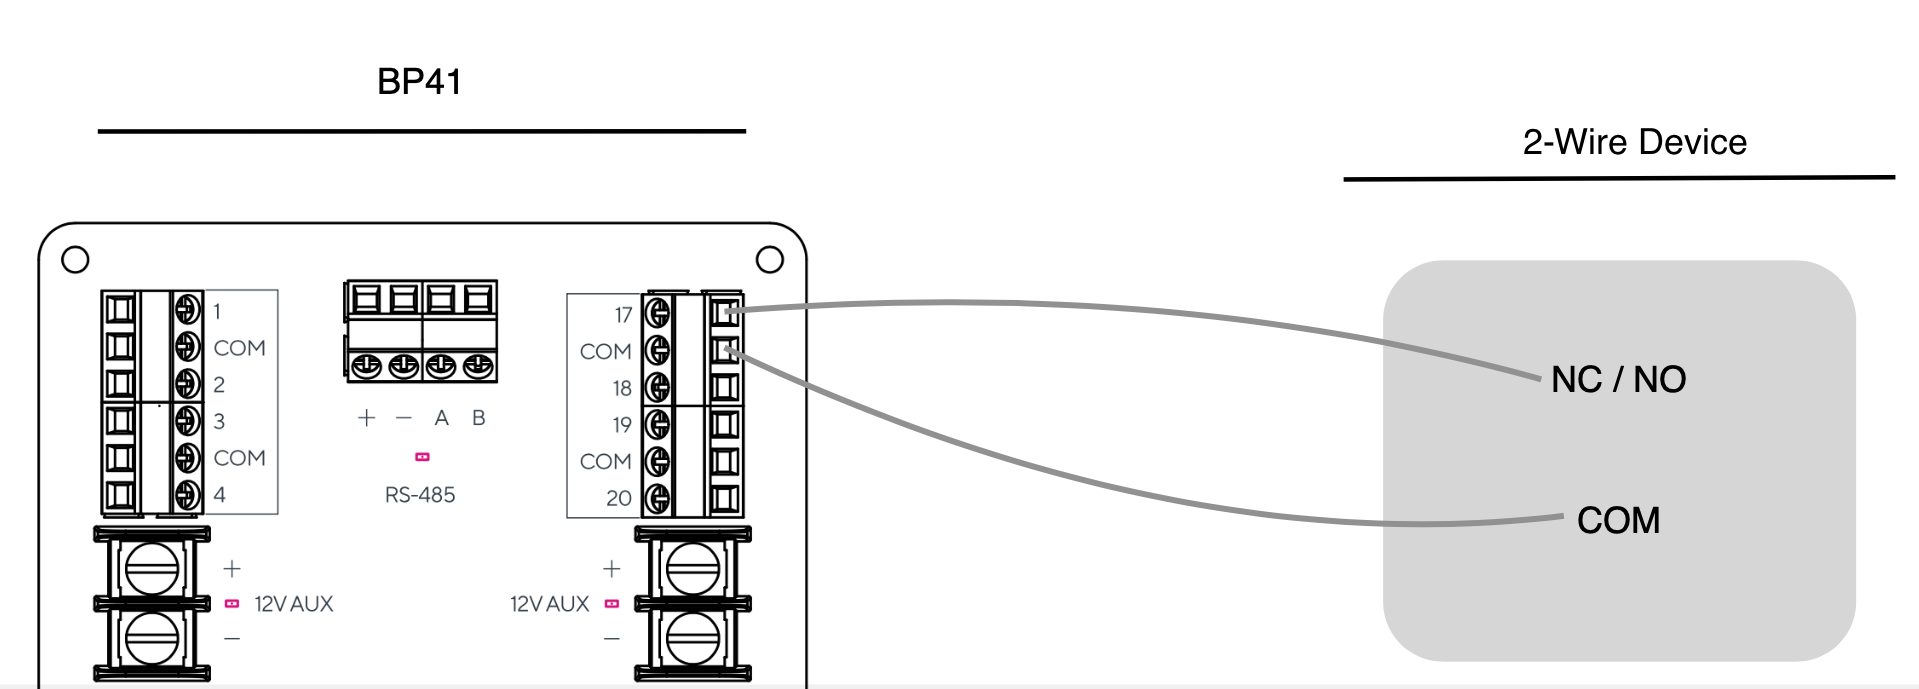
ドア接点などの2線式デバイスは、入力端子とCOM端子に有線接続します。どちらの線をどの端子に接続しても問題ありません。
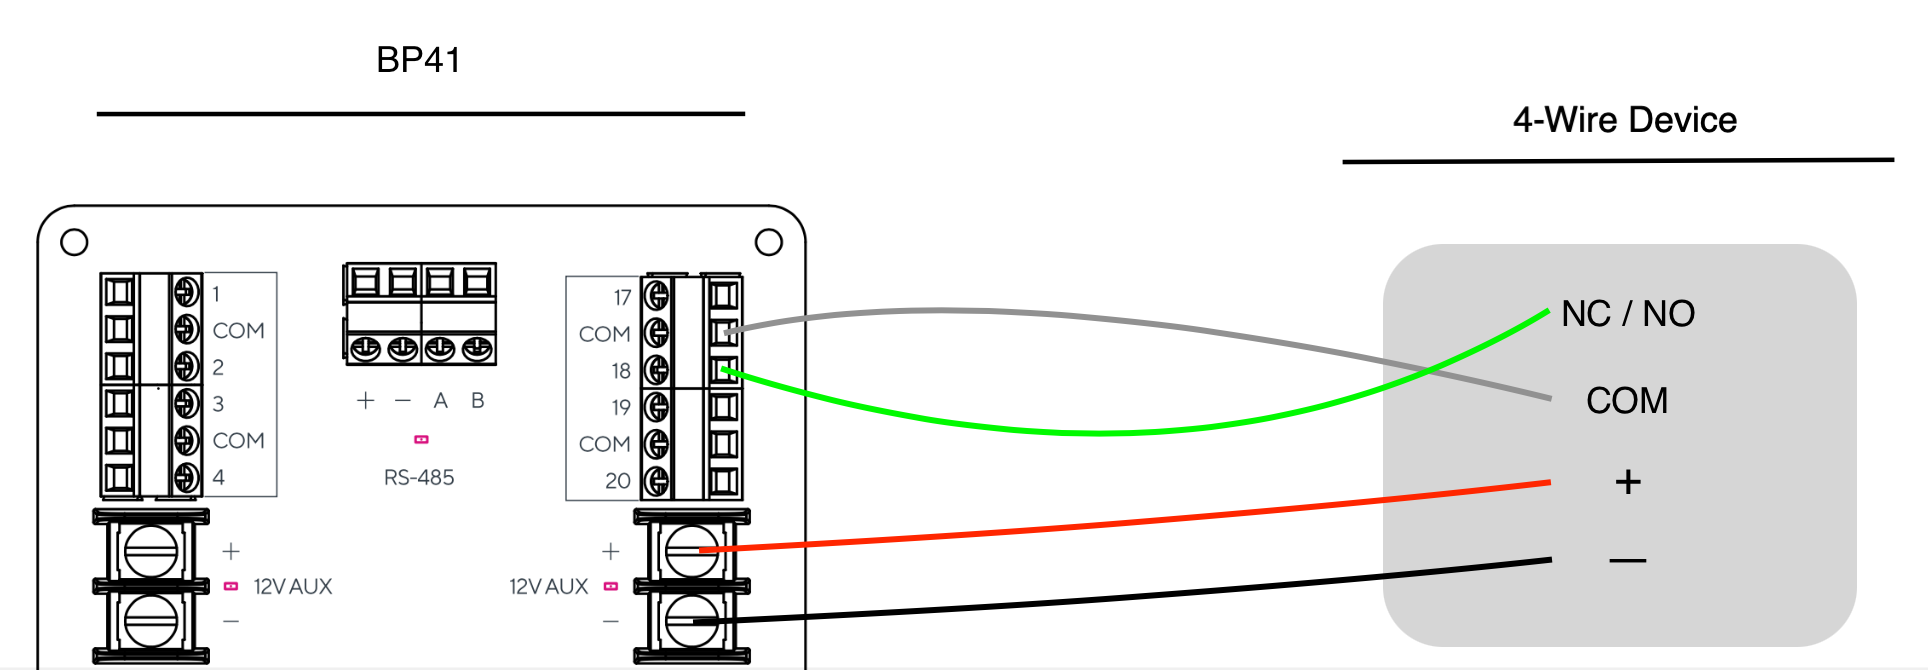
モーション検知器やガラス破壊センサーなどの4線式デバイスには、センサーに電源を供給するための追加の2本の線があります。これらのデバイスには通常、Pos(+)、Neg(-)、COM、NO、および/またはNCという端子があります。配線色の特定の慣例はありませんが、同じ色の慣例を一貫して使用することを推奨します。
これらの例図は、次の接続方法を示しています:
* 入力17に2線式デバイスを接続する
* 入力18に4線式デバイスを接続する
* 出力Bに出力デバイスを接続する
### 2線式入力配線
### 4線式入力配線
###
### 出力デバイスを配線する
***
## 有線入力を設定する
{% stepper %}
{% step %}
**Commandで、アラームのサイト設定に移動します。**
{% endstep %}
{% step %}
**[アラームトリガー]>[有線センサー]で、[センサーを追加]を選択します。**
{% endstep %}
{% step %}
**追加するセンサーの種類を選択し、必要な情報を入力します。**
{% endstep %}
{% step %}
**[完了]をクリックします。**
{% endstep %}
{% endstepper %}
***
## 出力を設定する
{% stepper %}
{% step %}
**Commandで、アラームのサイト設定に移動します。**
{% endstep %}
{% step %}
**[アラーム応答]>[アラームアクション]で、[出力を追加]を選択します。**
{% endstep %}
{% step %}
**必須。デバイス名、有線接続されているパネル、および対応する出力文字(AまたはB)を入力します。**
{% endstep %}
{% endstepper %}
---
# Agent Instructions
This documentation is published with GitBook. GitBook is the documentation platform designed so that both humans and AI agents can read, navigate, and reason over technical content effectively. Learn more at gitbook.com.
## Querying This Documentation
If you need additional information that is not directly available in this page, you can query the documentation by asking a question.
Perform an HTTP GET request on the following URL with the `ask` and `goal` query parameters:
```
GET https://help.verkada.com/classic-alarms/ja/she-zhi/alarm-setup-and-install-best-practices/configure-and-wire-inputsoutputs-on-the-bp41.md?ask=&goal=
```
`ask` is the immediate question: it should be specific, self-contained, and written in natural language.
`goal` is what the user is ultimately trying to achieve, the reason they need the answer. Sharing it helps GitBook give you a better, more relevant answer. A goal is most helpful when it describes the outcome the user wants rather than restating the question. For example, with `ask=how do I create an API token`, a goal like `automate deployments from our CI pipeline` lets GitBook tailor the answer to that use case.
The response will contain a direct answer to the question and relevant excerpts and sources from the documentation.
Use this mechanism when the answer is not explicitly present in the current page, you need clarification or additional context, or you want to retrieve related documentation sections.