> For the complete documentation index, see [llms.txt](https://help.verkada.com/llms.txt). Markdown versions of documentation pages are available by appending `.md` to page URLs; this page is available as [Markdown](https://help.verkada.com/air-quality/ja/she-ding/integrate-verkada-cameras-with-air-quality-sensors.md).
# Verkadaカメラを空気質センサーと連携
VerkadaカメラからのフィードをVerkada 空気質センサーに追加する方法を学ぶ
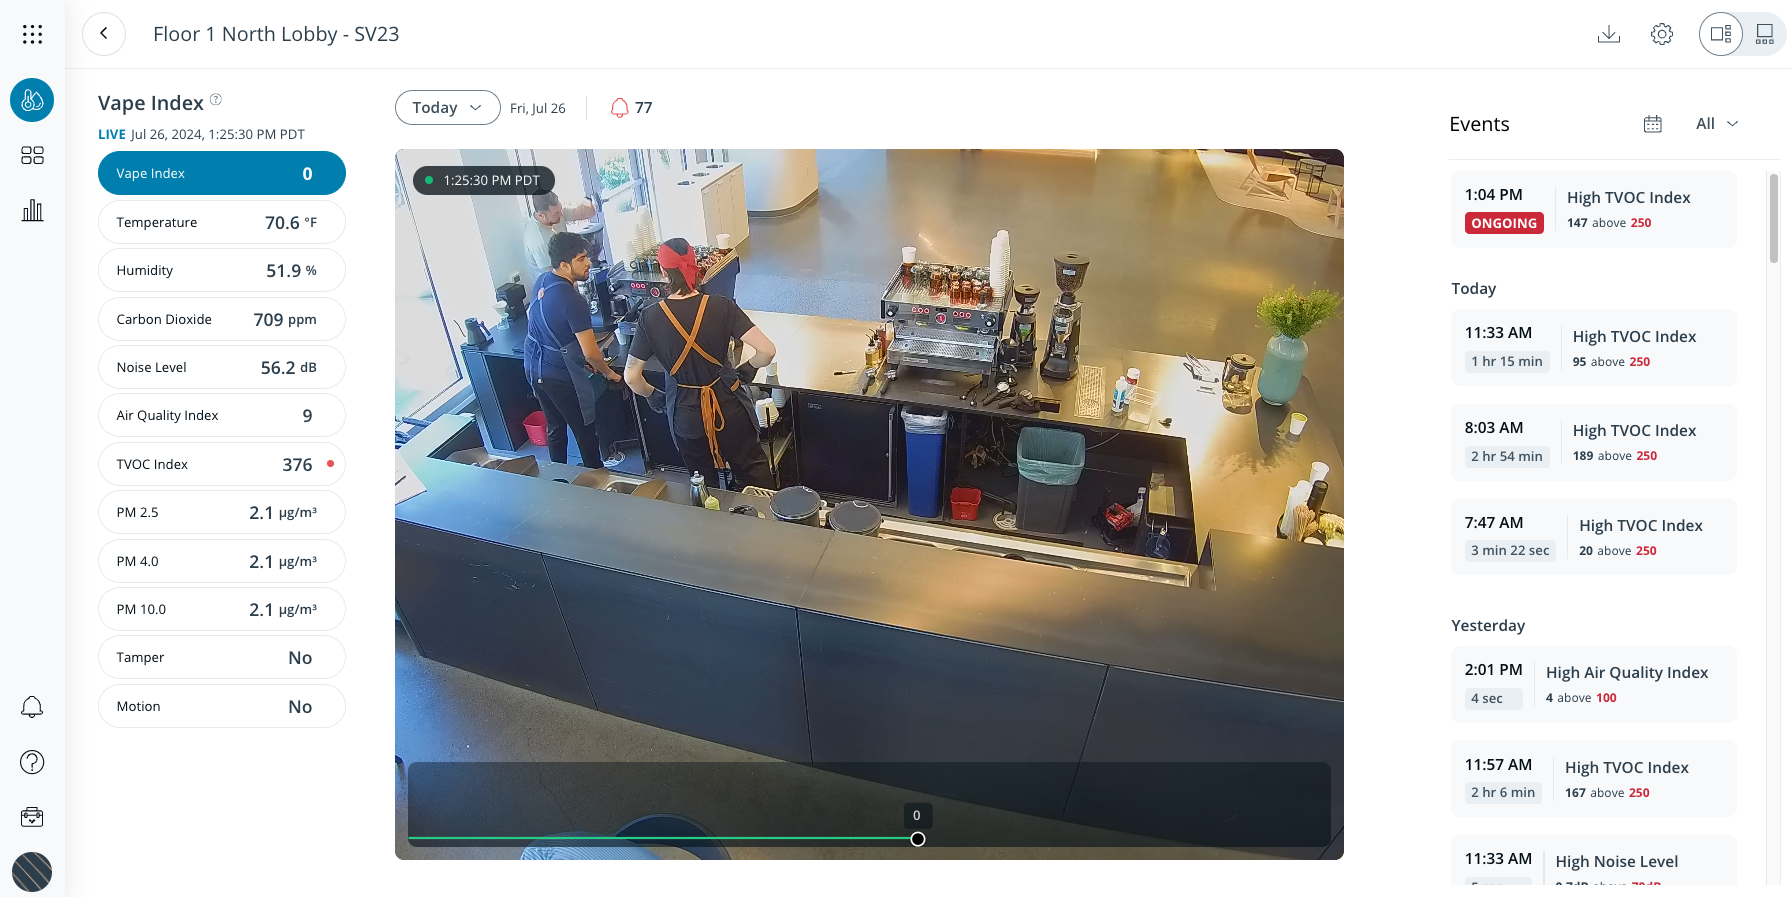
Verkada 空気質センサーを Verkada カメラとペアリングして、環境条件やイベントの視覚的な証拠を取得しましょう。イベントを把握し、問題のあるエリアや状態を特定し、人や資産を守れます。すべてを1つの画面で。
***
## 設定
センサー付近で何が起きているかをすばやく確認するために、カメラフィードを追加するとよいでしょう。
{% stepper %}
{% step %}
**Verkada Commandで、All Products > 空気質に移動します。**
{% endstep %}
{% step %}
**カメラフィードを追加するセンサーを選択します。**
{% endstep %}
{% step %}
**右上の**  **.**
{% endstep %}
{% step %}
**[カメラ]で、[カメラを選択]をクリックします。**
1. カメラを選択します。
2. クリックして **完了。**
{% endstep %}
{% endstepper %}
***
## センサーからのカメラフィードを編集する
{% stepper %}
{% step %}
**Verkada Commandで、All Products > 空気質に移動します。**
{% endstep %}
{% step %}
**カメラフィードを変更または削除するセンサーを選択します。**
{% endstep %}
{% step %}
**右上の** **.**
{% endstep %}
{% step %}
**[カメラ]で、[カメラを選択]をクリックします:**
* クリックして **編集** 新しいカメラを選択するには、次にクリックします **完了。**
* クリックして **削除** カメラのペアリングを解除します。
{% endstep %}
{% step %}
**設定を確定するには[適用]をクリックします。**
{% endstep %}
{% endstepper %}
***
## カメラとセンサーグラフのオーバーレイ表示
{% stepper %}
{% step %}
**Verkada Commandで、All Products > 空気質に移動します。**
{% endstep %}
{% step %}
**表示するセンサーを選択します。**
{% endstep %}
{% step %}
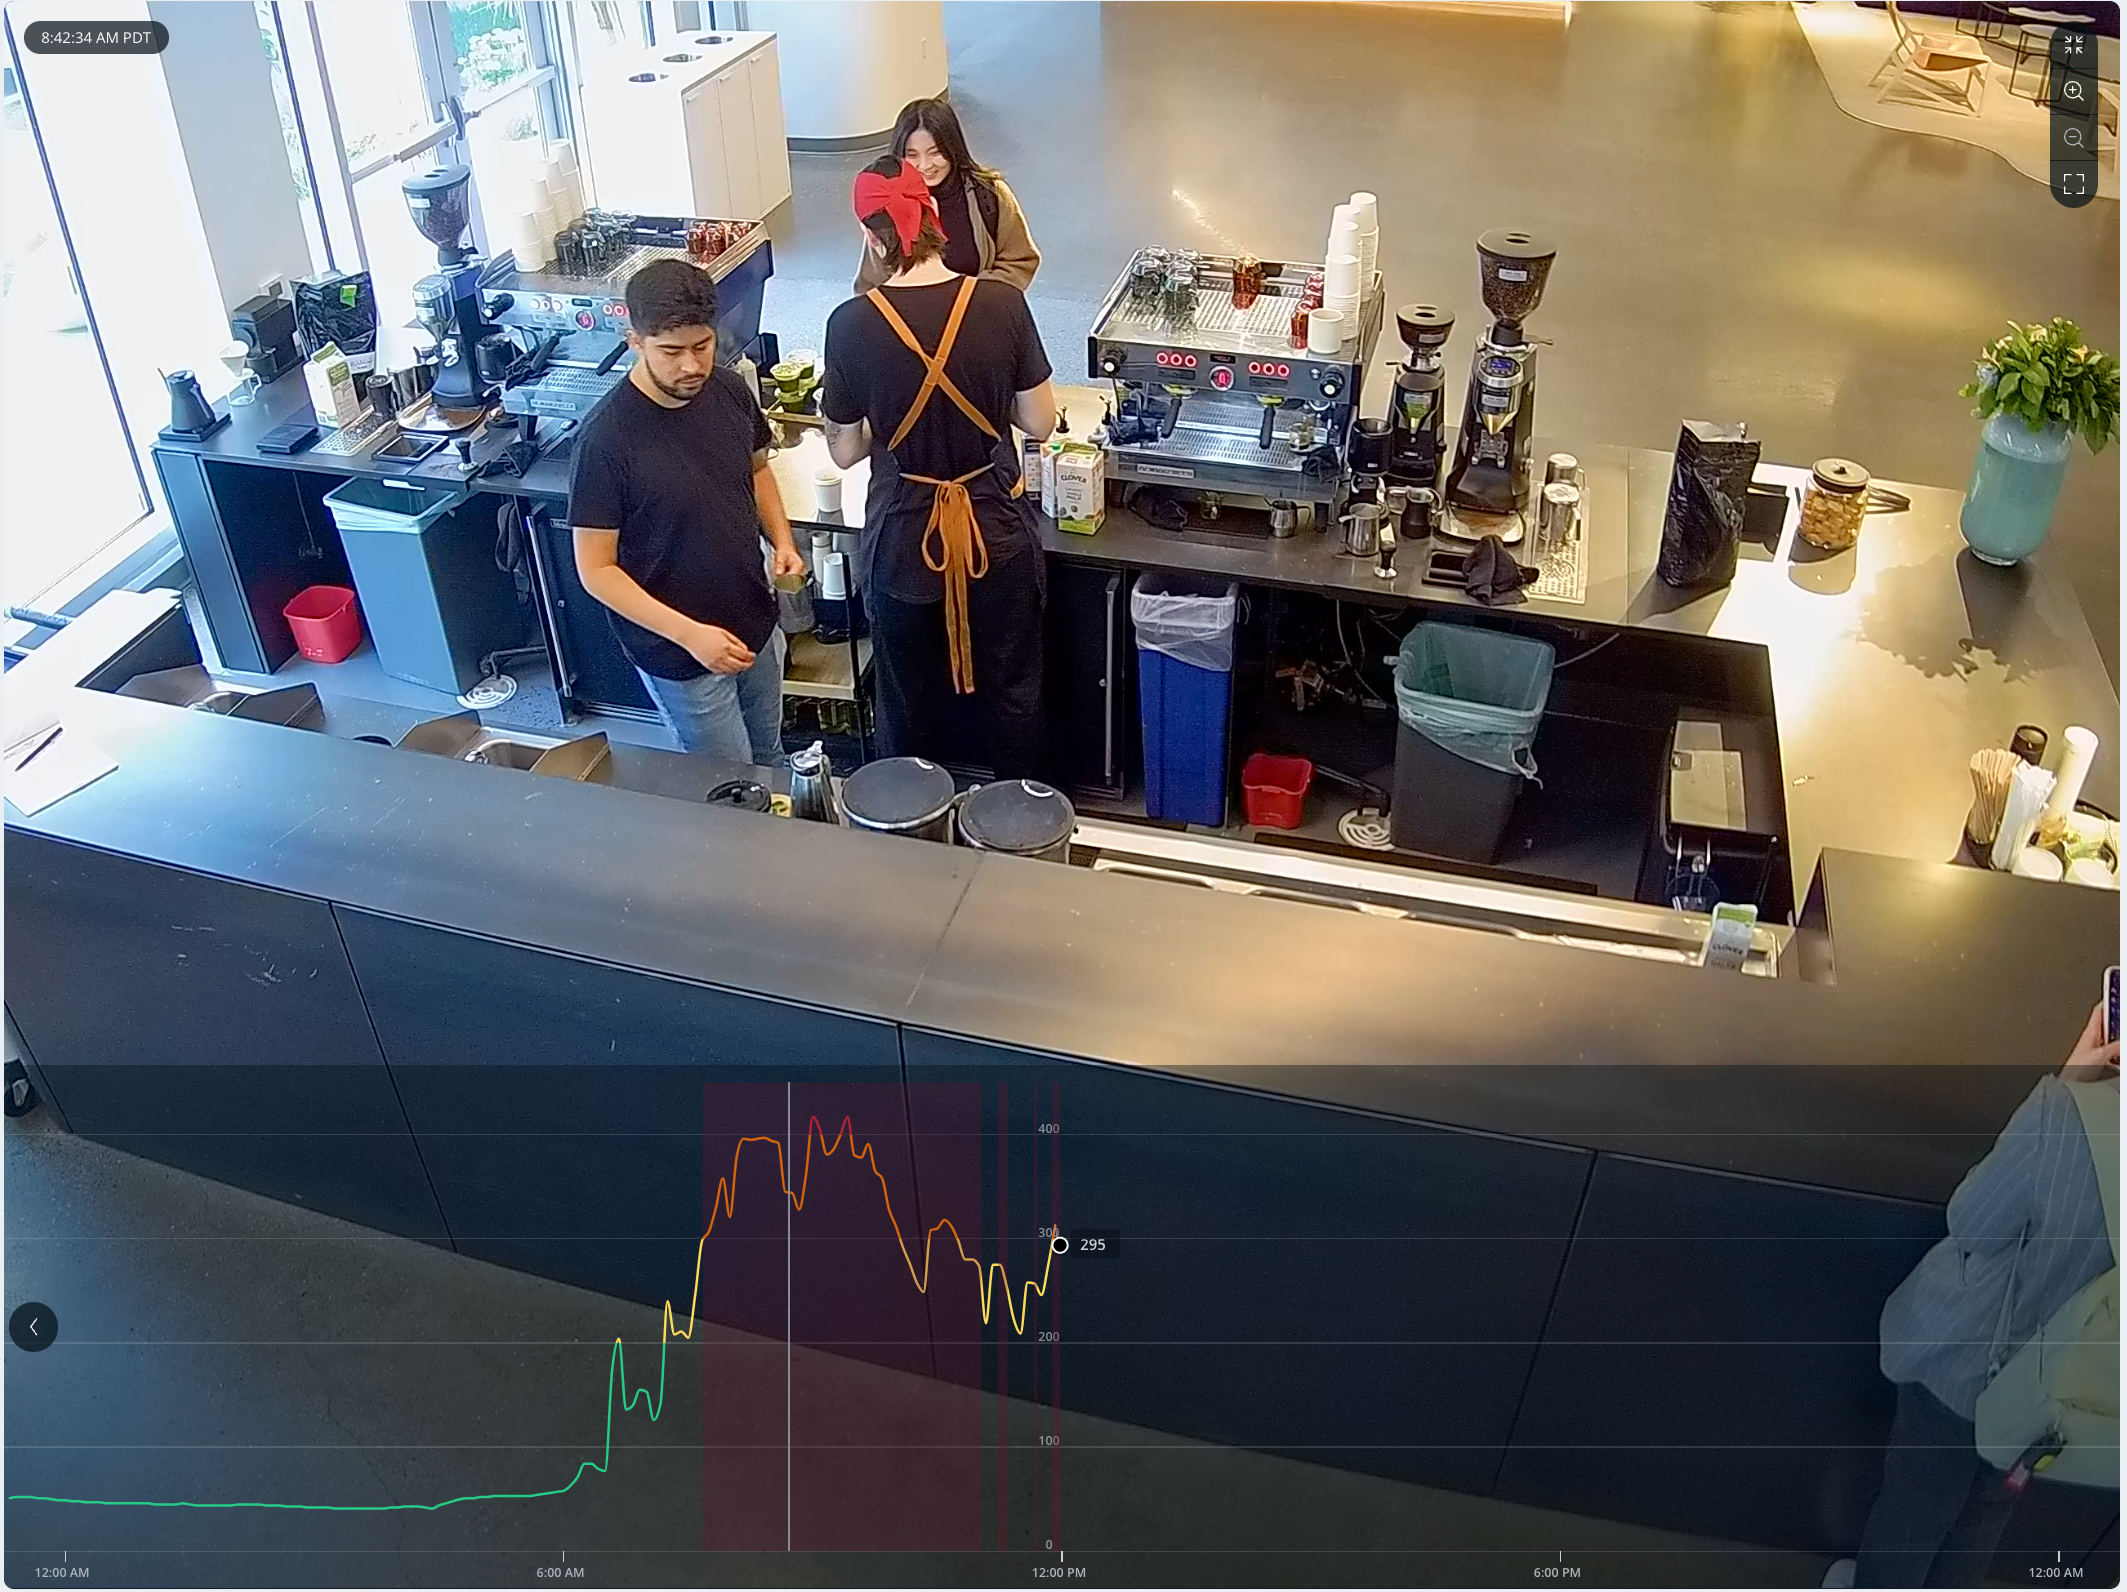
**カメラフィードの上にセンサーグラフがオーバーレイ表示され、右側にセンサーイベントが一覧表示されます。イベントはスクロールでき、日付、時刻、および/またはセンサー値で絞り込むことができます。**
{% endstep %}
{% step %}
**カメラフィードにカーソルを合わせてクリックすると、フルスクリーンモードでセンサーグラフとカメラのオーバーレイモードにアクセスできます。**
{% hint style="warning" %}
この
**.**
{% endstep %}
{% step %}
**[カメラ]で、[カメラを選択]をクリックします。**
1. カメラを選択します。
2. クリックして **完了。**
{% endstep %}
{% endstepper %}
***
## センサーからのカメラフィードを編集する
{% stepper %}
{% step %}
**Verkada Commandで、All Products > 空気質に移動します。**
{% endstep %}
{% step %}
**カメラフィードを変更または削除するセンサーを選択します。**
{% endstep %}
{% step %}
**右上の** **.**
{% endstep %}
{% step %}
**[カメラ]で、[カメラを選択]をクリックします:**
* クリックして **編集** 新しいカメラを選択するには、次にクリックします **完了。**
* クリックして **削除** カメラのペアリングを解除します。
{% endstep %}
{% step %}
**設定を確定するには[適用]をクリックします。**
{% endstep %}
{% endstepper %}
***
## カメラとセンサーグラフのオーバーレイ表示
{% stepper %}
{% step %}
**Verkada Commandで、All Products > 空気質に移動します。**
{% endstep %}
{% step %}
**表示するセンサーを選択します。**
{% endstep %}
{% step %}
**カメラフィードの上にセンサーグラフがオーバーレイ表示され、右側にセンサーイベントが一覧表示されます。イベントはスクロールでき、日付、時刻、および/またはセンサー値で絞り込むことができます。**
{% endstep %}
{% step %}
**カメラフィードにカーソルを合わせてクリックすると、フルスクリーンモードでセンサーグラフとカメラのオーバーレイモードにアクセスできます。**
{% hint style="warning" %}
この  このボタンを押すとカメラ履歴プレーヤーに移動し、そこで映像をアーカイブできます。
{% endhint %}
{% endstep %}
{% endstepper %}
---
# Agent Instructions
This documentation is published with GitBook. GitBook is the documentation platform designed so that both humans and AI agents can read, navigate, and reason over technical content effectively. Learn more at gitbook.com.
## Querying This Documentation
If you need additional information that is not directly available in this page, you can query the documentation by asking a question.
Perform an HTTP GET request on the following URL with the `ask` and `goal` query parameters:
```
GET https://help.verkada.com/air-quality/ja/she-ding/integrate-verkada-cameras-with-air-quality-sensors.md?ask=&goal=
```
`ask` is the immediate question: it should be specific, self-contained, and written in natural language.
`goal` is what the user is ultimately trying to achieve, the reason they need the answer. Sharing it helps GitBook give you a better, more relevant answer. A goal is most helpful when it describes the outcome the user wants rather than restating the question. For example, with `ask=how do I create an API token`, a goal like `automate deployments from our CI pipeline` lets GitBook tailor the answer to that use case.
The response will contain a direct answer to the question and relevant excerpts and sources from the documentation.
Use this mechanism when the answer is not explicitly present in the current page, you need clarification or additional context, or you want to retrieve related documentation sections.
このボタンを押すとカメラ履歴プレーヤーに移動し、そこで映像をアーカイブできます。
{% endhint %}
{% endstep %}
{% endstepper %}
---
# Agent Instructions
This documentation is published with GitBook. GitBook is the documentation platform designed so that both humans and AI agents can read, navigate, and reason over technical content effectively. Learn more at gitbook.com.
## Querying This Documentation
If you need additional information that is not directly available in this page, you can query the documentation by asking a question.
Perform an HTTP GET request on the following URL with the `ask` and `goal` query parameters:
```
GET https://help.verkada.com/air-quality/ja/she-ding/integrate-verkada-cameras-with-air-quality-sensors.md?ask=&goal=
```
`ask` is the immediate question: it should be specific, self-contained, and written in natural language.
`goal` is what the user is ultimately trying to achieve, the reason they need the answer. Sharing it helps GitBook give you a better, more relevant answer. A goal is most helpful when it describes the outcome the user wants rather than restating the question. For example, with `ask=how do I create an API token`, a goal like `automate deployments from our CI pipeline` lets GitBook tailor the answer to that use case.
The response will contain a direct answer to the question and relevant excerpts and sources from the documentation.
Use this mechanism when the answer is not explicitly present in the current page, you need clarification or additional context, or you want to retrieve related documentation sections.