> For the complete documentation index, see [llms.txt](https://help.verkada.com/llms.txt). Markdown versions of documentation pages are available by appending `.md` to page URLs; this page is available as [Markdown](https://help.verkada.com/air-quality/ja/sensdta/air-quality-sensor-settings.md).
# 空気質センサーの設定
空気質センサーの設定を変更する方法を学ぶ
Verkadaの [空気質センサー](https://www.verkada.com/air-quality/sensors#overview) は、物理空間の環境変化を監視するためのオールインワンデバイスです。デバイスを設定して、モニターするセンサーデータを表示し、特定のしきい値を超えた場合のカスタムアラートを設定できます。また、 [アラート通知](/air-quality/ja/ibento-arto/configure-air-quality-event-alerts.md) をリアルタイムで受け取ることができ、迅速かつプロアクティブな対応が可能になります。
***
## 設定を編集
{% stepper %}
{% step %}
**Verkada Commandで、All Products > 空気質に移動します。**
{% endstep %}
{% step %}
**変更するセンサーを選択します。**
{% endstep %}
{% step %}
**右上にある[設定]をクリックします。**
{% endstep %}
{% step %}
**[一般]で、各カテゴリに必要な設定を行います。**
* [**一般**](#h_0a5d18a6b6)
* [**カメラ**](#h_c7300020c4)
* [**センサーとトリガー**](#h_1905a9e65c)
* [**BACnet**](#h_6c10de28ca)
* [**デバイス**](#h_4f03494ca1)
{% endstep %}
{% step %}
**[適用]をクリックして保存します。**
{% endstep %}
{% endstepper %}
### 一般
| 項目 | 設定方法 |
| --------------- | ----------------------------------------------------------------------------------------------------------------------------------------------------------------------------------------------------------------------------------------------------------------------------------------------------------------------------- |
| **名前** | センサーの一意の名前を作成します。 |
| **サイト** | Verkadaカメラと同様に、センサーをサイトまたはサブサイトに追加して権限を定義できます。
するには 空気質センサーをサイトに追加する:
- の横にある サイト、 変化.
- 希望するサイトを選択します。
- クリックして 適用.
|
| **ゾーン** | を使用すると センサーゾーン、空気質センサーをゾーンにまとめて、複数のデバイスを1つのデバイスとして扱うことができます。
するには 空気質センサーをゾーンに追加する:
- の横にある ゾーン、 変更。
- ゾーンを選択します。
- クリックして 適用.
|
| **場所** | するには 場所を設定する 空気質センサーの:
- の横にある 場所、 変化.
- 地図と検索バーが表示されたら、住所を入力するか地図を移動して、設定する場所を指定します。
- クリックして 適用.
|
| **サムネイル** | 以下にサムネイルを追加できます:
センサーを識別しやすくするため、 空気質 ホームページ上で。
次の画像を更新します 空気質 ホームページとデバイスのページ。
するには サムネイルを追加する 空気質センサーに:
クリックして [サムネイル]を選択 ここでデスクトップから画像をアップロードできます。
するには サムネイルを削除する、 [サムネイルを削除].
|
| **シリアル番号** | センサーの一意の識別子で、デバイスをCommand organizationに登録するために使用されます。 |
| **センサーのタイムゾーン** | するには **タイムゾーンを変更する** センサーデータが存在する場所(次で指定): **場所**. |
### カメラ
オン **[設定を編集]**、次を選択します **カメラ** センサーにコンテキストカメラを追加します。これにより、モニターしている環境を確認できます。
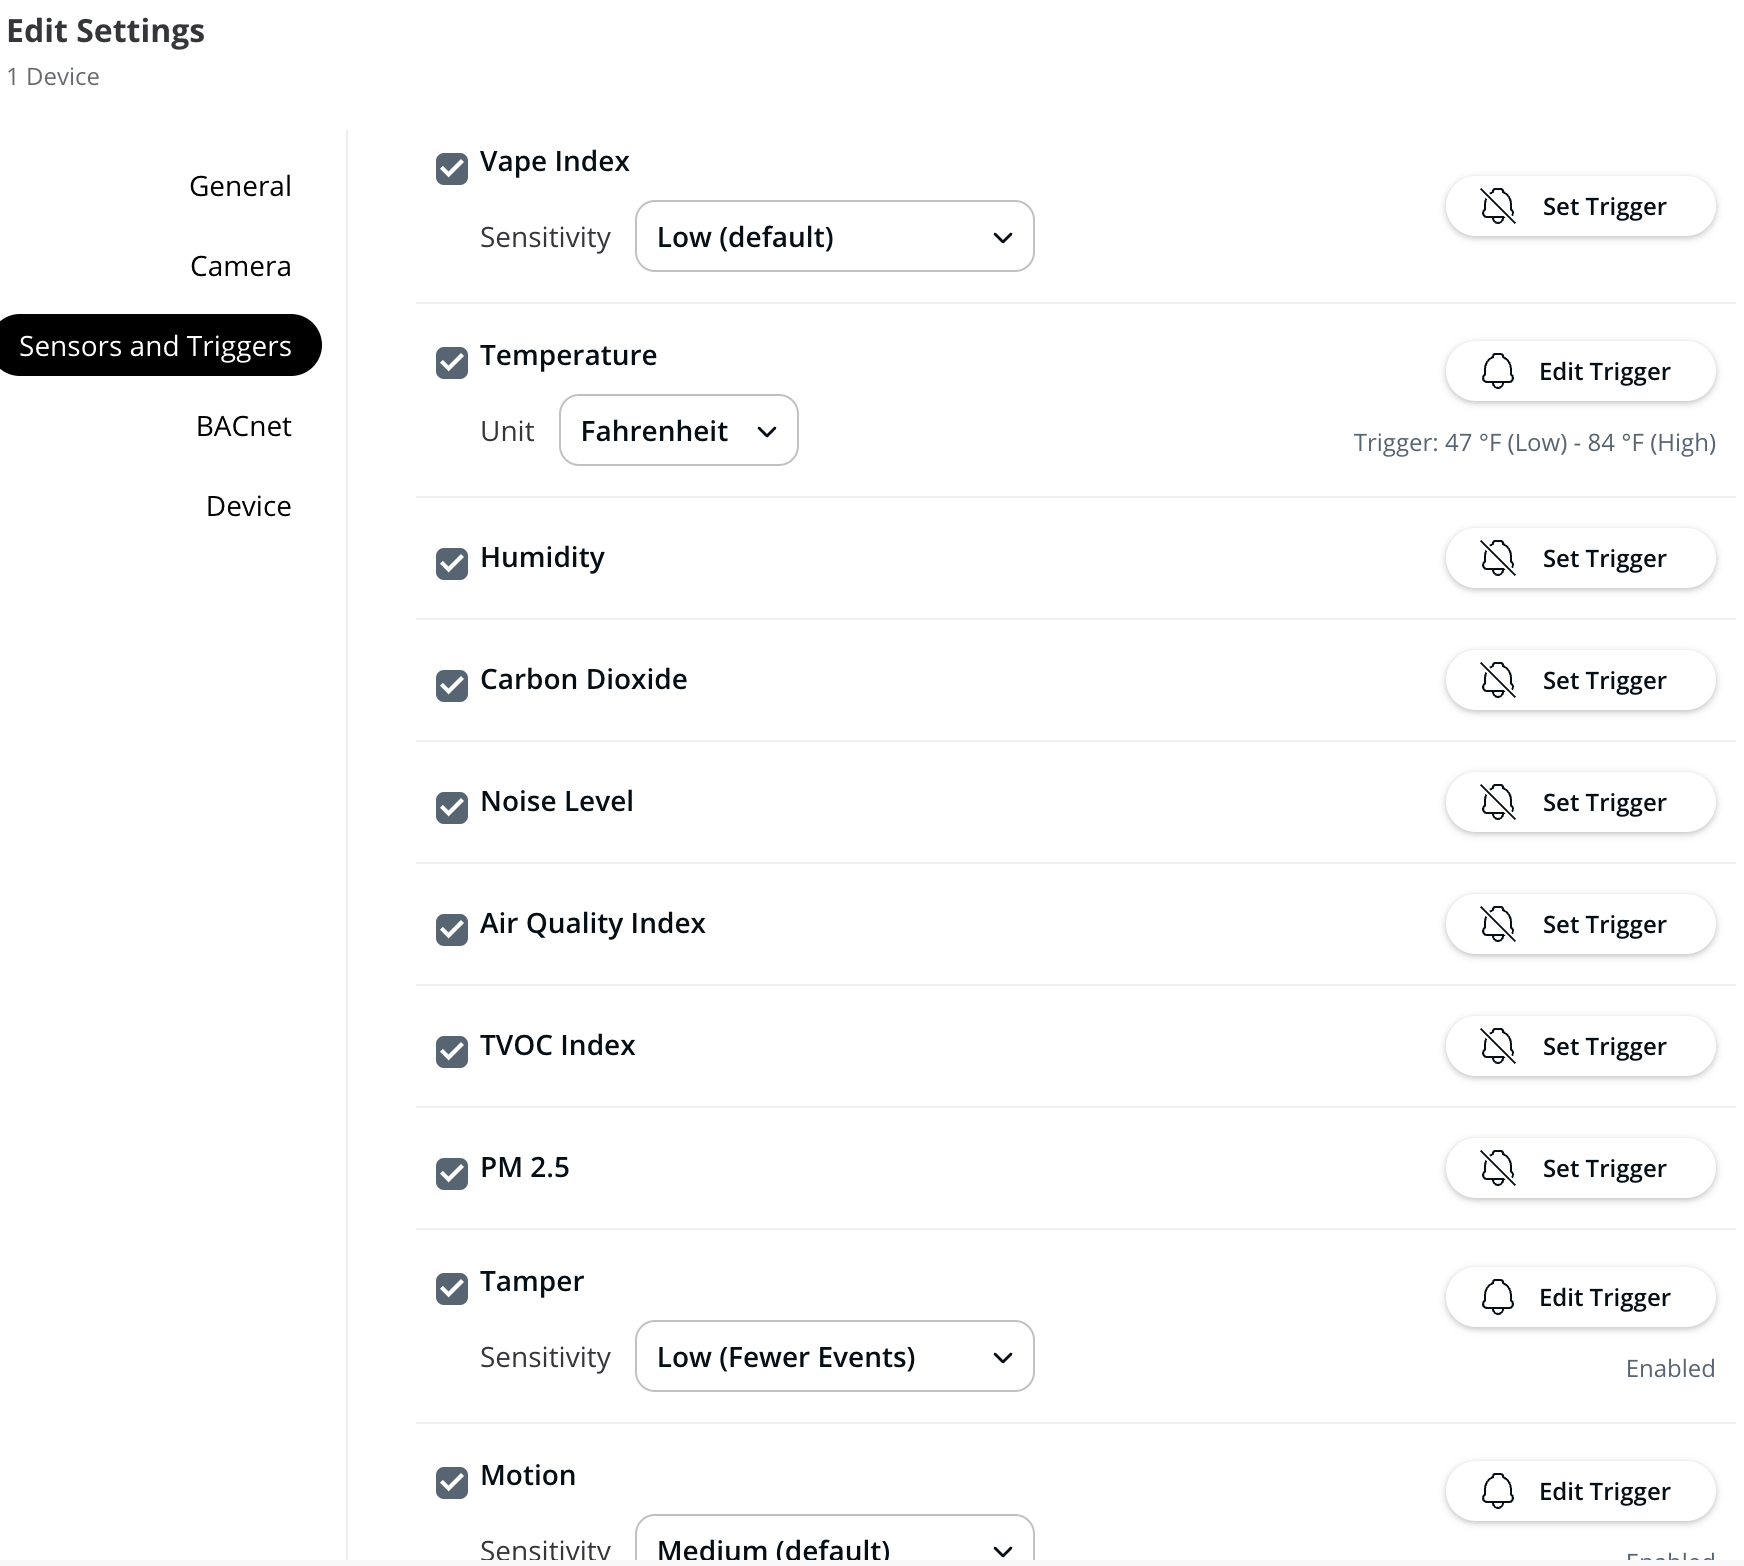
### センサーとトリガー
{% hint style="warning" %}
すべての空気質センサーバージョンに、すべてのセンサー測定値が含まれているわけではありません。デバイスのモデルで利用可能な測定値のみ表示できます。
{% endhint %}
#### センサー測定値を有効にする
{% stepper %}
{% step %}
**[設定を編集]で[センサーとトリガー]をクリックして設定します。**
{% endstep %}
{% step %}
**有効にするセンサー測定値の横にあるチェックボックスを選択します。測定値が有効な場合、その横に黒いチェックマークが表示されます。詳細:** [**センサー値**](/air-quality/ja/sensdta/air-quality-sensor-readings.md)**.**
{% endstep %}
{% endstepper %}
#### センサー測定値を無効にする
測定値を無効にするには、チェックボックスの選択を解除します。チェックボックス内のチェックマークが消えます。詳細: [センサー値](/air-quality/ja/sensdta/air-quality-sensor-readings.md).
#### 温度測定値を摂氏で表示する
オン **[設定を編集]** > **センサーとトリガー**、次に移動します **温度**、】【をクリックします **単位** ドロップダウンで摂氏に切り替えます。
{% hint style="warning" %}
この設定は **すべてのユーザーに対して変更されます** このセンサーを表示できるユーザー。
{% endhint %}
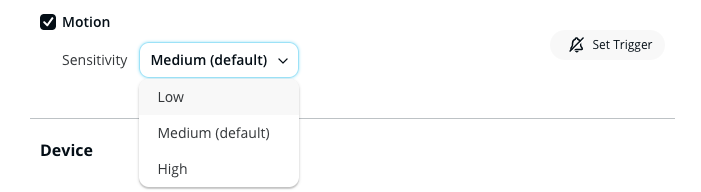
#### モーション感度を調整する
センサーが空調設備の近くに設置されている場合(感度が高すぎる)、または地面から離れた場所に設置されている場合(感度が十分でない)、モーション感度に影響することがあります。不規則なモーションイベントに気付いた場合は、デバイスにより適合するようモーション感度を調整することをお勧めします。
オン **[設定を編集]** > **センサーとトリガー**、次に移動します **動作**、】【をクリックします **感度** ドロップダウンで選択 **低**, **中** (デフォルト)、または **高**.
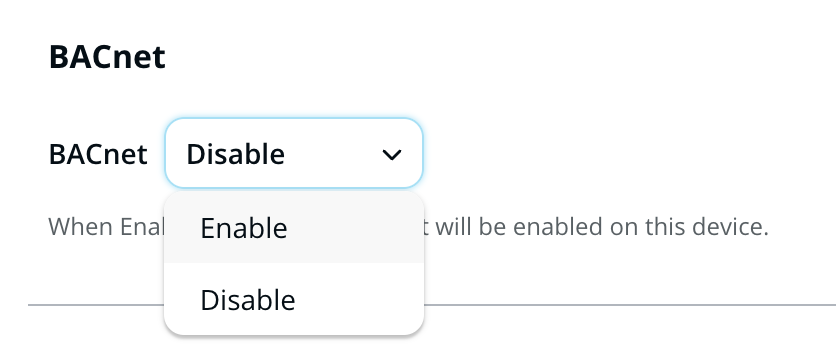
### BACnet
{% stepper %}
{% step %}
**[設定を編集]>[BACnet]で。**
{% endstep %}
{% step %}
**ドロップダウンをクリックし、必要に応じて[有効化]または[無効化]を選択します。有効化すると、このデバイスでBACnet/IPサポートが有効になります。詳細:** [**Verkadaセンサー向けBACnet**](/air-quality/ja/she-ding/bacnet-for-verkada-air-quality-sensors.md)**.**
{% endstep %}
{% endstepper %}
***
### デバイス
#### デバイスIP
Verkada SV20シリーズ([SV21](https://docs.verkada.com/docs/air-quality-sensors-overview.pdf), [SV23](https://docs.verkada.com/docs/air-quality-sensors-overview.pdf), [SV25](https://docs.verkada.com/docs/air-quality-sensors-overview.pdf))空気質センサーでは、次の操作が可能です [固定IPを設定/割り当てる](/air-quality/ja/she-ding/configure-static-ip-addresses-for-air-quality-sensors-sv20-series-only.md) これにより、空気質センサーデバイスは、動的ホスト構成プロトコル(DHCP)などの動的IP割り当てプロトコルに依存せず、一貫したネットワーク通信を維持できます。
センサーデバイスで固定IPアドレスを設定するには、まずデバイスがDHCPを使用してCommandに接続し、最新のファームウェアに更新する必要があります。デバイスの更新プロセスが完了すると、新しい固定IP設定を受信できるようになります。詳細: [空気質センサーデバイスの固定IP設定](/air-quality/ja/she-ding/configure-static-ip-addresses-for-air-quality-sensors-sv20-series-only.md).
#### センサーを識別する
{% stepper %}
{% step %}
**[設定を編集]>[デバイス]で。**
{% endstep %}
{% step %}
**[識別]をクリックして、室内のセンサーを特定します:**
* 次の操作を実行します [SV11](https://www.verkada.com/sensors/sv11/) 青とオレンジで点滅する
* 次の操作を実行します [SV21](https://docs.verkada.com/docs/air-quality-sensors-overview.pdf), [SV23](https://docs.verkada.com/docs/air-quality-sensors-overview.pdf)、および [SV25](https://docs.verkada.com/docs/air-quality-sensors-overview.pdf) 短時間、オレンジ色で素早く点滅する
{% endstep %}
{% endstepper %}
#### センサーデバイスを再起動する
{% stepper %}
{% step %}
**[設定を編集]>[デバイス]で。**
{% endstep %}
{% step %}
**[再起動]をクリックします。**
{% hint style="warning" %}
デバイスは、Verkada Commandバックエンドへの接続を維持できる場合にのみ再起動できます。青または白のステータスライト(場合によってはオレンジ色のステータスライト)が点滅しているデバイスは、この方法でリモート再起動できません。
{% endhint %}
{% endstep %}
{% endstepper %}
#### センサーデバイスを削除する
{% stepper %}
{% step %}
**[設定を編集]>[デバイス]で。**
{% endstep %}
{% step %}
**[削除]をクリックします。**
{% endstep %}
{% step %}
**リクエストを確認するため、確認コードを入力します。**
{% endstep %}
{% endstepper %}
{% hint style="warning" %}
オーガナイゼーション'からデバイスを削除すると、デバイスの登録が解除され、シリアル番号を持つ人なら誰でも自分のオーガナイゼーション'で登録できるようになります。また、すべてのセンサーデータが消去され、デバイスは工場出荷時のデフォルト設定にリセットされます。
{% endhint %}
#### オフライン通知
センサーがオフラインになったときの通知を設定できます:
{% stepper %}
{% step %}
**[設定を編集]>[デバイス]で。**
{% endstep %}
{% step %}
**[オフライン通知]で[アラートを作成]をクリックします。次の方法の詳細:** [**アラートを作成する**](/verkada-cameras/ja/fen-xi/create-camera-event-alerts.md)**.**
{% endstep %}
{% endstepper %}
---
# Agent Instructions
This documentation is published with GitBook. GitBook is the documentation platform designed so that both humans and AI agents can read, navigate, and reason over technical content effectively. Learn more at gitbook.com.
## Querying This Documentation
If you need additional information that is not directly available in this page, you can query the documentation by asking a question.
Perform an HTTP GET request on the following URL with the `ask` and `goal` query parameters:
```
GET https://help.verkada.com/air-quality/ja/sensdta/air-quality-sensor-settings.md?ask=&goal=
```
`ask` is the immediate question: it should be specific, self-contained, and written in natural language.
`goal` is what the user is ultimately trying to achieve, the reason they need the answer. Sharing it helps GitBook give you a better, more relevant answer. A goal is most helpful when it describes the outcome the user wants rather than restating the question. For example, with `ask=how do I create an API token`, a goal like `automate deployments from our CI pipeline` lets GitBook tailor the answer to that use case.
The response will contain a direct answer to the question and relevant excerpts and sources from the documentation.
Use this mechanism when the answer is not explicitly present in the current page, you need clarification or additional context, or you want to retrieve related documentation sections.