> For the complete documentation index, see [llms.txt](https://help.verkada.com/llms.txt). Markdown versions of documentation pages are available by appending `.md` to page URLs; this page is available as [Markdown](https://help.verkada.com/access-control/ja/toraburushtingu/access-control-hardware-checks/troubleshoot-an-immediate-door-relock.md).
# ドアの即時再施錠のトラブルシューティング
ドアの解錠時間が想定より短い場合のトラブルシューティング方法を学ぶ
場合によっては、ドアが予想より早く再施錠され、ドアを開けるのに十分な時間が確保されないことがあります。この問題の最も一般的な原因は 2 つあります:
* その [ドアの解錠時間が短すぎる](#h_25ed3693db) 期間の
* その [ドア位置インジケーター(DPI)が、ドアはすでに開いていると示している](#h_083edd3bc6)
***
## ドアの解錠時間が短すぎる
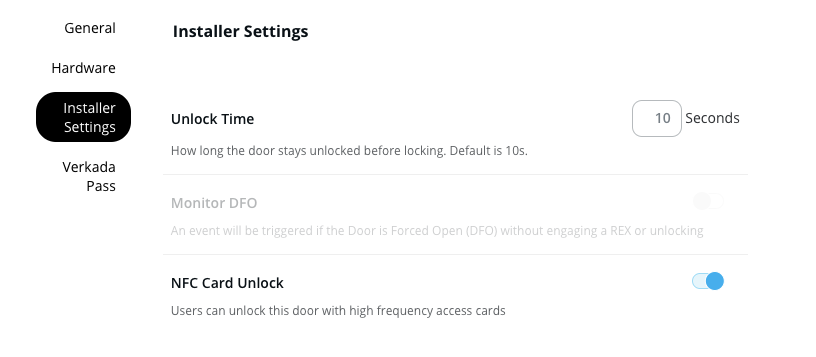
リーダーとドアの距離によっては、ドアの解錠時間が短すぎて、ユーザーがリーダーからドアまで移動する前に再施錠されてしまうことがあります。
### ドアの解錠時間を確認して調整する
{% stepper %}
{% step %}
**Verkada Command で、All Products > Access に移動します。**
{% endstep %}
{% step %}
**編集したいドアを選択します。**
{% endstep %}
{% step %}
**右上で、[設定]をクリックします。**
{% endstep %}
{% step %}
**Installer Settings > Unlock Time で解錠時間を設定します。**
{% endstep %}
{% endstepper %}
## DPI はドアがすでに開いていることを示している
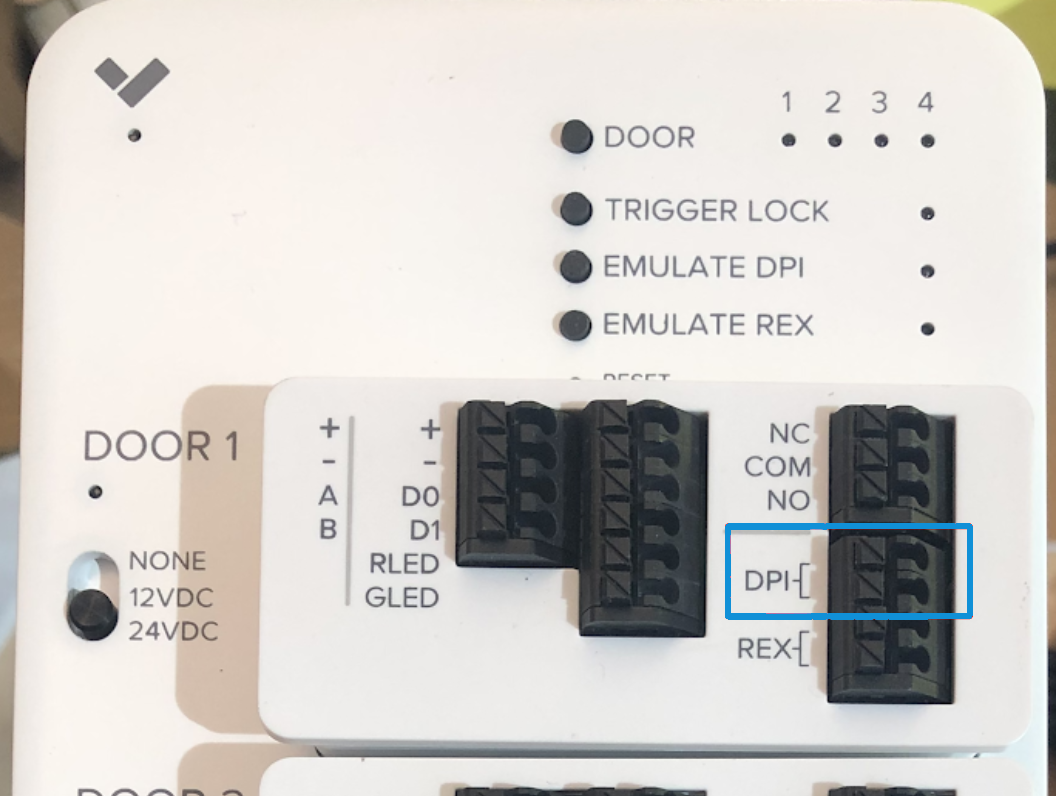
DPI は、ドアが開いているか閉じているかを検知するセンサーです。ドアが解錠され、DPI がある場合、解錠時間が完全に経過しているかどうかにかかわらず、コントローラーは開信号が検知されるまで待ってからドアを再施錠します。解錠イベント発生時に DPI がドア開を示している場合、ドアは解錠イベントから 1 秒以内に再施錠されます。
この問題は次のような場合に発生します:
{% stepper %}
{% step %}
**ドアの設定で DPI が有効になっているにもかかわらず、DPI が取り付けられていない。**
{% endstep %}
{% step %}
**実際には閉まっているのに、DPI がドアは開いていると示している。**
{% endstep %}
{% endstepper %}
### トラブルシューティングの手順
ドアのページの左上で、タイムスタンプを確認します。ドアは次のように表示されているはずです: **開**, **閉**、または **ドアセンサーなし**.
* ドアのタイムスタンプが次のように示している場合: **開** 実際にはドアが閉まっているのにそう表示される場合、解錠後すぐに再施錠される理由はこれで説明できます。DPI の配線または DPI 本体に問題がないか確認してください。
* ドアに DPI が取り付けられていない場合は、以下で **設定** > **ハードウェア**、オフに切り替えます **DPI**。これにより、ドアのタイムスタンプは次のように表示されます **ドアセンサーなし**.
* もし **DPI が取り付けられている**にもかかわらず、ドアが次のように表示される場合 **開** 実際には閉まっているときは、ワイヤーがカセットの DPI ポートに完全に差し込まれていることを確認してください。
* それでもドアが次のように表示される場合 **開**, [配線を確認します](#h_e0aa70035d) と [センサーの位置](#h_38c5f0505a).
#### 配線を確認する
{% stepper %}
{% step %}
**DPI のワイヤーをスロットから取り外します。**
{% endstep %}
{% step %}
**マルチメーターを使用して、2 本のワイヤー間の導通をテストします。**
{% endstep %}
{% endstepper %}
マルチメーターで 2 本のワイヤー間の回路が開いていると表示された場合、センサーはドアが開いていることを示しています。Verkada のアクセスコントローラーは、ドアが閉まっているときに閉回路であることを想定しています。
#### センサーの位置を確認する
{% stepper %}
{% step %}
**ドアの DPI センサーを確認します。**
{% endstep %}
{% step %}
**ドアが閉まっているとき、枠側とドア側の接点が揃っていることを確認してください。接点がずれていると回路が切れ、実際には閉まっているのにアクセスコントローラーにドアが開いていると通知されます。**
{% endstep %}
{% endstepper %}
{% hint style="warning" %}
**AC41 のみの注意**: DPI の状態を確認する別の方法は次に示されています [AC41 テストボタンの使用](/access-control/ja/toraburushtingu/verkada-ac41-status-led/use-the-ac41-test-buttons.md)からの入力を受けるために使用されます。 **ドア** コントローラーのボタンを使って対象のドアを選択し、次に **DPI をエミュレート** ライトを確認します。
* ライトが点灯していれば、DPI 回路は正常で、ドアが閉まっていることを示します。
* 消灯している場合、ドアは次のように報告されます **開**.
{% endhint %}
---
# Agent Instructions
This documentation is published with GitBook. GitBook is the documentation platform designed so that both humans and AI agents can read, navigate, and reason over technical content effectively. Learn more at gitbook.com.
## Querying This Documentation
If you need additional information that is not directly available in this page, you can query the documentation by asking a question.
Perform an HTTP GET request on the following URL with the `ask` and `goal` query parameters:
```
GET https://help.verkada.com/access-control/ja/toraburushtingu/access-control-hardware-checks/troubleshoot-an-immediate-door-relock.md?ask=&goal=
```
`ask` is the immediate question: it should be specific, self-contained, and written in natural language.
`goal` is what the user is ultimately trying to achieve, the reason they need the answer. Sharing it helps GitBook give you a better, more relevant answer. A goal is most helpful when it describes the outcome the user wants rather than restating the question. For example, with `ask=how do I create an API token`, a goal like `automate deployments from our CI pipeline` lets GitBook tailor the answer to that use case.
The response will contain a direct answer to the question and relevant excerpts and sources from the documentation.
Use this mechanism when the answer is not explicitly present in the current page, you need clarification or additional context, or you want to retrieve related documentation sections.