> For the complete documentation index, see [llms.txt](https://help.verkada.com/llms.txt). Markdown versions of documentation pages are available by appending `.md` to page URLs; this page is available as [Markdown](https://help.verkada.com/access-control/ja/toarto/access-control-reports/roll-call-reports.md).
# 安否確認レポート
点呼レポートを作成、プレビュー、実行する
Verkadaの安否確認レポートを使用すると、サイト内に現在いるすべてのユーザーと訪問者を一覧表示したレポートを取得できます。安否確認レポートは、緊急時に全員の安全を確認するために使用できます。これは、次のシナリオで使用するように設計されています:
* 緊急避難または緊急事態における人員確認
* 入退室管理
* 出席確認
***
## 安否確認レポートのテンプレートを作成する
{% hint style="danger" %}
必要なのは **システム管理者にアクセスする** 安否確認レポートを作成および変更する権限。
{% endhint %}
レポートを実行する前に、安否確認レポートのテンプレートを作成する必要があります。このテンプレートでは、含める入口ドア、出口ドア、避難集合場所、およびその他の関連設定を定義します。
{% stepper %}
{% step %}
**Verkada Command で、All Products > Access に移動します。**
{% endstep %}
{% step %}
**左側のナビゲーションで、[レポート]を選択します。**
{% endstep %}
{% step %}
**上部で、[安否確認]を選択します。**
{% endstep %}
{% step %}
**右上で、[テンプレート]>[テンプレートを作成]をクリックします。**
{% endstep %}
{% step %}
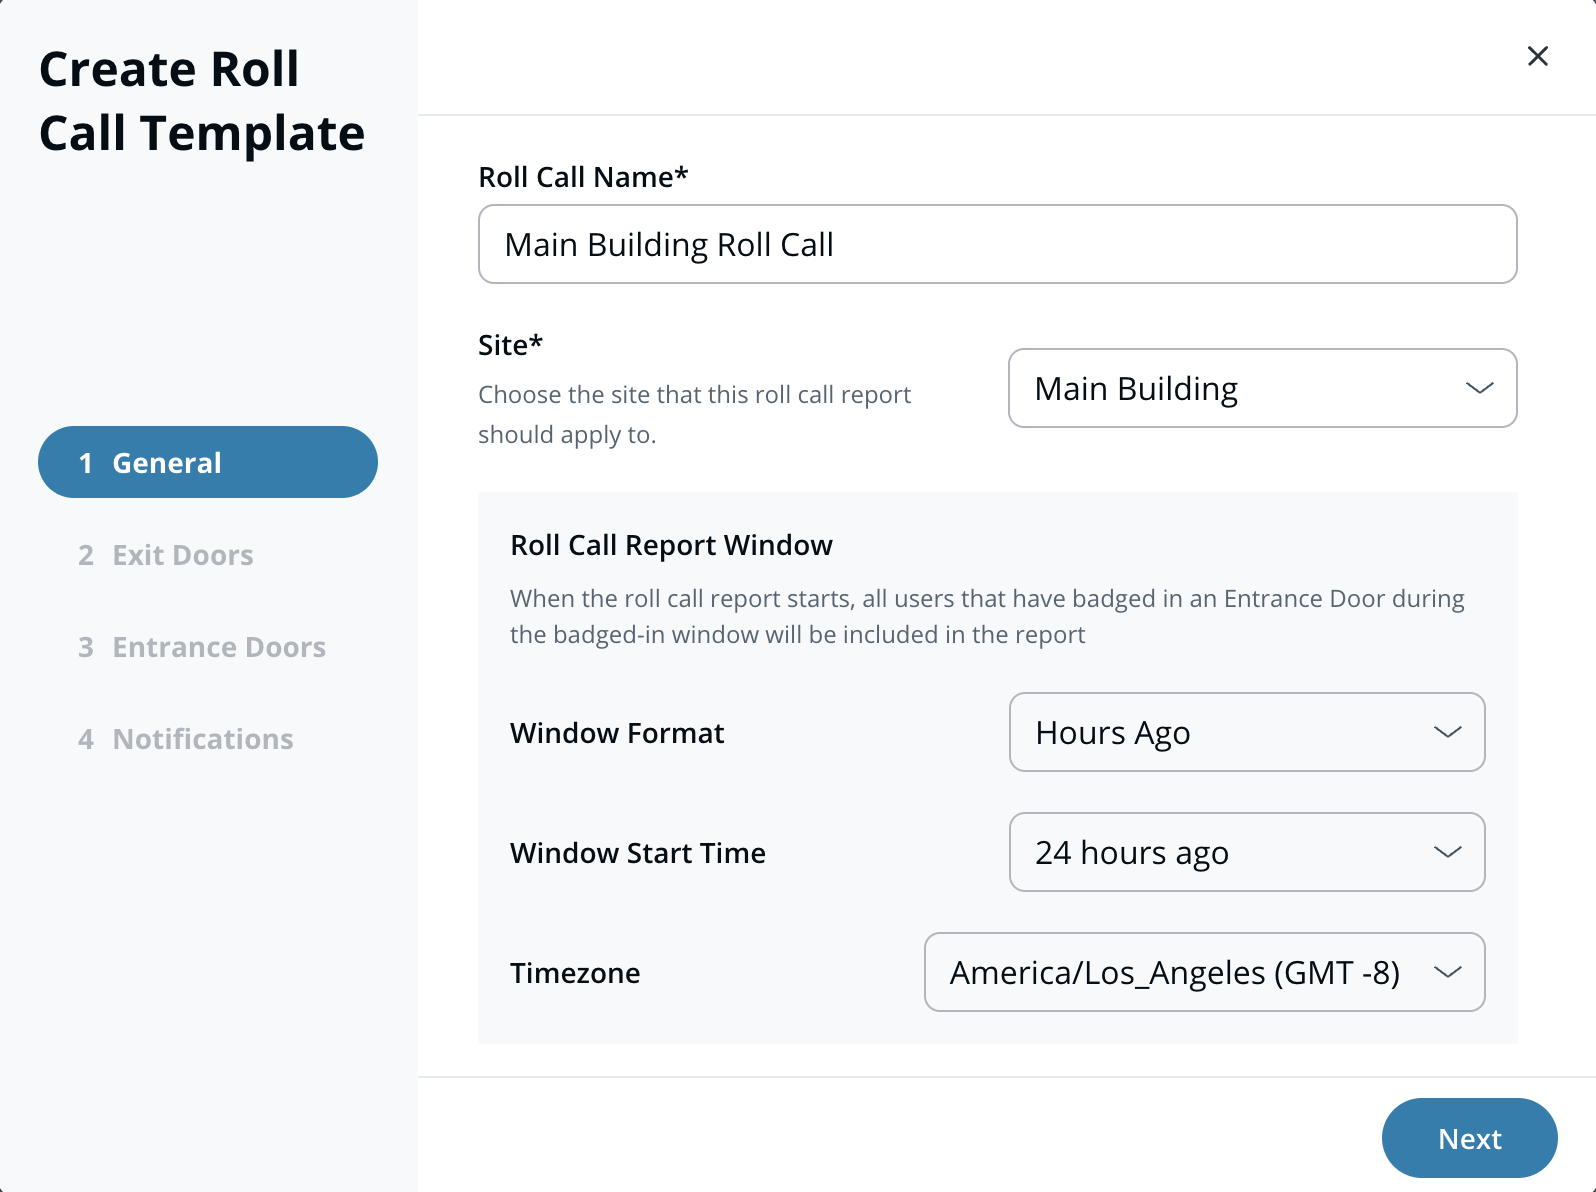
**[全般]で、次の内容を入力します:**
1. **テンプレート名**
2. **サイト**
3. **安否確認レポートのウィンドウ設定**
4. **ウィンドウ形式**
5. **ウィンドウ開始時刻**
6. **タイムゾーン**
7. クリック **次へ。**
{% endstep %}
{% step %}
**[入口ドア]で、次の内容を実行します:**
1. 選択 **入口を表すドア** これは、レポートの時間枠内に誰が入館したかを判定し、レポートに含めるために使用されます。
2. クリック **次へ。**
{% endstep %}
{% step %}
**[出口ドア]で、次の内容を実行します:**
1. 選択 **出口または避難集合場所を表すドア** これは、レポート内でユーザーを「safe」としてマークするために使用されます。
2. クリック **次へ。**
{% endstep %}
{% step %}
**[通知]で、次の内容を実行します:**
1. レポート実行時に通知されるユーザーを選択します。
2. クリック **保存。**
{% endstep %}
{% endstepper %}
***
## 安否確認レポートをプレビューする
安否確認レポートをプレビューして、どのユーザーが含まれるか、およびそのステータス(safe または欠席)を確認できます。
{% stepper %}
{% step %}
**Verkada Command で、All Products > Access に移動します。**
{% endstep %}
{% step %}
**左側のナビゲーションで、[レポート]を選択します。**
{% endstep %}
{% step %}
**上部で、[安否確認]を選択します。**
{% endstep %}
{% step %}
**右上で、[テンプレート]をクリックします。**
{% endstep %}
{% step %}
**一覧の安否確認テンプレートにカーソルを合わせ、[プレビュー]をクリックします。**
{% endstep %}
{% endstepper %}
***
## 安否確認レポートを実行する
{% stepper %}
{% step %}
**Verkada Command で、All Products > Access に移動します。**
{% endstep %}
{% step %}
**左側のナビゲーションで、[レポート]を選択します。**
{% endstep %}
{% step %}
**上部で、[安否確認]を選択します。**
{% endstep %}
{% step %}
**右上で、[安否確認レポートを実行]をクリックし、テンプレートを選択します。**
{% endstep %}
{% endstepper %}
レポートの実行中は、レポートの時間枠内に入口ドアで入館したすべてのユーザーが含まれます。出口ドアで入館したユーザーは自動的に「safe」としてマークされます。Commandからユーザーを手動で「safe」としてマークすることもできます。
{% hint style="warning" %}
アクティブなレポートは、 **[レポートを終了]をクリックするまでバックグラウンドで実行されます。**
 {% endhint %}
***
## 過去の安否確認レポートを確認およびエクスポートする
これまでに実行されたすべての安否確認レポートは、 **過去のレポート**に保存され、CSV形式で確認およびエクスポートできます。
{% stepper %}
{% step %}
**Verkada Command で、All Products > Access に移動します。**
{% endstep %}
{% step %}
**左側のナビゲーションで、[レポート]を選択します。**
{% endstep %}
{% step %}
**上部で、[安否確認]を選択します。**
{% endstep %}
{% step %}
**[過去]で、確認したいレポートを含む期間を選択します。**
{% endstep %}
{% step %}
**一覧から過去の安否確認レポートを選択します。**
{% endstep %}
{% step %}
**[エクスポート]をクリックして、過去のレポートをCSVとしてダウンロードします。**
{% endstep %}
{% endstepper %}
***
## 安否確認レポート内の訪問者
Verkada Guestを使用してチェックインした訪問者には、ドアアクセスに加えて、安否確認レポートに表示される権限を付与できます。これらの訪問者は、Visit Access Type に関連付けられたサイトのアクティブなレポートに含まれます。チェックイン時に安否確認レポートで有効になり、チェックアウト時にそこから削除されます。
{% hint style="warning" %}
参照 [Visitor Access & Visit Access Type](/guest/ja/she-ding/door-access-for-guests/manage-visitor-access-control-privileges.md) 詳細については
{% endhint %}
***
{% hint style="info" %}
**実際の動作をご覧になりますか?** こちらをご覧ください。 [動画チュートリアル](https://www.youtube.com/watch?v=w9Ek6r8Bn0w).
{% endhint %}
---
# Agent Instructions
This documentation is published with GitBook. GitBook is the documentation platform designed so that both humans and AI agents can read, navigate, and reason over technical content effectively. Learn more at gitbook.com.
## Querying This Documentation
If you need additional information that is not directly available in this page, you can query the documentation dynamically by asking a question.
Perform an HTTP GET request on the current page URL with the `ask` query parameter, and the optional `goal` query parameter:
```
GET https://help.verkada.com/access-control/ja/toarto/access-control-reports/roll-call-reports.md?ask=&goal=
```
`ask` is the immediate question: it should be specific, self-contained, and written in natural language.
`goal` is optional and describes the broader end goal you are ultimately trying to accomplish on behalf of the user. GitBook uses it to tailor the answer towards what is most useful for that goal.
The response will contain a direct answer to the question and relevant excerpts and sources from the documentation.
Use this mechanism when the answer is not explicitly present in the current page, you need clarification or additional context, or you want to retrieve related documentation sections.
{% endhint %}
***
## 過去の安否確認レポートを確認およびエクスポートする
これまでに実行されたすべての安否確認レポートは、 **過去のレポート**に保存され、CSV形式で確認およびエクスポートできます。
{% stepper %}
{% step %}
**Verkada Command で、All Products > Access に移動します。**
{% endstep %}
{% step %}
**左側のナビゲーションで、[レポート]を選択します。**
{% endstep %}
{% step %}
**上部で、[安否確認]を選択します。**
{% endstep %}
{% step %}
**[過去]で、確認したいレポートを含む期間を選択します。**
{% endstep %}
{% step %}
**一覧から過去の安否確認レポートを選択します。**
{% endstep %}
{% step %}
**[エクスポート]をクリックして、過去のレポートをCSVとしてダウンロードします。**
{% endstep %}
{% endstepper %}
***
## 安否確認レポート内の訪問者
Verkada Guestを使用してチェックインした訪問者には、ドアアクセスに加えて、安否確認レポートに表示される権限を付与できます。これらの訪問者は、Visit Access Type に関連付けられたサイトのアクティブなレポートに含まれます。チェックイン時に安否確認レポートで有効になり、チェックアウト時にそこから削除されます。
{% hint style="warning" %}
参照 [Visitor Access & Visit Access Type](/guest/ja/she-ding/door-access-for-guests/manage-visitor-access-control-privileges.md) 詳細については
{% endhint %}
***
{% hint style="info" %}
**実際の動作をご覧になりますか?** こちらをご覧ください。 [動画チュートリアル](https://www.youtube.com/watch?v=w9Ek6r8Bn0w).
{% endhint %}
---
# Agent Instructions
This documentation is published with GitBook. GitBook is the documentation platform designed so that both humans and AI agents can read, navigate, and reason over technical content effectively. Learn more at gitbook.com.
## Querying This Documentation
If you need additional information that is not directly available in this page, you can query the documentation dynamically by asking a question.
Perform an HTTP GET request on the current page URL with the `ask` query parameter, and the optional `goal` query parameter:
```
GET https://help.verkada.com/access-control/ja/toarto/access-control-reports/roll-call-reports.md?ask=&goal=
```
`ask` is the immediate question: it should be specific, self-contained, and written in natural language.
`goal` is optional and describes the broader end goal you are ultimately trying to accomplish on behalf of the user. GitBook uses it to tailor the answer towards what is most useful for that goal.
The response will contain a direct answer to the question and relevant excerpts and sources from the documentation.
Use this mechanism when the answer is not explicitly present in the current page, you need clarification or additional context, or you want to retrieve related documentation sections.