> For the complete documentation index, see [llms.txt](https://help.verkada.com/llms.txt). Markdown versions of documentation pages are available by appending `.md` to page URLs; this page is available as [Markdown](https://help.verkada.com/access-control/ja/she-zhi/ax11-elevator-installation.md).
# AX11エレベーターの設置
AX11エレベーターを設置する方法を学ぶ
Verkada [AX11 IOコントローラー](https://docs.verkada.com/docs/io-controller-ax11-datasheet.pdf) これにより、組織は最大 2 つのエレベーターバンクで、最大 16 階までのアクセスコントロールを管理できます。リーダーは各エレベーターの内側に設置する必要があります。エレベーター内でバッジをスキャンすると、階ボタンを押せるようになります。
{% hint style="danger" %}
Verkada Command を通じて、その階へのアクセス権を付与される必要があります。階へのアクセス権がない場合、階ボタンはどれも押せません。方法を学ぶ [Command で AX11 を構成する](/access-control/ja/she-ding/configure-the-ax11-io-controller.md).
{% endhint %}
## 前提条件
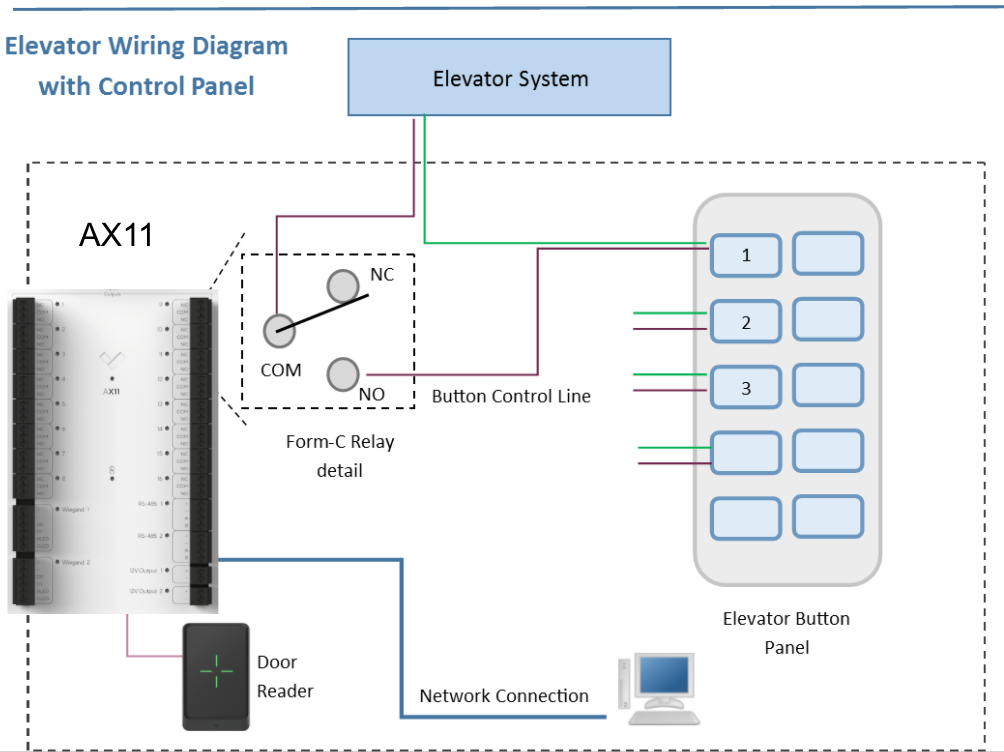
各階には **2** 本のボタン制御リード線(**1 組のワイヤーから**)が必要で、これはエレベーターシステムの設置の一部として提供される必要があります。
標準構成では:
* これらのリード線を接触させると、ボタンを押してその階にアクセスできます。
* リード線が離れていると、階ボタンを押せません。エレベーターメーカー/モデルによっては、動作が逆の場合があります。
## AX11 エレベーターの配線
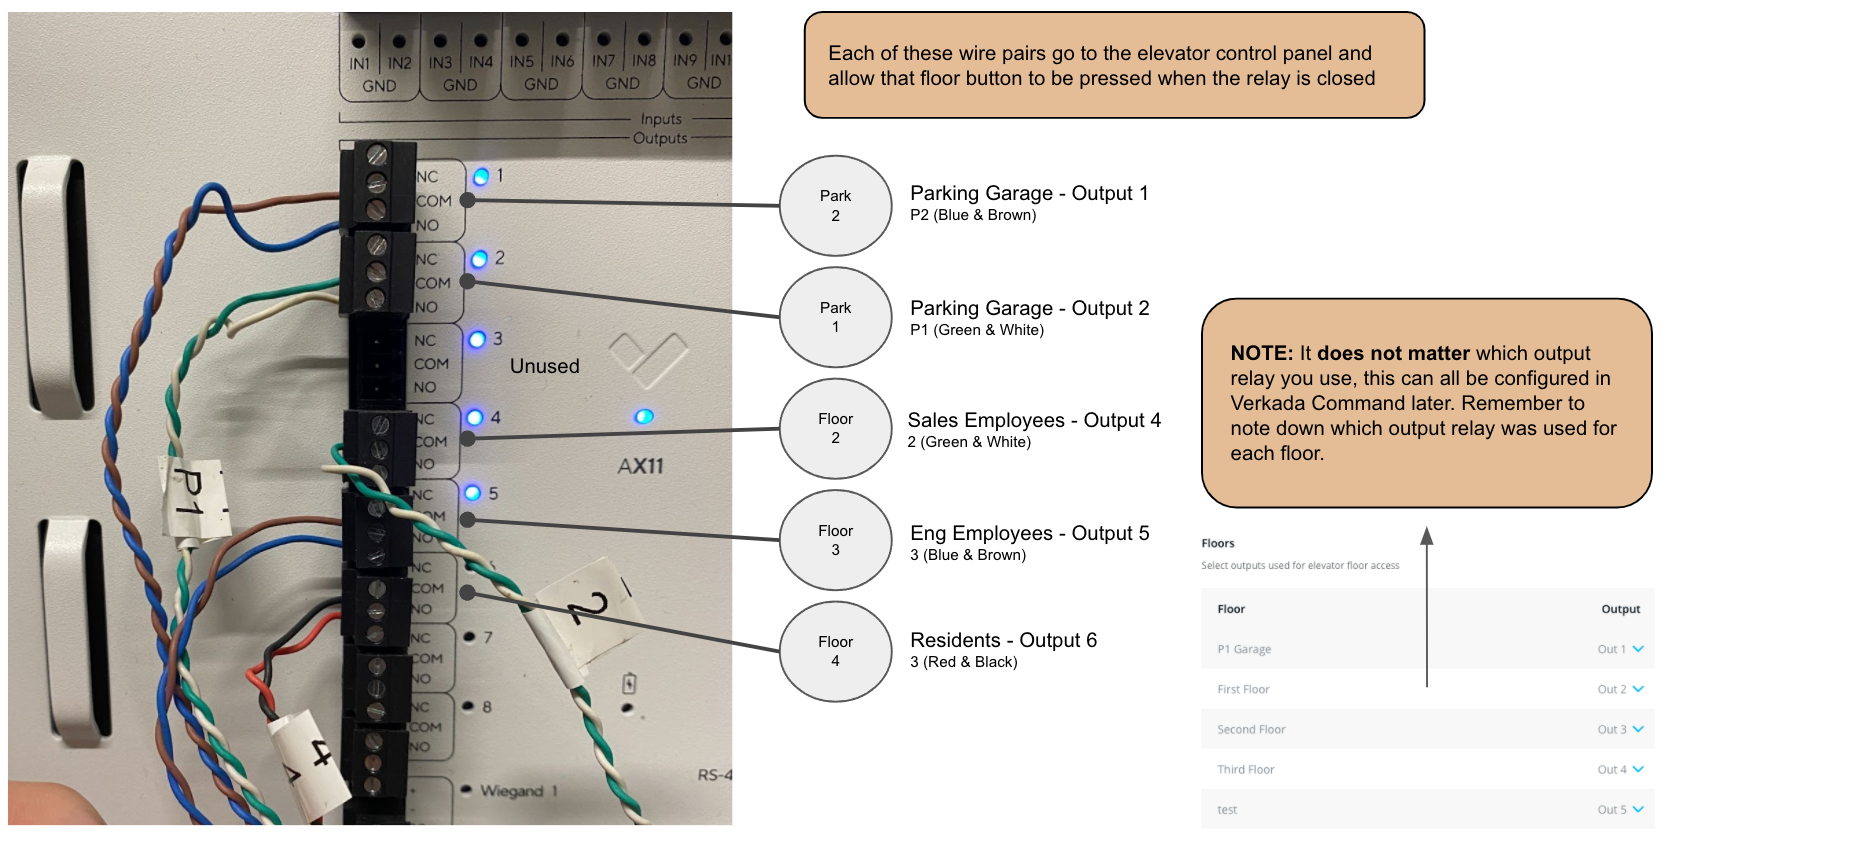
標準構成では、エレベーター制御盤で制御リード線は Normally Open (NO) として有線接続されています。各階の制御リード線は、以下のように AX11 の出力リレーのいずれかに接続する必要があります。
正しい配線構成要件(たとえば NO または Normally Closed (NC))を満たしていることを確認するため、エレベーターメーカーの設置マニュアルを参照してください。
**例**: AX11 エレベーター配線
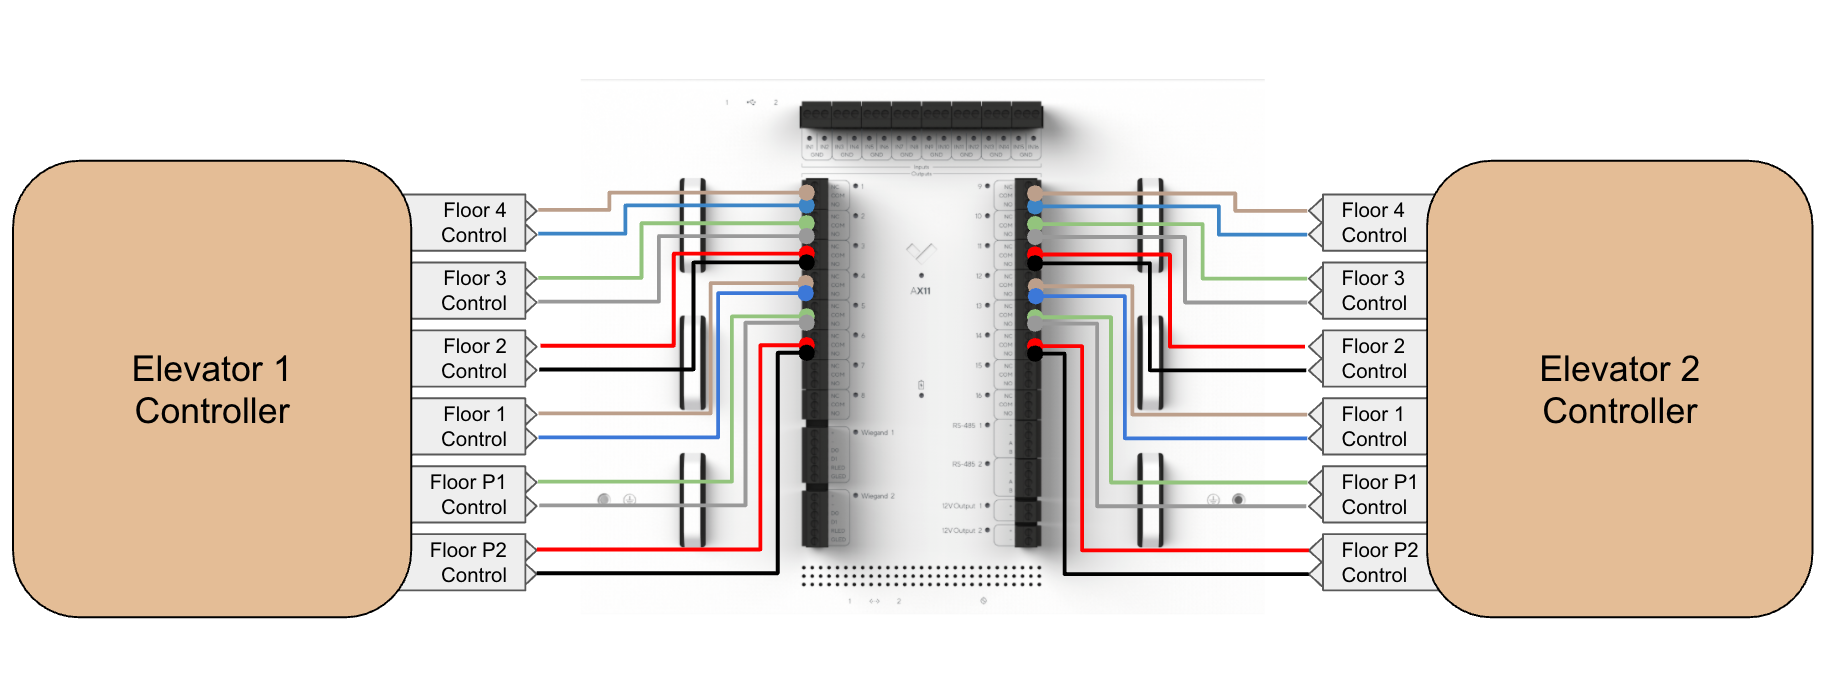
**例**: AX11 エレベーター配線(エレベーター 2 台、各 6 階の例)
## AX11 リーダーの配線
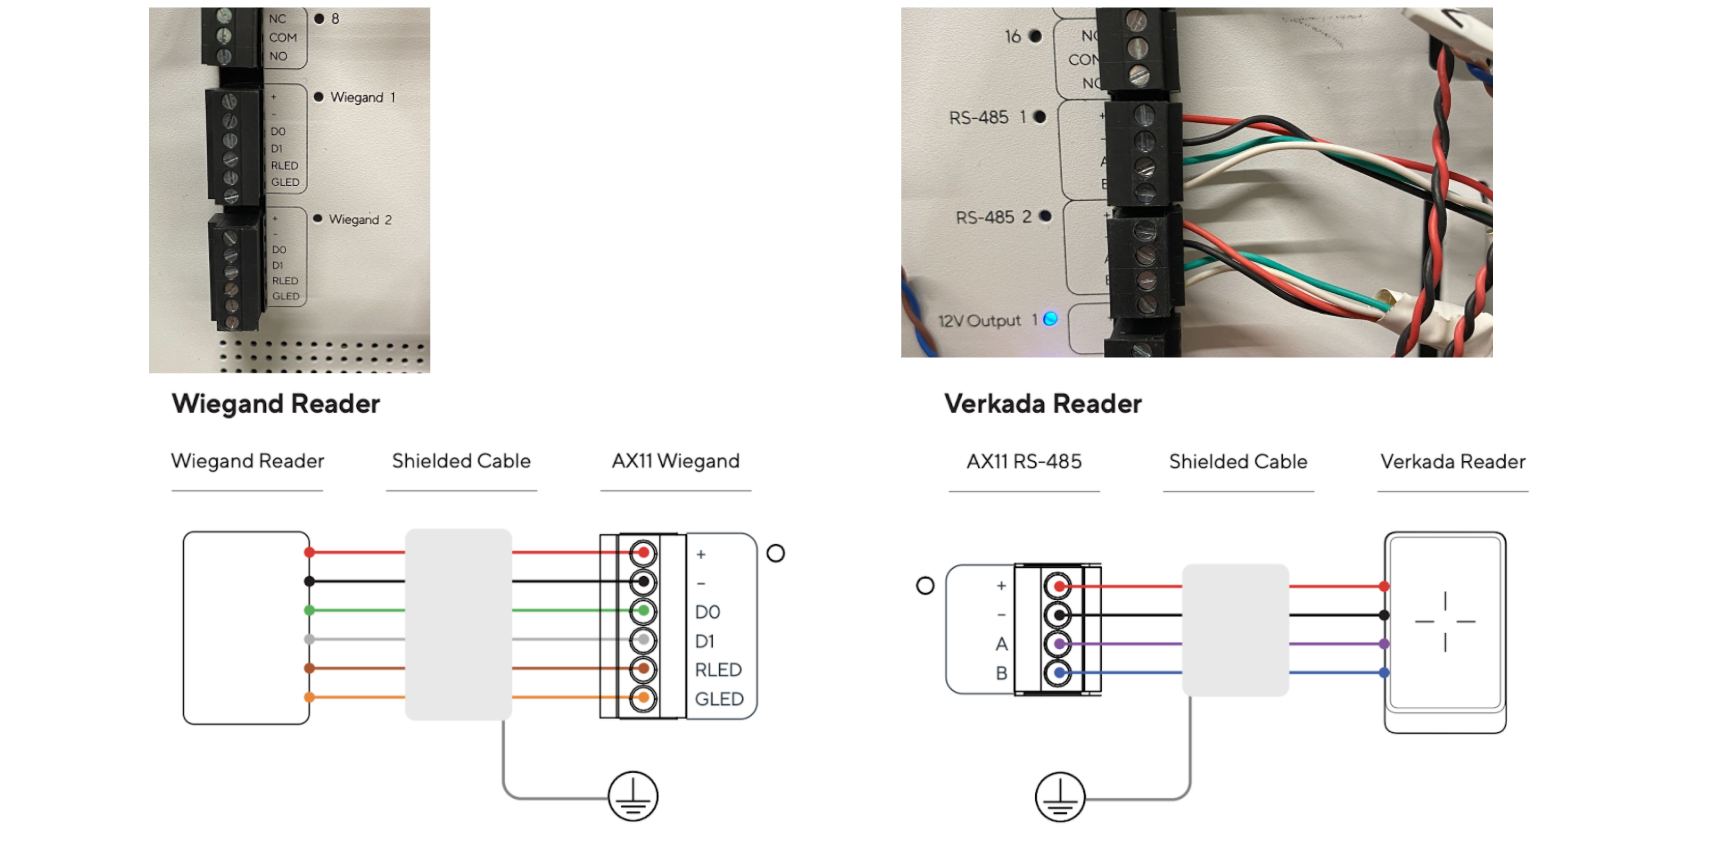
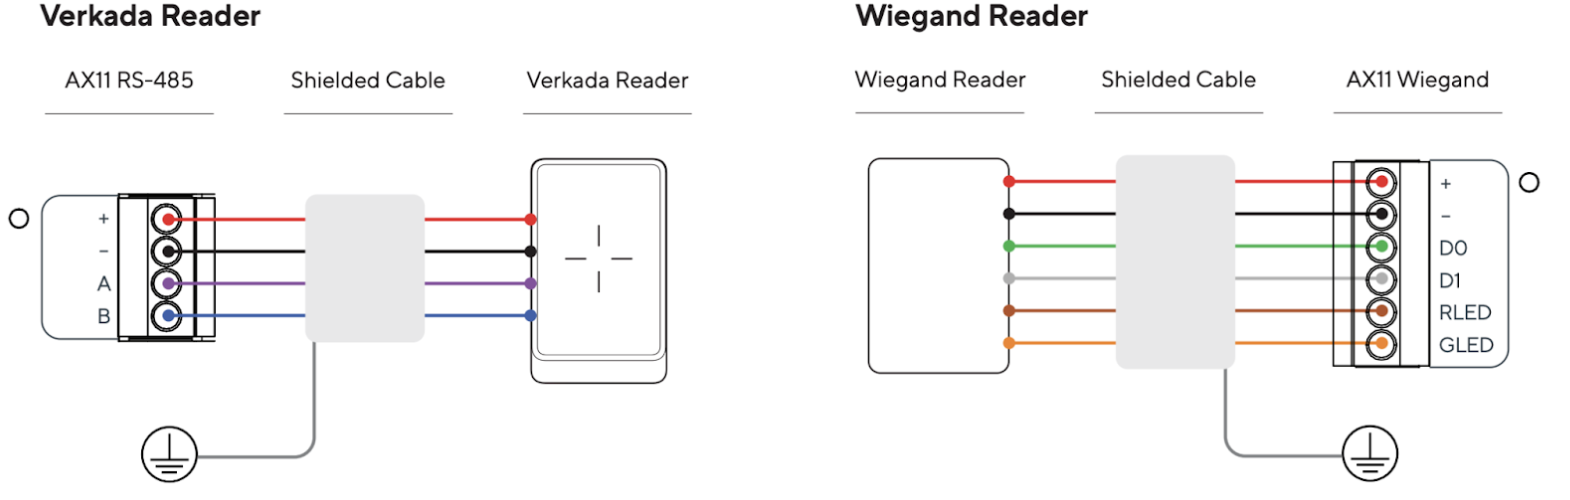
リーダーはエレベーターかごの内側に設置してください。AX11 は Wiegand リーダーと Verkada リーダーをサポートしています。リーダーの組み合わせは自由です(たとえば、Verkada リーダー 1 台と Wiegand リーダー 1 台)。リーダーを接続する方法について詳しく見る [リーダーを接続する](https://docs.verkada.com/docs/access-control-ax11-quick-start-guide.pdf).
{% hint style="warning" %}
このデバイスでは同時に 2 台のリーダーまでしか使用できません。エレベーター 1 台につき 1 リーダー(エレベーター 2 台の場合)、または 1 台のエレベーターに対して 2 リーダーです。
{% endhint %}
**例**: リーダー配線
## AX11 を接地する
エレベーターの移動ケーブルは EMF の影響を受けやすく、特にリーダー配線で顕著です。これにより AX11 コントローラーが損傷するおそれがあります。
リーダーはシールドケーブルを使用して有線接続し、むき出しのメタルドレインワイヤーを適切に大地アースへ接地してください、 **理想的にはリーダー設置側で**.
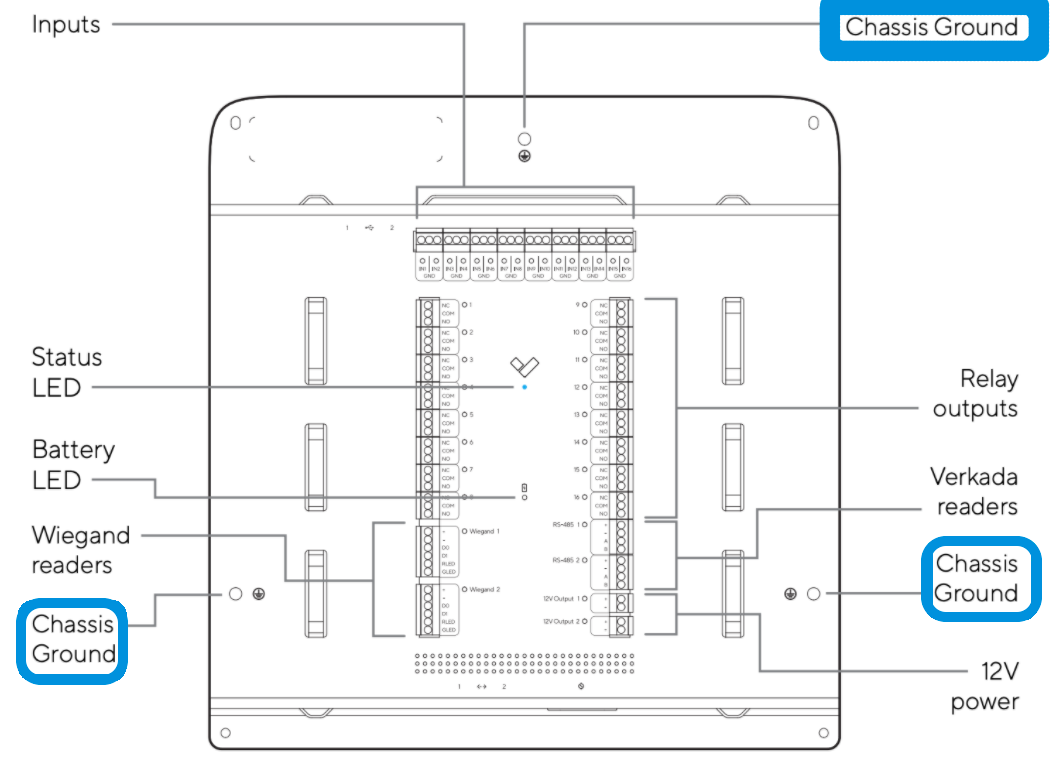
リーダー側でワイヤーを適切に大地アースへ接地できない場合は、AX11 の筐体接地点を使用できます。シールドケーブルのドレインワイヤーは、最寄りの AX11 筐体接地点に固定してください。AX11 には **3 つの**見つけやすい筐体接地点があります。
---
# Agent Instructions
This documentation is published with GitBook. GitBook is the documentation platform designed so that both humans and AI agents can read, navigate, and reason over technical content effectively. Learn more at gitbook.com.
## Querying This Documentation
If you need additional information that is not directly available in this page, you can query the documentation dynamically by asking a question.
Perform an HTTP GET request on the current page URL with the `ask` query parameter, and the optional `goal` query parameter:
```
GET https://help.verkada.com/access-control/ja/she-zhi/ax11-elevator-installation.md?ask=&goal=
```
`ask` is the immediate question: it should be specific, self-contained, and written in natural language.
`goal` is optional and describes the broader end goal you are ultimately trying to accomplish on behalf of the user. GitBook uses it to tailor the answer towards what is most useful for that goal.
The response will contain a direct answer to the question and relevant excerpts and sources from the documentation.
Use this mechanism when the answer is not explicitly present in the current page, you need clarification or additional context, or you want to retrieve related documentation sections.