> For the complete documentation index, see [llms.txt](https://help.verkada.com/llms.txt). Markdown versions of documentation pages are available by appending `.md` to page URLs; this page is available as [Markdown](https://help.verkada.com/access-control/ja/she-ding/configure-the-ax11-io-controller/ax11-event-bridge.md).
# AX11イベントブリッジ
ビデオ分析を含むドアイベントをVerkada Commandに取り込む方法を学ぶ
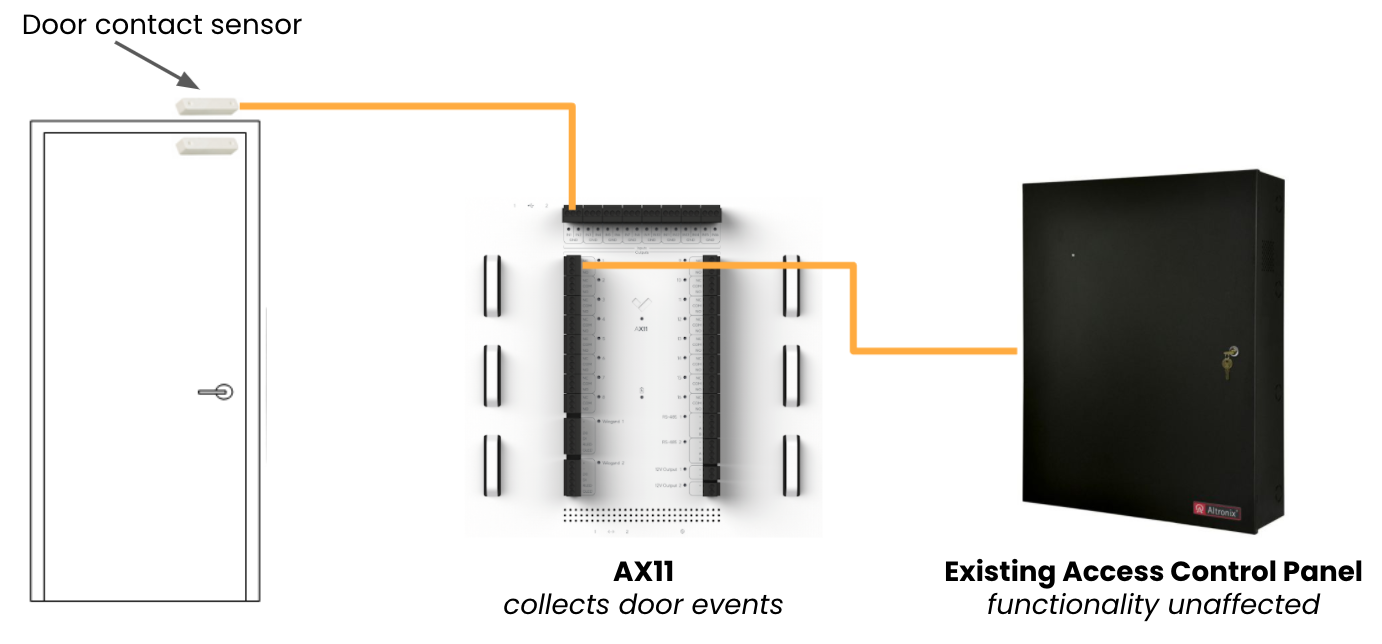
Verkadaの [AX11 IOコントローラー](https://docs.verkada.com/docs/io-controller-ax11-datasheet.pdf) Event Bridge機能を使用すると、2つのデバイスの間に配置することで、既存のドアコンタクトとアクセスコントローラーを活用できます。この記事では、既存のアクセスコントロールまたはアラームシステムを引き続き使用しながら、ビデオ解析付きのドアイベントをVerkada Commandに取り込む方法を説明します。
Event Bridgeの主な機能:
* ネイティブなカメラ統合によるビデオ解析
* ドア開放およびドア開放保持(DHO)のイベント/通知
* SMS/メールアラート
* 時間経過に伴うドアのアクティビティ
* 登録人物
* レポート
### 仕組み
{% stepper %}
{% step %}
**ドア位置インジケーター(DPI)、またはドアコンタクトは、AX11の入力に接続されます。**
{% endstep %}
{% step %}
**この接続により、対応する出力がトリガーされます。**
{% endstep %}
{% step %}
**この出力はその後、既存のサードパーティ製アクセスコントローラーに接続されます。**
{% endstep %}
{% step %}
**すべてを接続したら、Verkada Commandで簡単に切り替えるだけで、新しいモニター対象のドアでEvent Bridge機能を有効にできます。**
{% endstep %}
{% step %}
**この有効化により、Verkadaプラットフォームを使用できるようになります。**
{% endstep %}
{% endstepper %}
***
## AX11にEvent Bridgeをインストールする
AX11にドアコンタクトを使ってEvent Bridgeをインストールできます。これは、 [ドアコンタクトセンサー](#h_10ef70ef79) と既存のアクセスコントローラーの間に配置されます。インストールを完了するために必要なコンポーネントと手順については、以下をお読みください。
### ドアコンタクトセンサーをインストールする
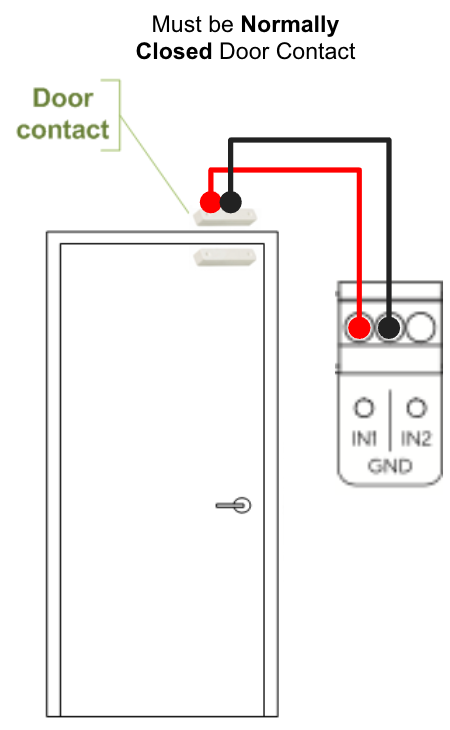
AX11上段の入力と、入力の下にある同番号の出力を使用して、ドアコンタクトセンサーをインストールできます。たとえば、入力1(IN1)を使用する場合は、出力1のリレーを使用します。
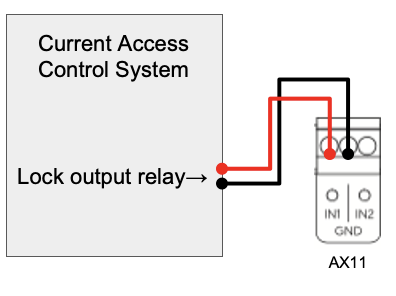
この例では入力1(IN1)を使用しており、IN1がドアコンタクトセンサーに接続されます:
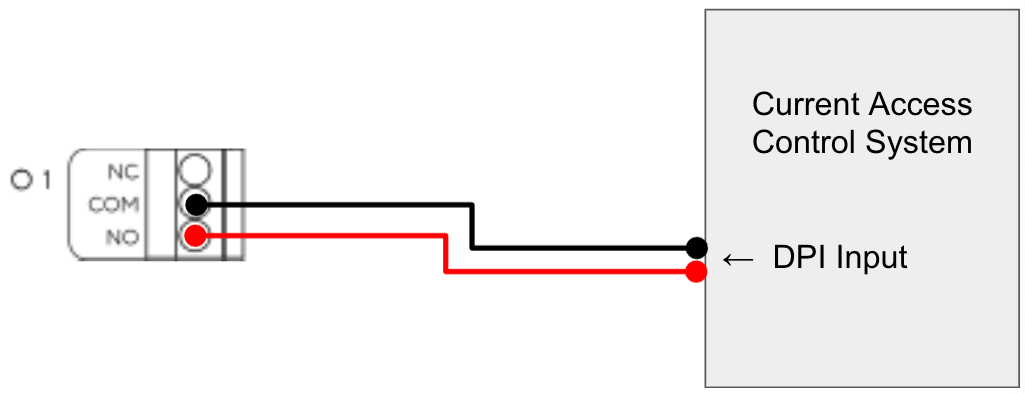
出力は既存のサードパーティ製アクセスコントローラーに接続されます。
{% hint style="danger" %}
AX11の出力を配線する際は、 **NOとCOMを使用する必要があります** ドアコンタクトを正しくシミュレートするためです。
{% endhint %}
Event Bridgeモードでは:
* もし **IN1** = 開放、次に **OUTPUT1** = 通常状態
* もし **IN1** = 閉鎖、次に **OUTPUT1** = トリガーされる
### モーションセンサーREXを配線する
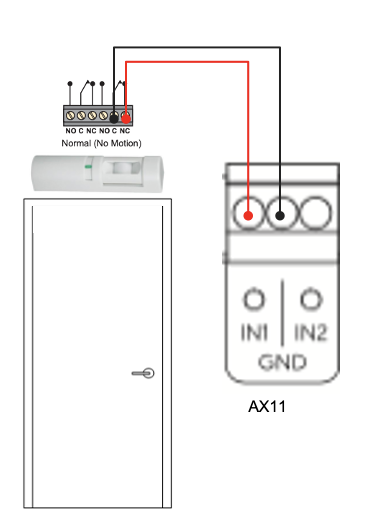
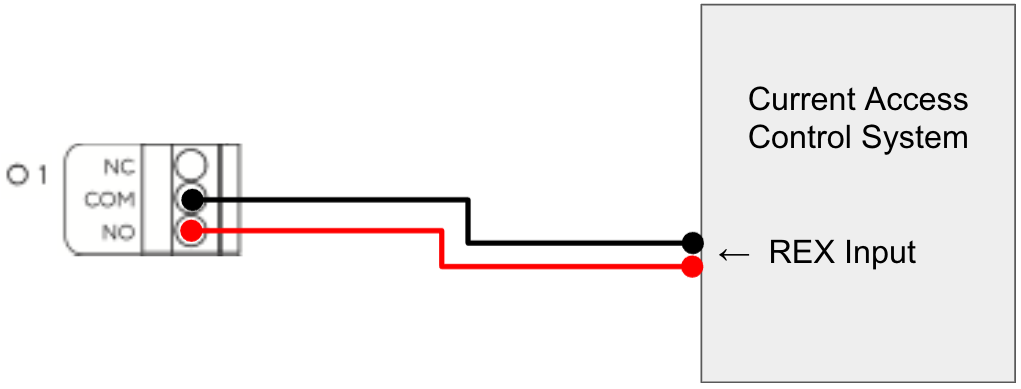
ドアコンタクトセンサーが利用できず、モーションセンサーの退出要求(REX)がある場合は、既存のモーションセンサーREXの通常閉(NC)およびCOM出力を使用して配線できます。この出力はその後、AX11上段の入力に配線されます。
この例ではIN1を使用し、同番号の出力ポートにサードパーティ製コントローラーを接続できます。
### ロックを使用する
ドアコンタクトセンサーとモーションセンサーREXの両方が利用できない場合は、Event Bridgeでロックを使用できます。
{% hint style="info" %}
ただし、この設定オプションは、 **最終手段**.
{% endhint %}
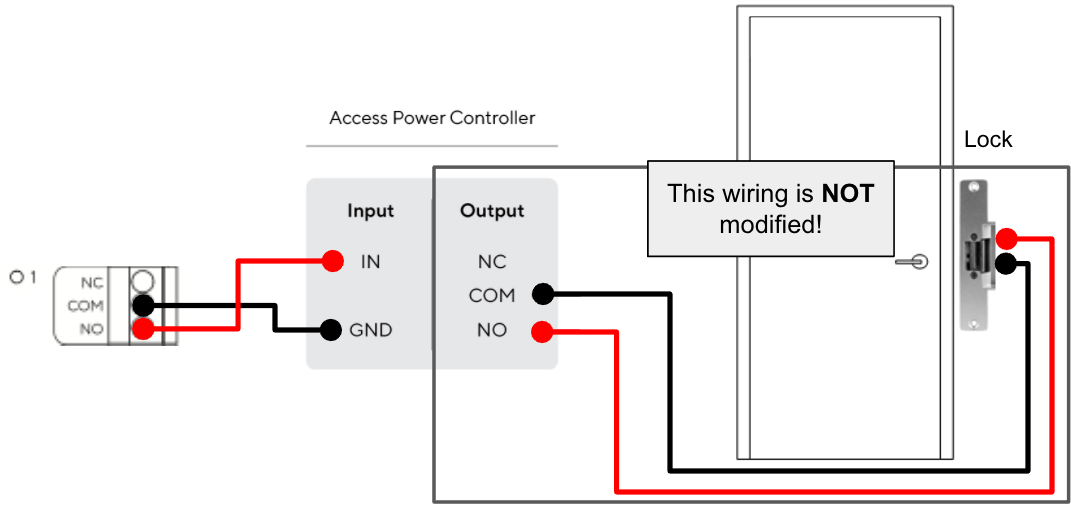
このシナリオでは、サードパーティ製アクセスコントローラーがAX11上段の入力に接続されます。
{% hint style="danger" %}
対応する出力は、アクセス用電源コントローラーに有線接続する必要があります。
{% endhint %}
{% hint style="warning" %}
Event Bridge機能は、ロックに電源を供給するためにウェット構成を使用するアクセスコントロールシステムとは互換性がありません。
{% endhint %}
## CommandでEvent Bridgeを有効にする
Event Bridgeは2つの方法で有効にできます:
* モニター対象のドアを設定するとき [初めて](#h_a22d4d0eff)
* インストーラー設定から
### 初回設定
入力と出力をインストールし、AX11が組織に追加されると、モニター対象のドアを設定できるようになります。
{% stepper %}
{% step %}
**Verkada Commandで、All Products > に移動します。** [**デバイス**](https://command.verkada.com/devices)**.**
{% endstep %}
{% step %}
**AX11を選択します。**
{% endstep %}
{% step %}
**デバイスのページの右上で、[入力を追加]をクリックします。**
{% endstep %}
{% step %}
**[入力を追加]では、ドアモニターを追加するオプションが表示されるはずです。**
{% endstep %}
{% step %}
**[ドアモニター > 名前]:**
a. ドアに一意の名前を付けます。\nb. 場所を設定します。\nc. クリックします **次へ**.
{% endstep %}
{% step %}
**[ドアモニター > ハードウェア]:**
a. ペアリングするカメラを選択します(該当する場合)。\nb. 入力ポート(ドアコンタクトを配線した番号)を選択します。\nc. クリックします **次へ**.
{% endstep %}
{% step %}
**[ドアモニター > 設定]:**
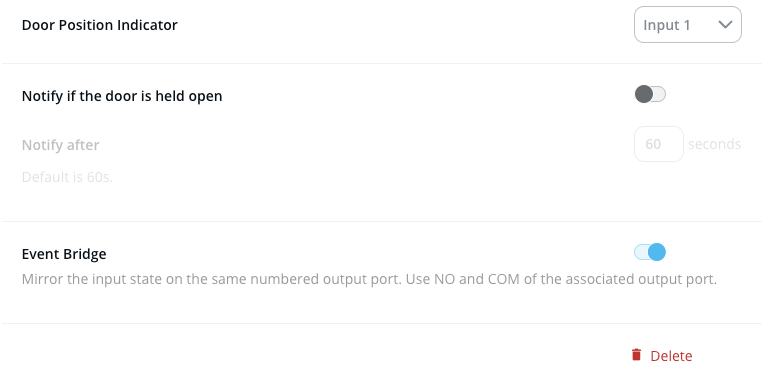
a. をオンに切り替えます **Event Bridge**。\nb. クリック **完了**.
{% endstep %}
{% endstepper %}
### インストーラー設定からEvent Bridgeを有効にする
モニター対象のドアをすでに設定している場合:
{% stepper %}
{% step %}
**Verkada Commandで、All Products > に移動します。** [**デバイス**](https://command.verkada.com/devices)**.**
{% endstep %}
{% step %}
**AX11を選択します。**
{% endstep %}
{% step %}
**デバイスのページで、モニター対象のドアを見つけてクリックし、Event Bridgeを有効にします。**
{% endstep %}
{% step %}
**右上の[設定]をクリックします。**
{% endstep %}
{% step %}
**ページの下部までスクロールし、インストーラー設定を選択します。**
{% endstep %}
{% step %}
**Event Bridgeをオンにし、必要に応じて入力ポートを再設定します。**
{% endstep %}
{% endstepper %}
---
# Agent Instructions
This documentation is published with GitBook. GitBook is the documentation platform designed so that both humans and AI agents can read, navigate, and reason over technical content effectively. Learn more at gitbook.com.
## Querying This Documentation
If you need additional information that is not directly available in this page, you can query the documentation dynamically by asking a question.
Perform an HTTP GET request on the current page URL with the `ask` query parameter, and the optional `goal` query parameter:
```
GET https://help.verkada.com/access-control/ja/she-ding/configure-the-ax11-io-controller/ax11-event-bridge.md?ask=&goal=
```
`ask` is the immediate question: it should be specific, self-contained, and written in natural language.
`goal` is optional and describes the broader end goal you are ultimately trying to accomplish on behalf of the user. GitBook uses it to tailor the answer towards what is most useful for that goal.
The response will contain a direct answer to the question and relevant excerpts and sources from the documentation.
Use this mechanism when the answer is not explicitly present in the current page, you need clarification or additional context, or you want to retrieve related documentation sections.