> For the complete documentation index, see [llms.txt](https://help.verkada.com/llms.txt). Markdown versions of documentation pages are available by appending `.md` to page URLs; this page is available as [Markdown](https://help.verkada.com/access-control/ja/she-ding/configure-a-door-in-command/add-a-door-to-an-access-controller.md).
# アクセスコントローラにドアを追加する
Verkada アクセスコントロールシステムにドアを追加する
ドアは、特定のカセット上のアクセスコントローラーに接続されているすべての構成とコンポーネントで構成されます。
{% hint style="danger" %}
ドアを追加するには、Access Site Admin である必要があります。詳しくは、 [アクセスコントロールのロールと権限](/access-control/ja/hajimeni/roles-and-permissions-for-access-control.md).
{% endhint %}
{% stepper %}
{% step %}
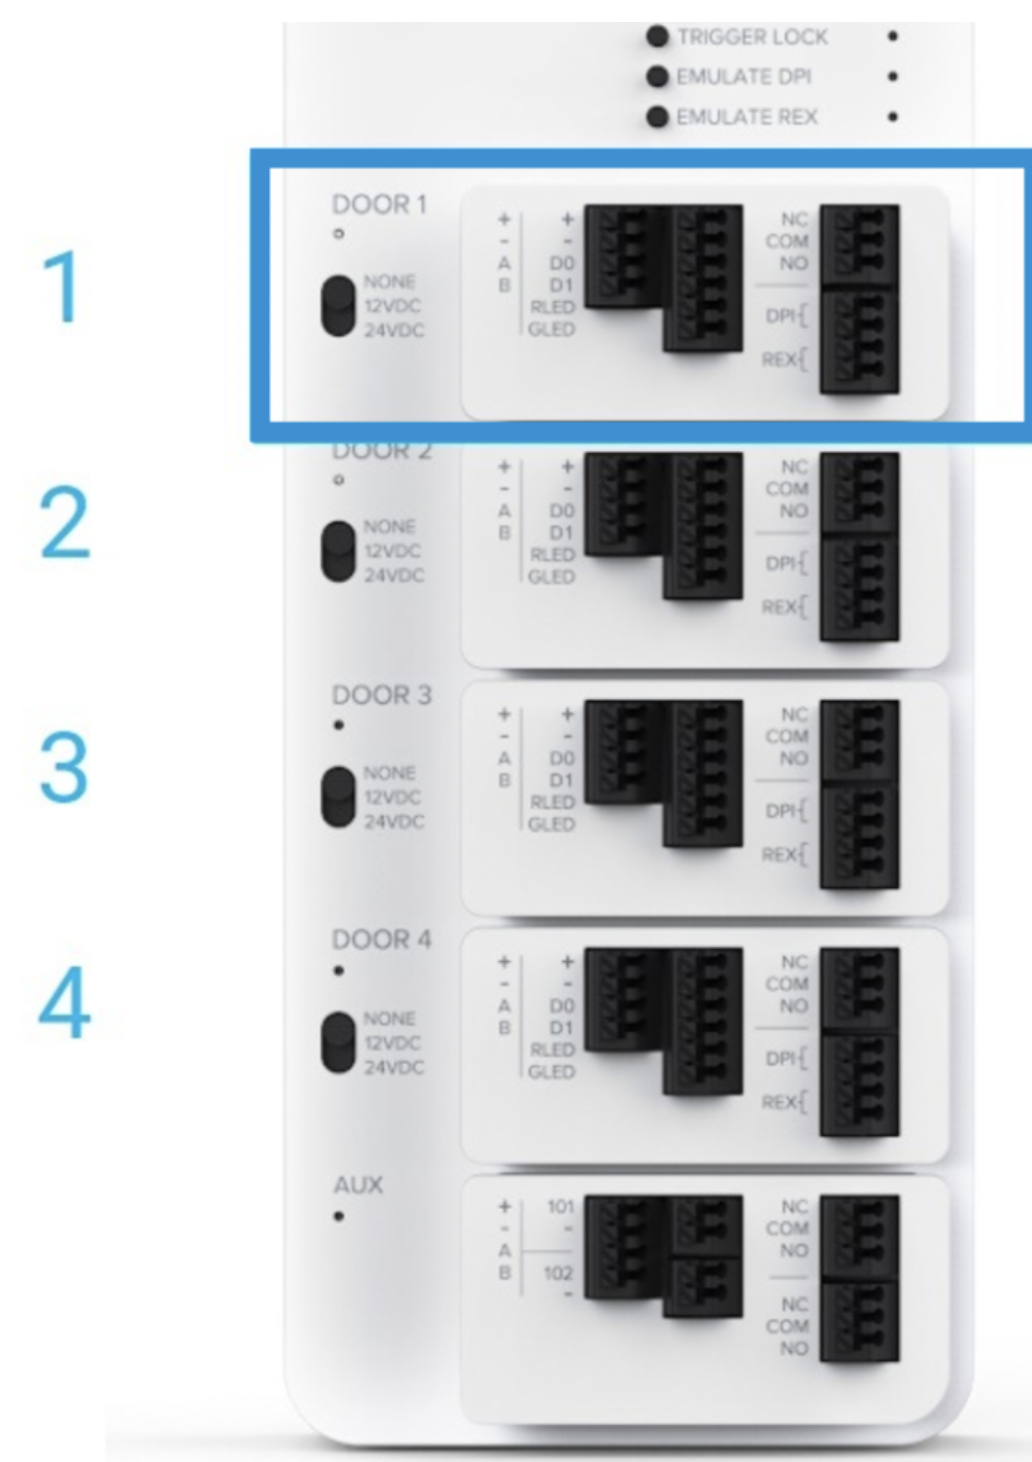
**AC41 には、各ドアに対応する 1 から 4 まで番号が付いた 4 つのカセットがあります。**
{% endstep %}
{% step %}
**ドアを構成します。関連付けられたカセットに有線接続されているドアの番号を確認します。**
{% endstep %}
{% step %}
**Verkada Command で、[すべての製品]>[デバイス]に移動します。**
{% endstep %}
{% step %}
**ドアを追加したい Verkada アクセスコントローラーを見つけます。**
{% endstep %}
{% step %}
**右側で、アクセスコントローラーを選択します。**
{% endstep %}
{% step %}
**右上の[追加]をクリックします。**
{% endstep %}
{% step %}
**セットアップリストから、[ドア]をクリックします。**
{% endstep %}
{% step %}
**構成手順に従って、名前と設置済みのコンポーネントを追加します。**
{% endstep %}
{% endstepper %}
{% hint style="warning" %}
のみを確認してください **REX** (退出要求)または **DPI** (ドア位置インジケーター)のボックスは、これらが設置されており、REX センサー/ボタンでドアのロックを解除したい場合にのみ選択してください(通常、磁気ロックの場合です)。
{% endhint %}
***
{% hint style="info" %}
**実際の動作をご覧になりたいですか?** こちらの [動画チュートリアルをご覧ください](https://www.youtube.com/watch?v=reGRRopgx7Q).
{% endhint %}
---
# Agent Instructions
This documentation is published with GitBook. GitBook is the documentation platform designed so that both humans and AI agents can read, navigate, and reason over technical content effectively. Learn more at gitbook.com.
## Querying This Documentation
If you need additional information that is not directly available in this page, you can query the documentation by asking a question.
Perform an HTTP GET request on the following URL with the `ask` and `goal` query parameters:
```
GET https://help.verkada.com/access-control/ja/she-ding/configure-a-door-in-command/add-a-door-to-an-access-controller.md?ask=&goal=
```
`ask` is the immediate question: it should be specific, self-contained, and written in natural language.
`goal` is what the user is ultimately trying to achieve, the reason they need the answer. Sharing it helps GitBook give you a better, more relevant answer. A goal is most helpful when it describes the outcome the user wants rather than restating the question. For example, with `ask=how do I create an API token`, a goal like `automate deployments from our CI pipeline` lets GitBook tailor the answer to that use case.
The response will contain a direct answer to the question and relevant excerpts and sources from the documentation.
Use this mechanism when the answer is not explicitly present in the current page, you need clarification or additional context, or you want to retrieve related documentation sections.