> For the complete documentation index, see [llms.txt](https://help.verkada.com/llms.txt). Markdown versions of documentation pages are available by appending `.md` to page URLs; this page is available as [Markdown](https://help.verkada.com/access-control/ja/akusesu/add-and-modify-access-levels/access-level-schedules-and-exceptions.md).
# アクセスレベルのスケジュールと例外
アクセスレベルと例外によってドアへのアクセスがどのように許可されるかを学ぶ
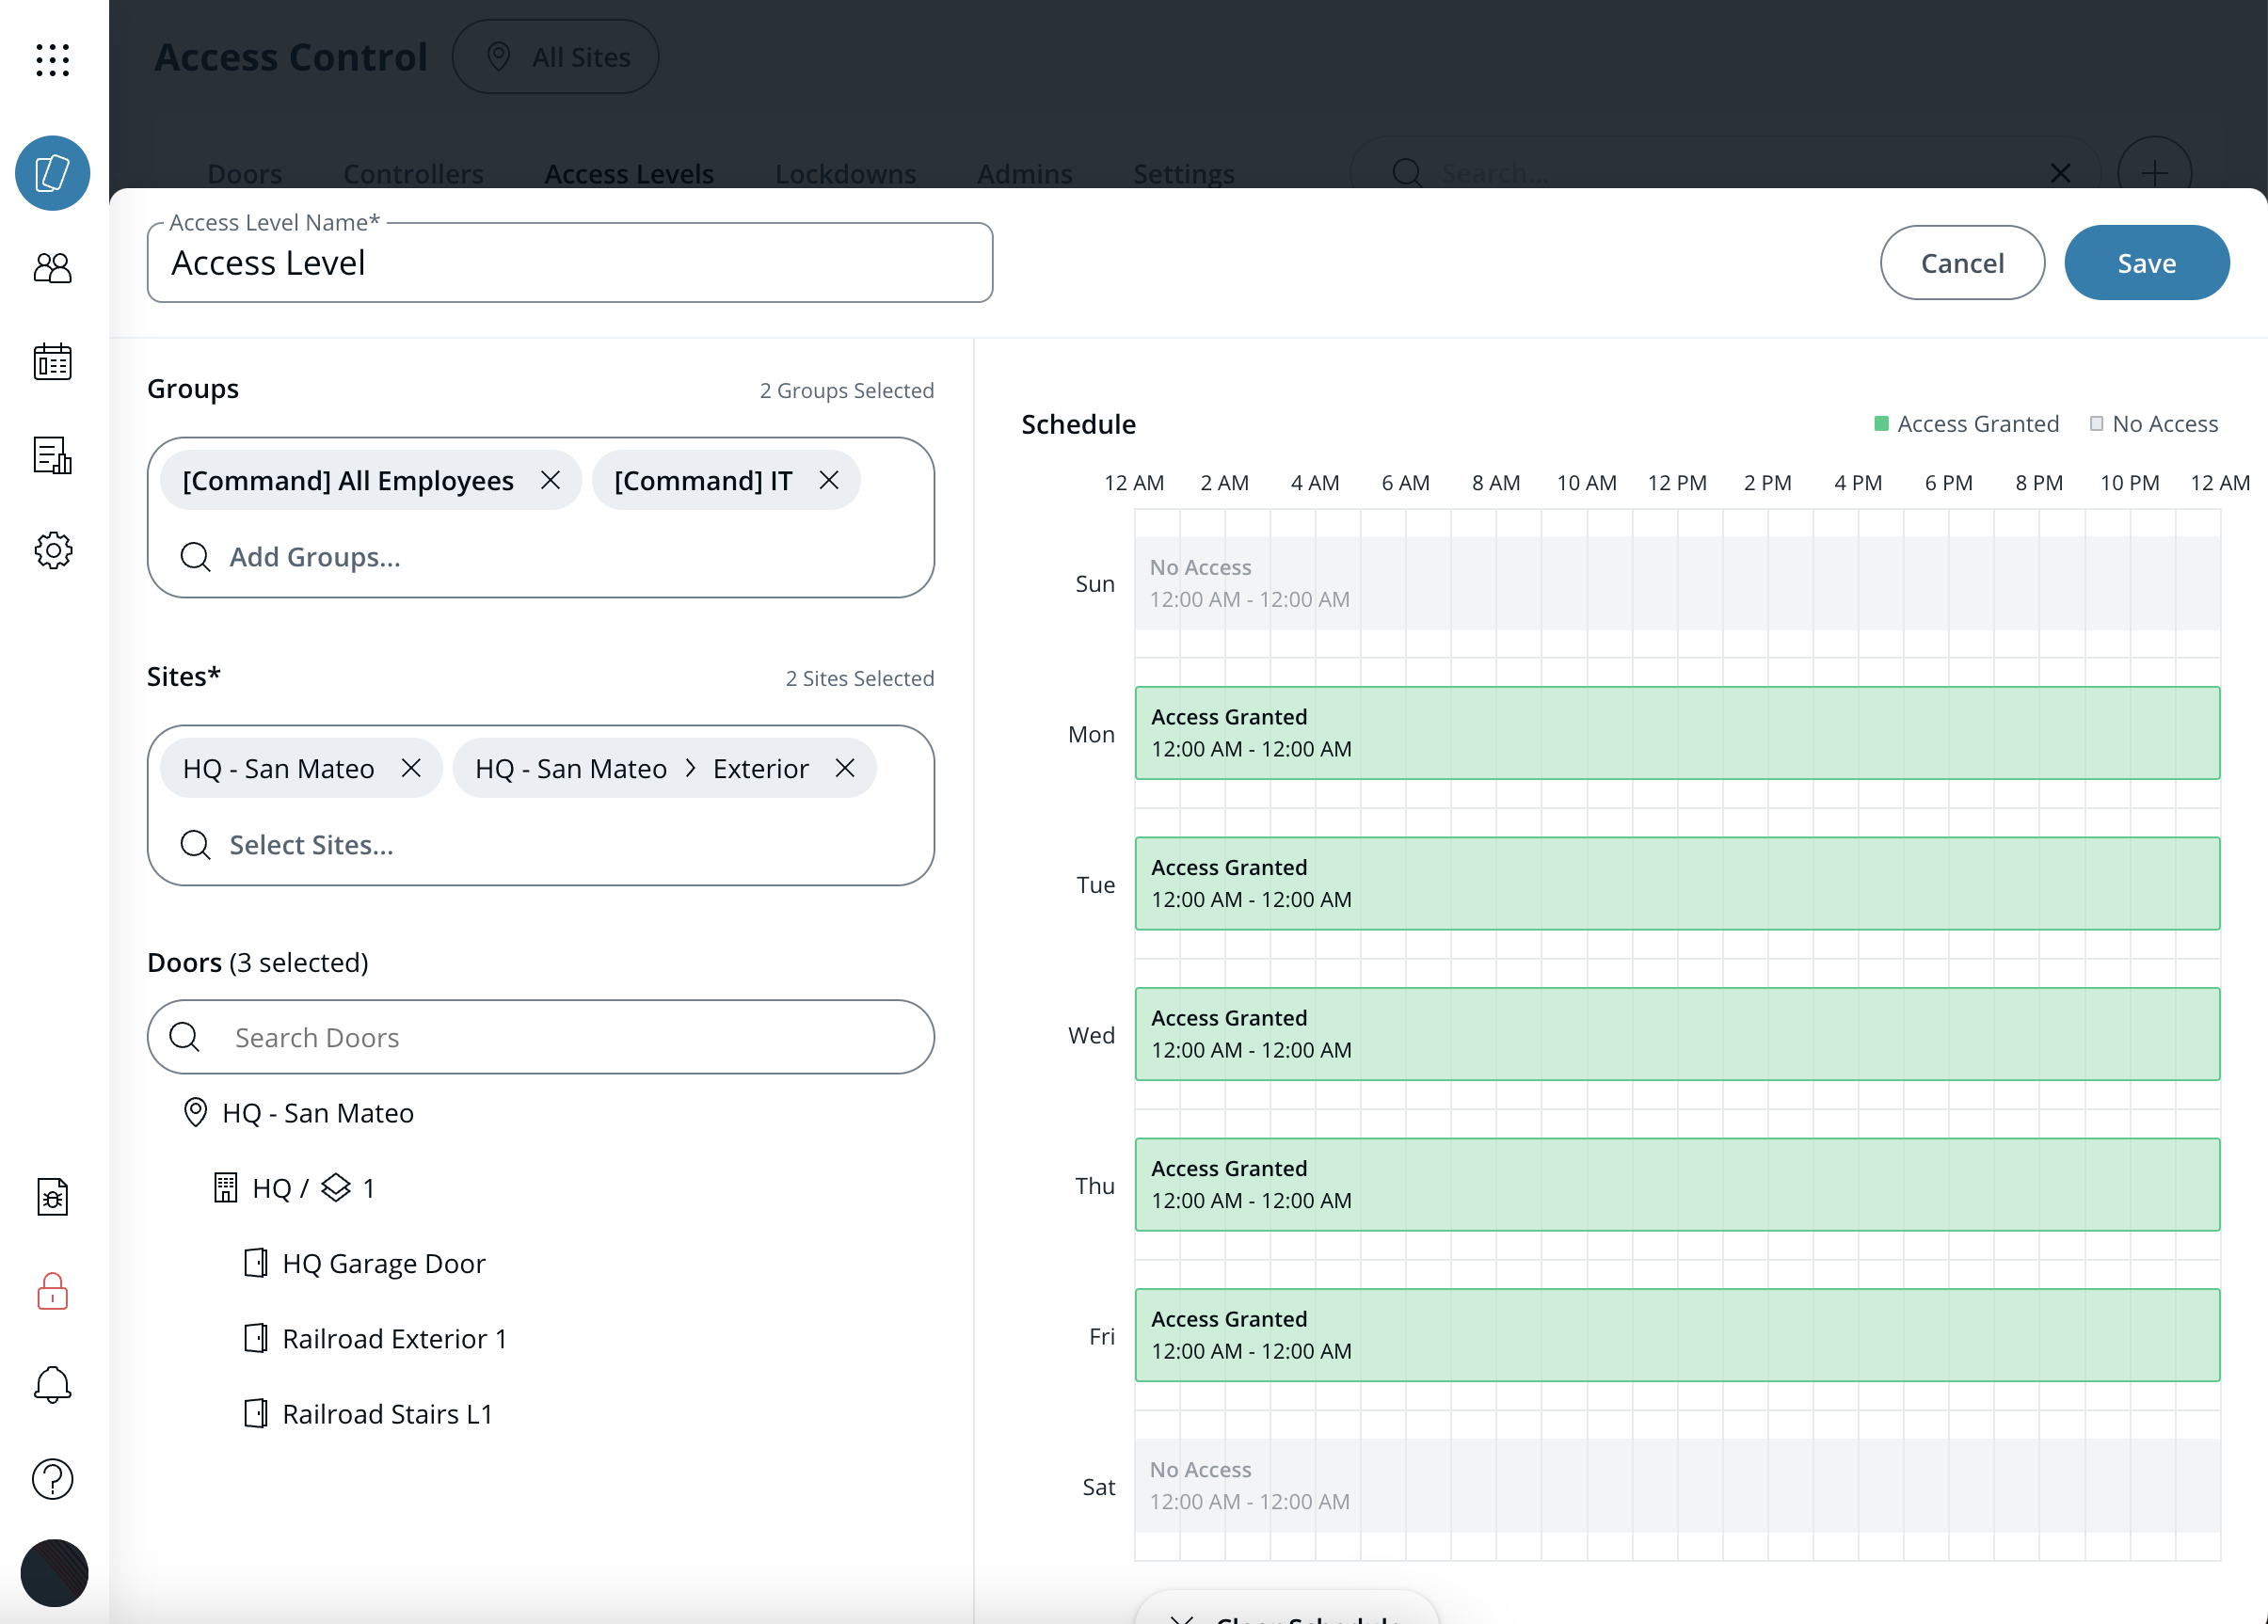
アクセスレベルを使用してドアへのアクセスを管理します。アクセスは次の構成要素で設定されます:
* **スケジュール** ユーザーがドアにアクセスできる時間を決定します。
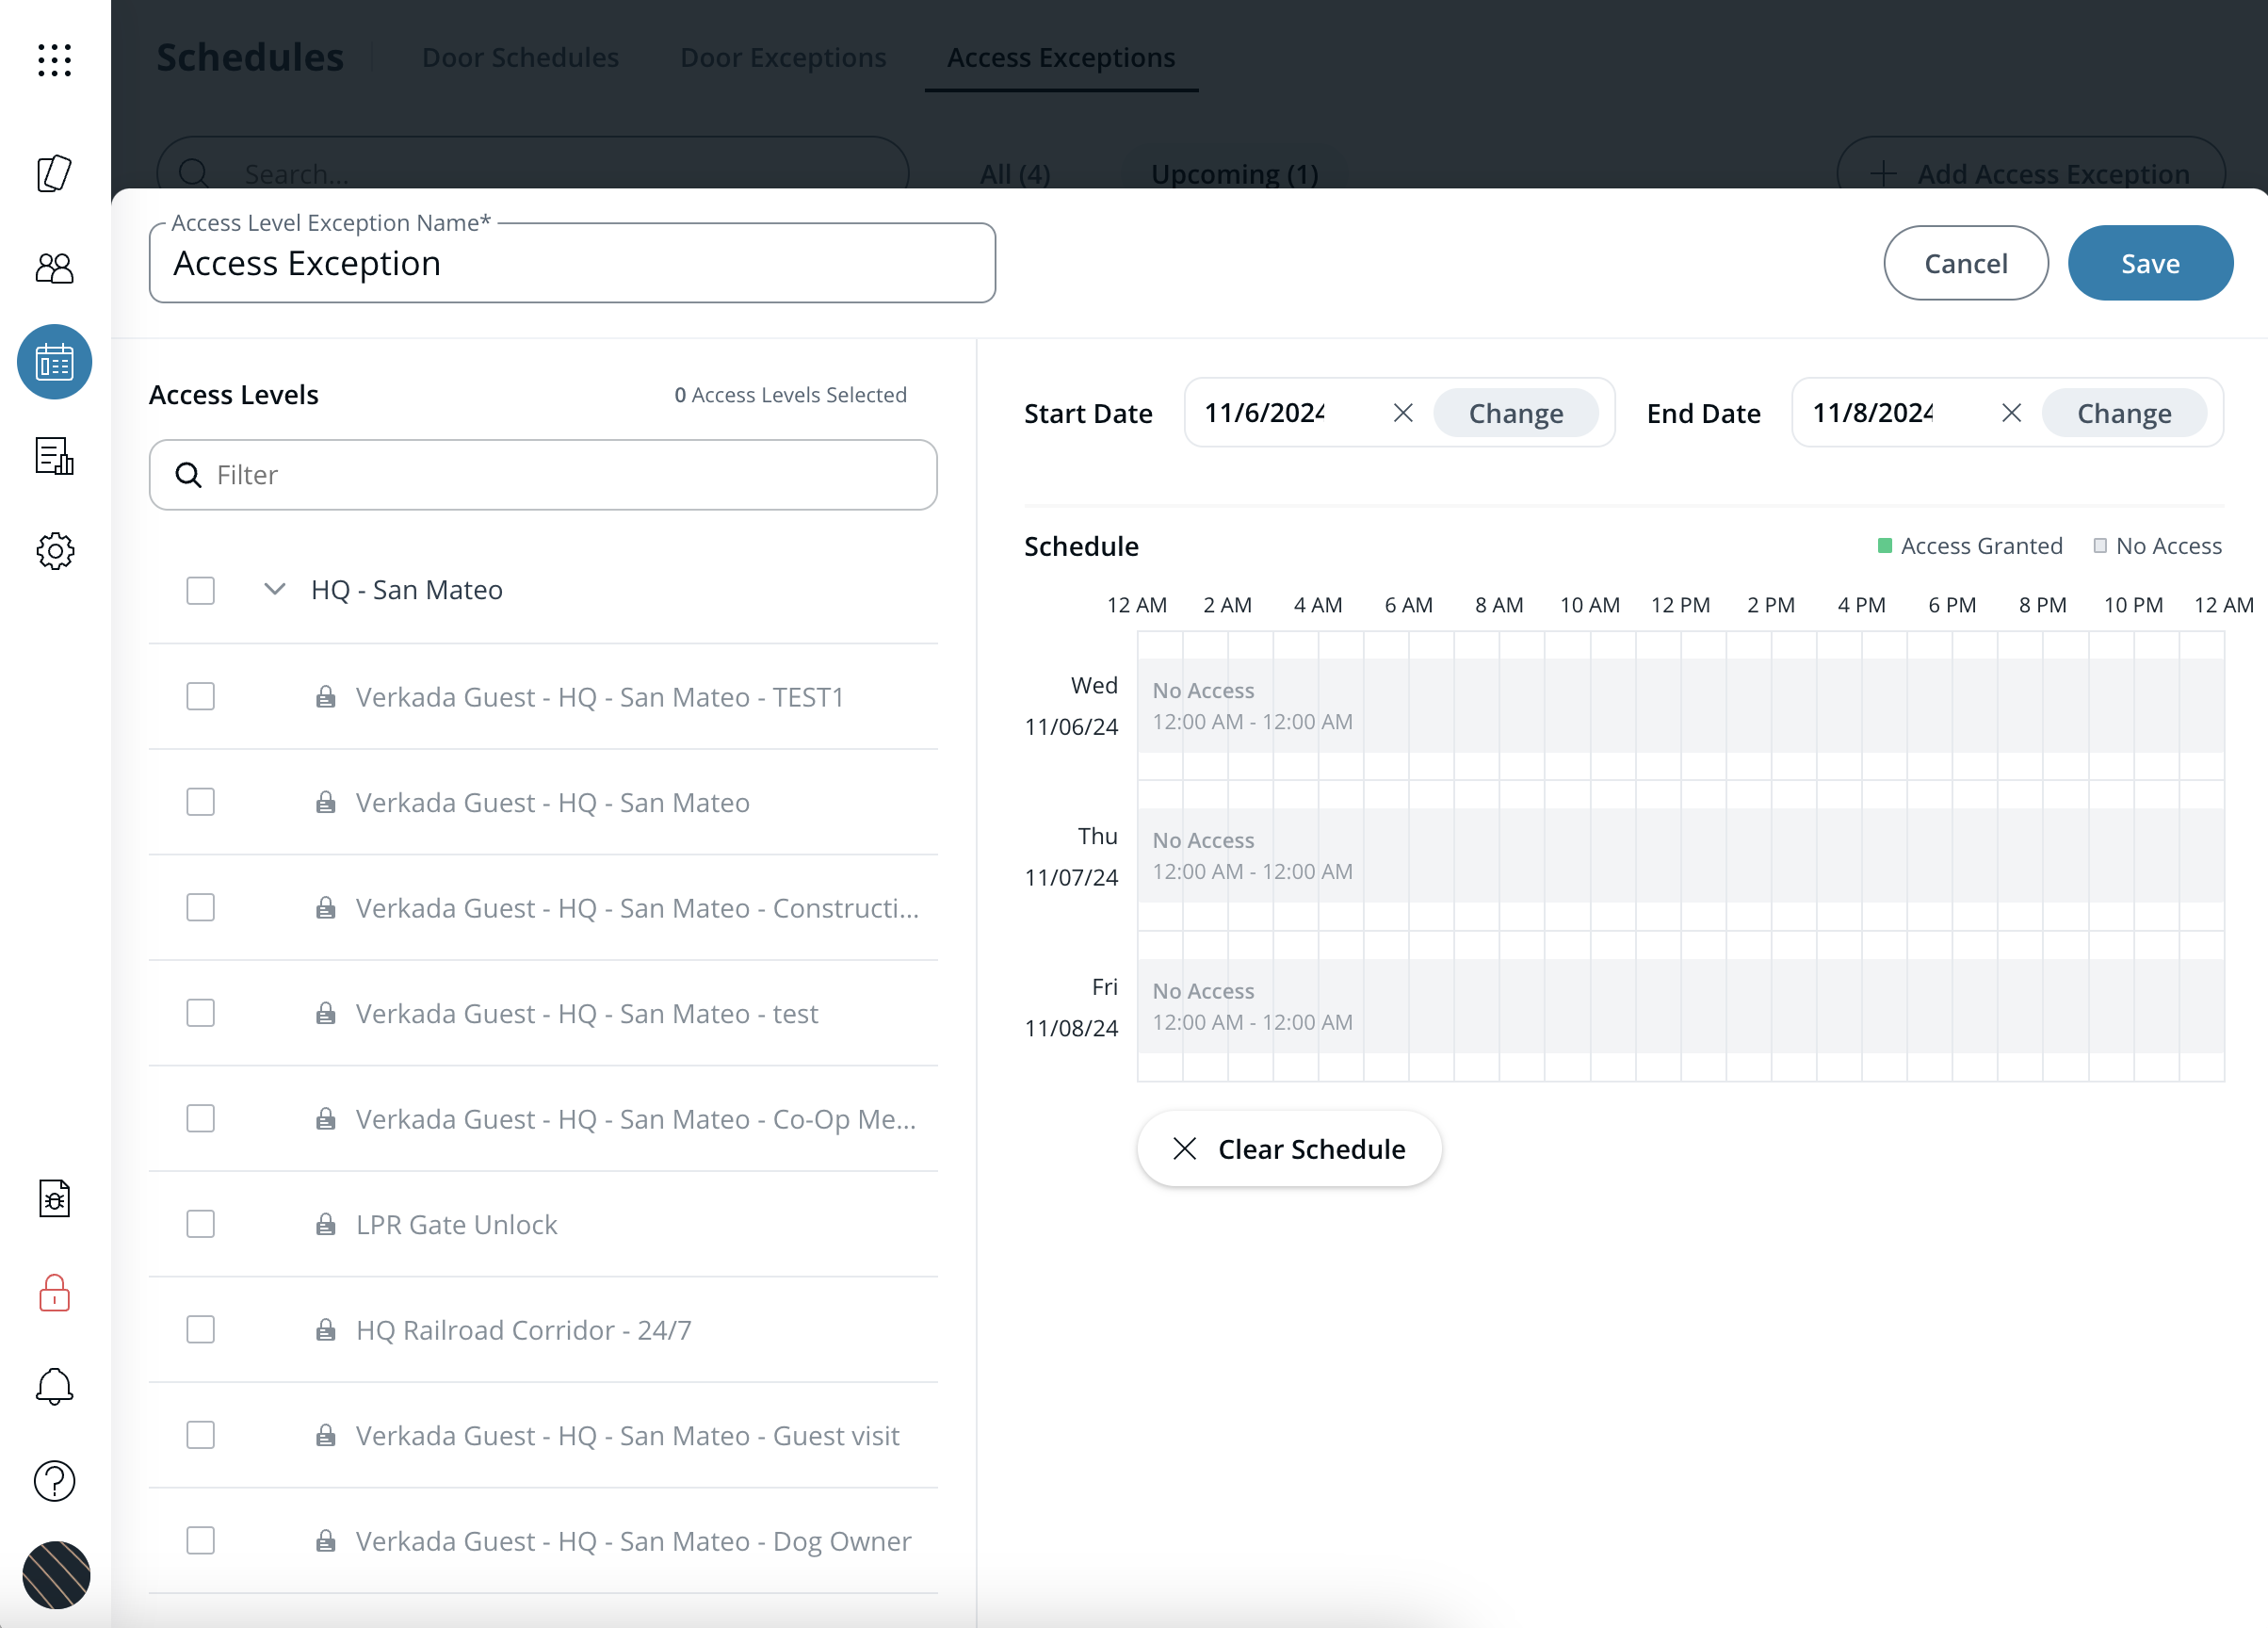
* **例外** スケジュールを一時的に変更できます。
* 例外は、一定期間だけアクセスレベルを変更したいが、スケジュール全体を変更する必要がない場合に便利です。
* 例外はスケジュールより優先され、アクセスレベルの動作を変更します。通常、これは休暇や特別イベントなど、アクセスを一時的に変更する必要がある場合に使用されます。
{% hint style="danger" %}
次の権限を持つユーザーアカウントでログインしている必要があります: **Access Site Admin** または **Access Site Manager** サイトでアクセスレベルを変更または作成するには、の権限が必要です。詳細については、 [アクセスコントロールのロールと権限](/access-control/ja/hajimeni/roles-and-permissions-for-access-control.md).
{% endhint %}
***
## アクセススケジュールを作成する
{% stepper %}
{% step %}
**Verkada Commandで、\[All Products] > \[Access] に移動します。**
{% endstep %}
{% step %}
**\[All Sites] ドロップダウンからサイトを選択します。**
{% endstep %}
{% step %}
**上部で \[Access Levels] を選択します。**
{% endstep %}
{% step %}
**右上で、** :plus:**.**
{% endstep %}
{% step %}
**必要に応じて、次の設定を行います:**
1. 一意の名前を付けます。
2. スケジュールを作成します。
3. アクセスグループとサイトを追加します。
4. 選択したサイトのドアを追加します。
{% endstep %}
{% step %}
**すべての変更が完了したら、\[Save] をクリックします。**
{% endstep %}
{% endstepper %}
{% hint style="warning" %}
1つのアクセスレベルに複数のサイトが割り当てられている場合:
* ユーザーが [Access Site Admin](/access-control/ja/hajimeni/roles-and-permissions-for-access-control.md) または [Access Site Manager](/access-control/ja/hajimeni/roles-and-permissions-for-access-control.md) シナリオ内のすべてのサイトに対してそのいずれでもない場合、そのユーザーは、これらのアクセスコントロールのロールのいずれかを持つサイトのドアのみを追加または削除できます。
{% endhint %}
***
## アクセススケジュールを変更する
{% stepper %}
{% step %}
**Verkada Commandで、\[All Products] > \[Access] に移動します。**
{% endstep %}
{% step %}
**\[All Sites] ドロップダウンからサイトを選択します。**
{% endstep %}
{% step %}
**上部で \[Access Levels] を選択します。**
{% endstep %}
{% step %}
**編集するスケジュールを選択します。**
{% endstep %}
{% step %}
**必要に応じて、次の設定を行います:**
1. スケジュール名を編集します。
2. スケジュールを編集します。
3. アクセスグループを編集する
4. 選択したサイトのサイトおよびドアを編集します。
{% endstep %}
{% step %}
**すべての変更が完了したら、\[Save] をクリックします。**
{% endstep %}
{% endstepper %}
{% hint style="warning" %}
ロック解除スケジュールは加算式で、変更を行う前に既存の日をクリアする必要があります。既存の **アクセス許可** 指定された編集期間より長いスケジュールがある場合、複数の日を同時に変更することはできません。
{% endhint %}
***
## アクセススケジュールを削除する
{% stepper %}
{% step %}
**Verkada Commandで、\[All Products] > \[Access] に移動します。**
{% endstep %}
{% step %}
**\[All Sites] ドロップダウンからサイトを選択します。**
{% endstep %}
{% step %}
**上部で \[Access Levels] を選択します。**
{% endstep %}
{% step %}
**削除するスケジュールの横にあるチェックボックスをクリックします。**
{% endstep %}
{% step %}
**右上で \[Delete] をクリックします。**
{% endstep %}
{% step %}
**確認のため、もう一度 \[Delete] をクリックします。**
{% endstep %}
{% endstepper %}
***
## アクセススケジュールの例外を作成する
{% hint style="info" %}
例外は1か月の期間に制限されているため、より長い例外が必要な場合は、代わりに別のスケジュールを作成することをお勧めします。
{% endhint %}
{% stepper %}
{% step %}
**Verkada Commandで、\[All Products] > \[Access] に移動します。**
{% endstep %}
{% step %}
**\[All Sites] ドロップダウンからサイトを選択します。**
{% endstep %}
{% step %}
**メニューから \[Schedules] をクリックし、\[Access Exceptions] を選択します。**
{% endstep %}
{% step %}
**右上で \[Add Access Exception] をクリックします。**
{% endstep %}
{% step %}
**必要に応じて、次の設定を構成できます:**
1. 一意の名前を付けます。
2. 開始日と終了日を設定する
3. スケジュールを作成します。
4. アクセスレベルを追加します。
{% endstep %}
{% step %}
**すべての変更が完了したら、\[Save] をクリックします。**
{% endstep %}
{% endstepper %}
***
## アクセススケジュールの例外を変更する
{% stepper %}
{% step %}
**Verkada Commandで、\[All Products] > \[Access] に移動します。**
{% endstep %}
{% step %}
**\[All Sites] ドロップダウンからサイトを選択します。**
{% endstep %}
{% step %}
**メニューから \[Schedules] をクリックし、\[Door Exceptions] を選択します。**
{% endstep %}
{% step %}
**編集する例外を選択します。**
{% endstep %}
{% step %}
**必要に応じて、次の設定を行います:**
1. 例外名を編集します。
2. 各日付の例外スケジュールを編集します。
3. 選択したアクセスレベルを編集します。
{% endstep %}
{% step %}
**すべての変更が完了したら、\[Save] をクリックします。**
{% endstep %}
{% endstepper %}
***
## アクセススケジュールの例外を削除する
{% stepper %}
{% step %}
**Verkada Commandで、\[All Products] > \[Access] に移動します。**
{% endstep %}
{% step %}
**\[All Sites] ドロップダウンからサイトを選択します。**
{% endstep %}
{% step %}
**メニューから \[Schedules] をクリックし、\[Access Exceptions] を選択します。**
{% endstep %}
{% step %}
**削除する例外の横にあるチェックボックスをクリックします。**
{% endstep %}
{% step %}
**右上で \[Delete] をクリックします。**
{% endstep %}
{% step %}
**確認のため、もう一度 \[Delete] をクリックします。**
{% endstep %}
{% endstepper %}
---
# Agent Instructions
This documentation is published with GitBook. GitBook is the documentation platform designed so that both humans and AI agents can read, navigate, and reason over technical content effectively. Learn more at gitbook.com.
## Querying This Documentation
If you need additional information that is not directly available in this page, you can query the documentation by asking a question.
Perform an HTTP GET request on the following URL with the `ask` and `goal` query parameters:
```
GET https://help.verkada.com/access-control/ja/akusesu/add-and-modify-access-levels/access-level-schedules-and-exceptions.md?ask=&goal=
```
`ask` is the immediate question: it should be specific, self-contained, and written in natural language.
`goal` is what the user is ultimately trying to achieve, the reason they need the answer. Sharing it helps GitBook give you a better, more relevant answer. A goal is most helpful when it describes the outcome the user wants rather than restating the question. For example, with `ask=how do I create an API token`, a goal like `automate deployments from our CI pipeline` lets GitBook tailor the answer to that use case.
The response will contain a direct answer to the question and relevant excerpts and sources from the documentation.
Use this mechanism when the answer is not explicitly present in the current page, you need clarification or additional context, or you want to retrieve related documentation sections.